
Buy One Get One Free: A FluentCart Guide for WordPress Store Owners
FluentCart can run a buy one get one free offer using three of its existing tools: Bundles, Order Bump, and Coupons.
Each one builds the offer a different way, baked directly into a product’s price, offered as a checkout upsell, or triggered through a coupon code.
This guide walks through exactly how to set up each method, what each version of the offer actually looks like to a customer, and which one fits your store.
TL;DR
- FluentCart can build a BOGO offer three different ways, Bundles, Order Bump, and Coupons, each creating a different version of the deal.
- Bundles bake the deal into a single product listing. Customers see one price with no extra step.
- Order Bump presents the free item as a checkout offer the customer has to accept, closer to an upsell than an automatic discount.
- Coupons can replicate BOGO using a Fixed Amount discount and a minimum spend threshold, but this only works cleanly on single-price products.
- Which method to use depends on whether you want the offer automatic, presented as a choice, or set up without touching product structure at all.
What Is a Buy One Get One Free Offer
A buy one get one free offer, usually shortened to BOGO, is a promotion where a customer who purchases one unit of a product receives a second unit at no additional cost.
The discount is mathematically identical to 50 percent off two units, though it is marketed differently because “get one free” tends to test better with customers than a percentage figure.
Store owners run BOGO offers to move inventory quickly, clear seasonal stock, or increase average order value by giving customers a reason to buy two instead of one. It differs from a plain percentage-off sale in one important way.
A percentage discount reduces the price of everything in the cart, while BOGO specifically rewards buying a second unit of one particular item.
That distinction is what makes it a quantity-driven promotion rather than a blanket discount.
How FluentCart Actually Builds BOGO
Three separate tools inside FluentCart can each be configured to produce the same customer-facing result: buy one, get a second one free. None of them is labeled “BOGO” specifically, which is why the option does not show up under one dedicated name in the settings.
Which tool fits depends less on which one is correct and more on how you want the offer to behave, baked silently into a product price, offered as a checkout upsell, or triggered through a coupon.
Method 1: Building BOGO with Bundles
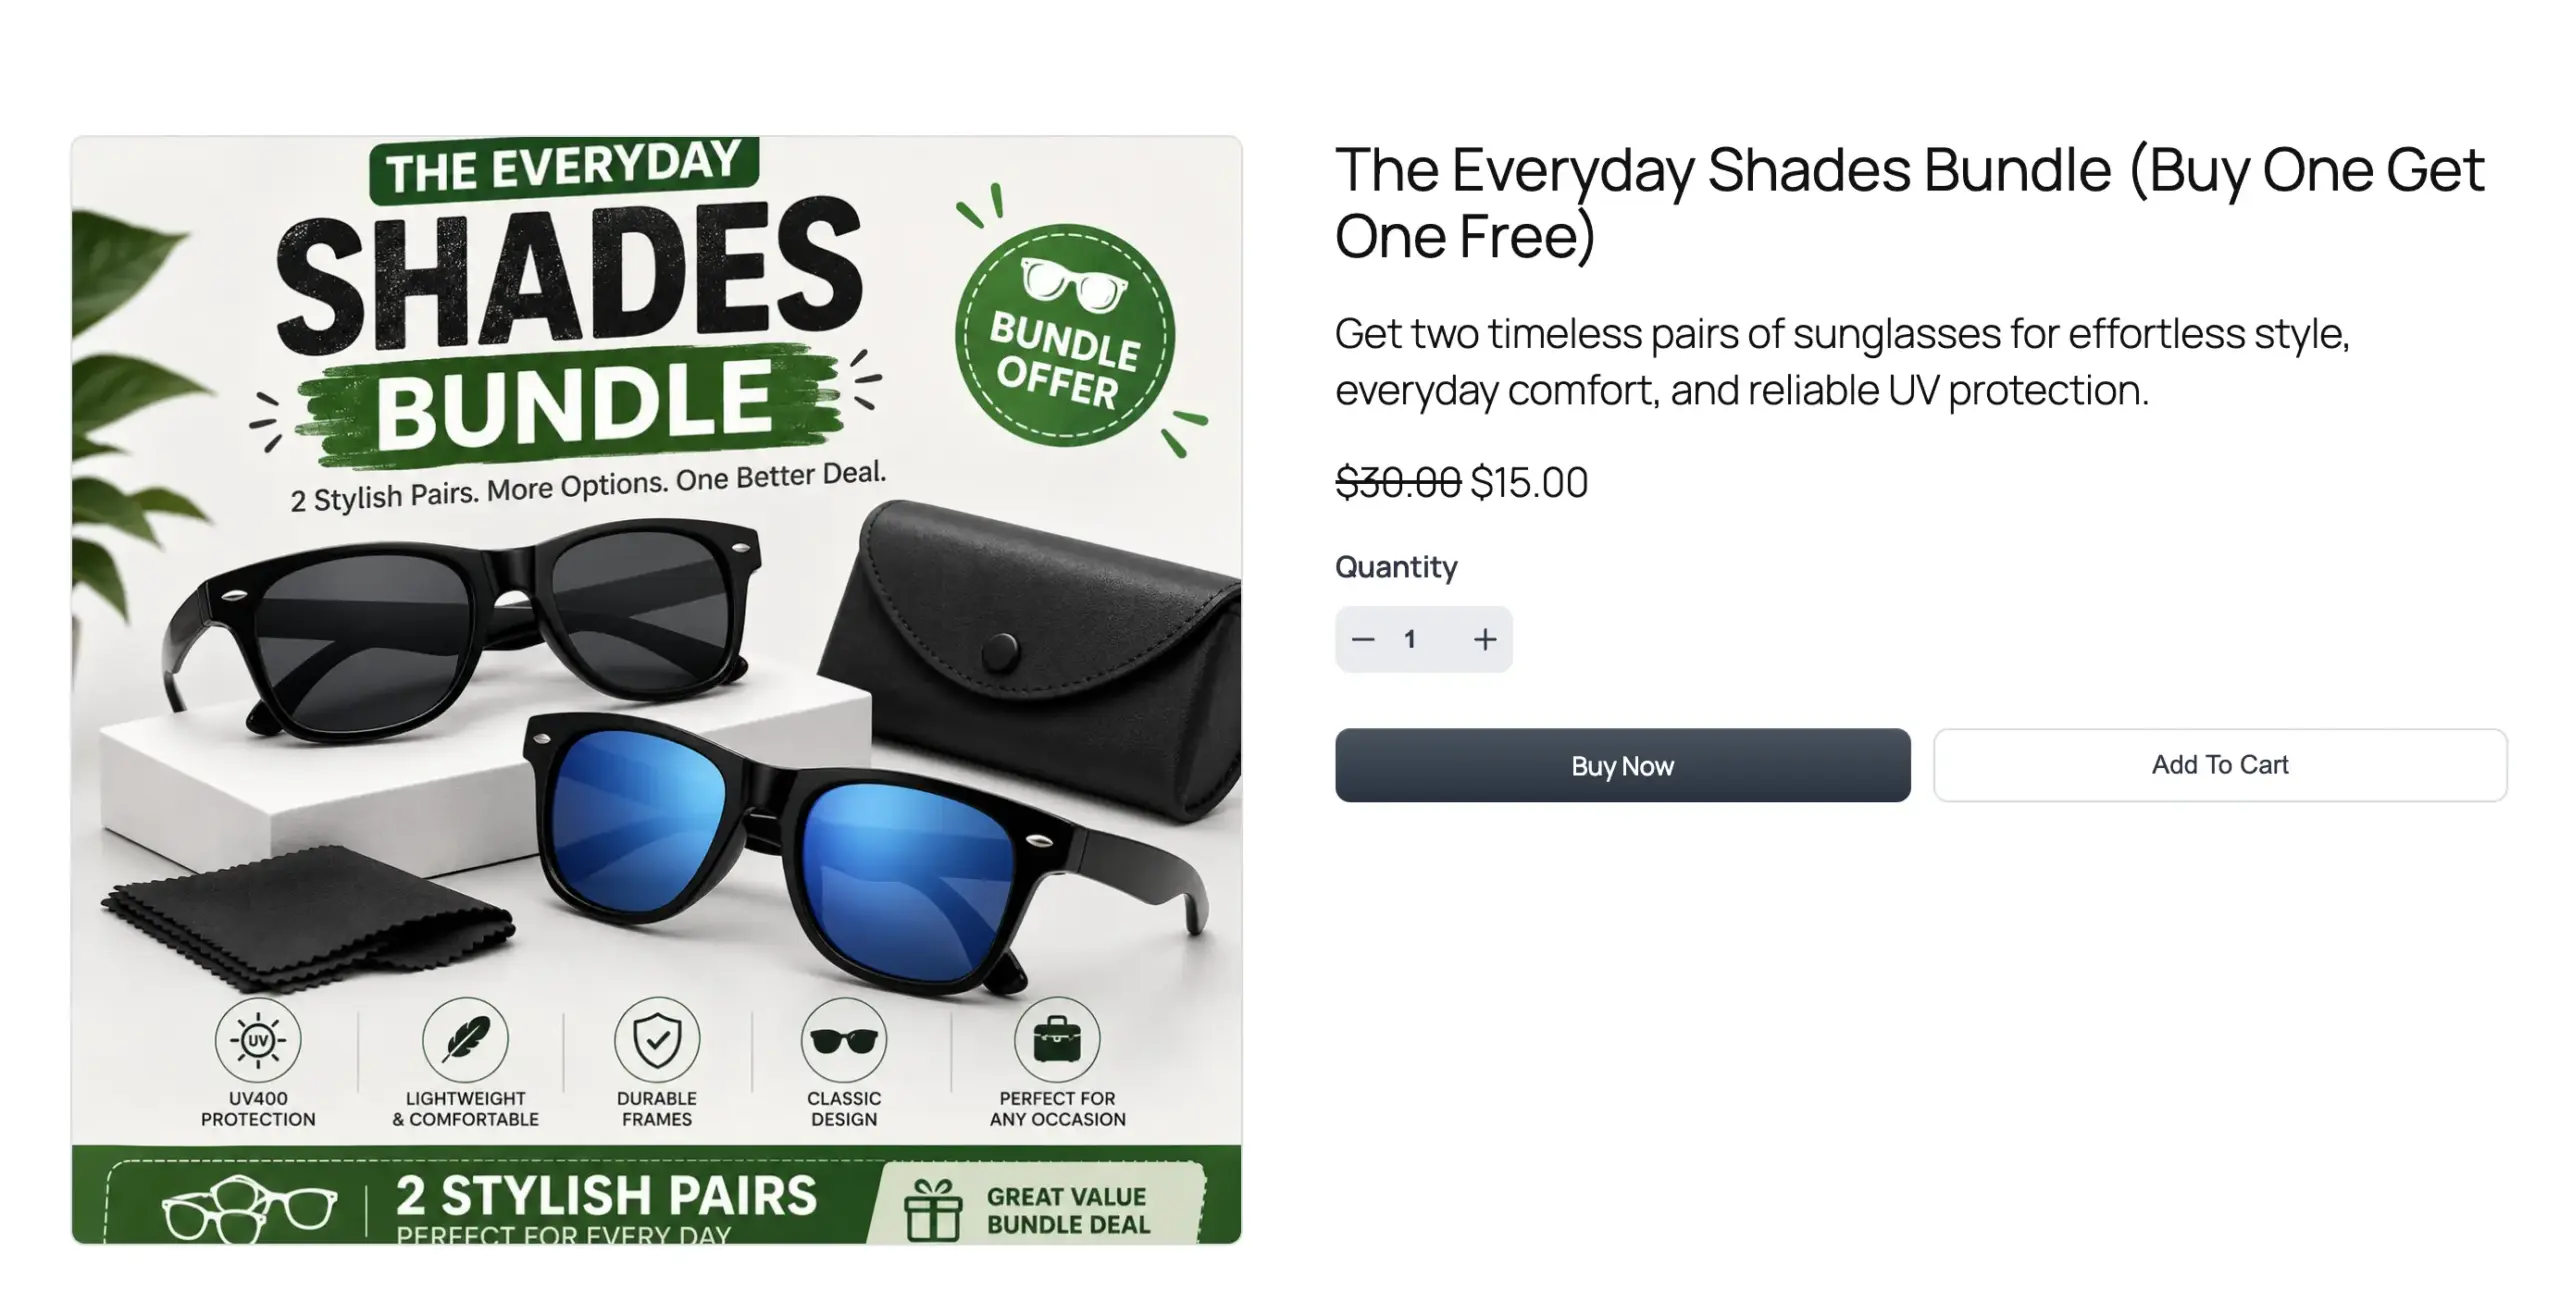
Bundles create a single product listing that already contains two units at one price. The customer never sees a discount being applied. They just see one listing, one price, and a visible comparison showing what they are saving.
Step 1: Create the Bundle Product
In your WordPress dashboard (FluentCart), go to Products and click Add Product.
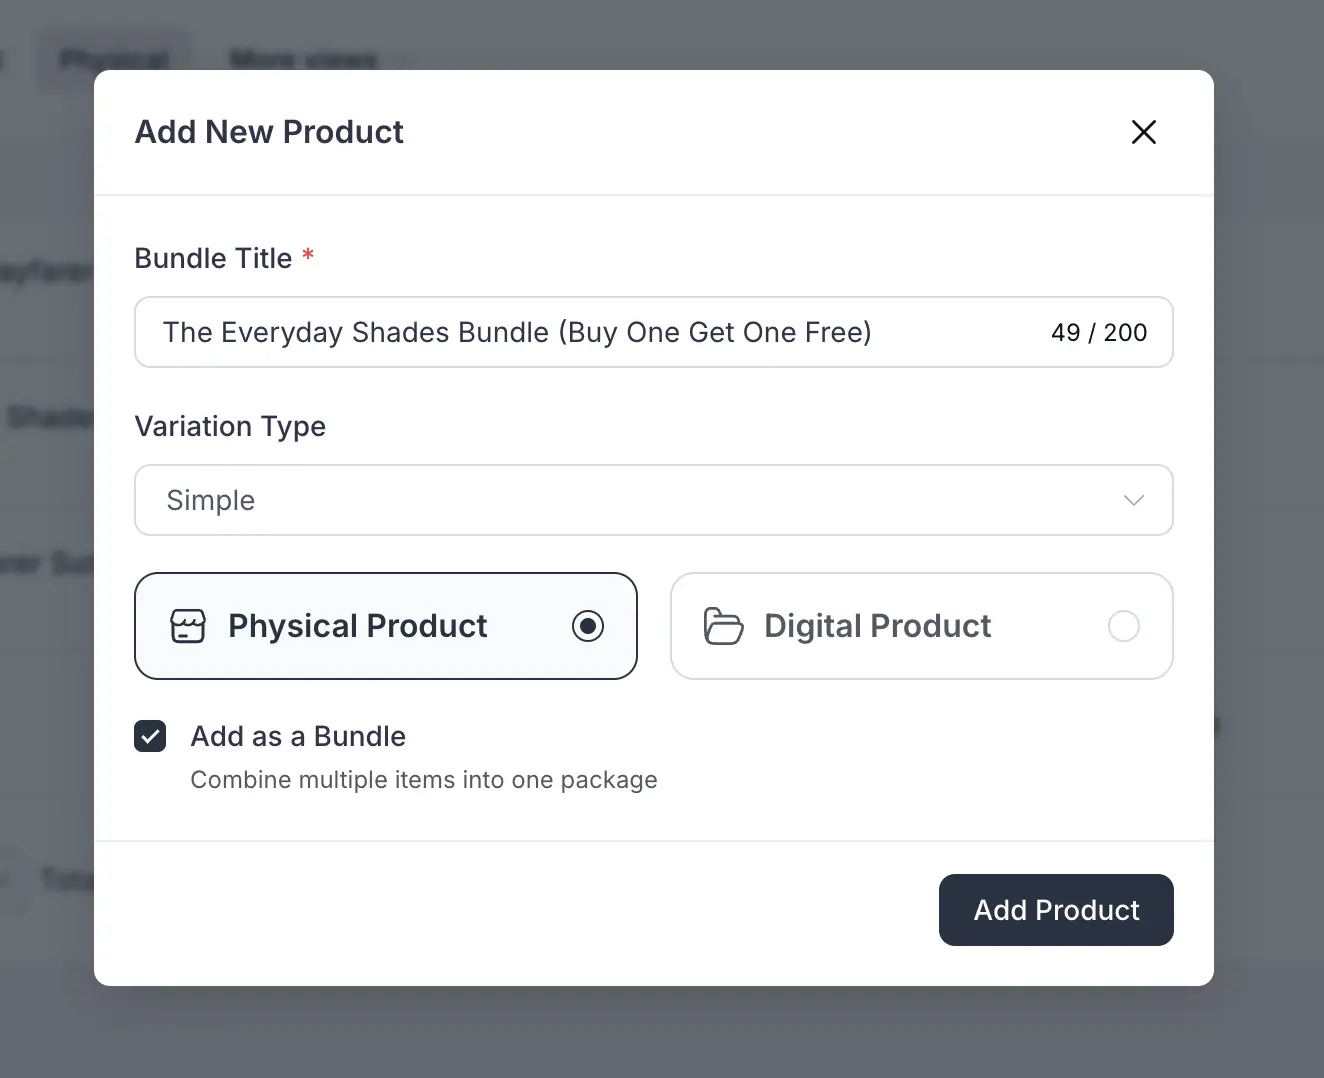
Give the bundle a title, something like “[Product Name] Buy One Get One Free” works well, choose the product type that matches what you are selling, physical or digital, and check the box labeled Add as a Bundle. We are proceeding with Physical product.
Click Add Product to move into the full editor.
Step 2: Map the Bundle Items
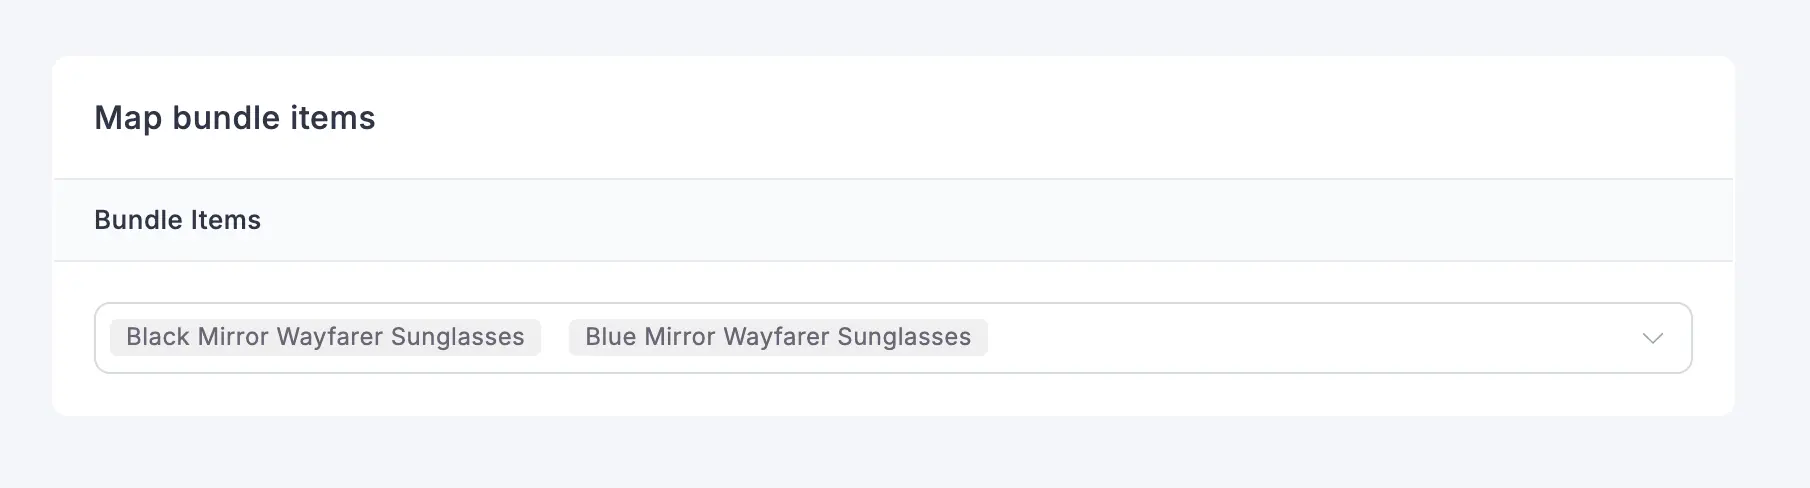
Scroll down to the Map Bundle Items section. Under Bundle Items, use the dropdown to select the existing products you want included in this bundle.
Sunglasses sold in two different shades is a good example of how this works: one pair in the shade a customer is already buying, plus a second pair in a different shade included at no extra cost. A bundle titled something like “[Product Name] (Buy 1 Get 1 Free, second shade included)” communicates the deal clearly from the listing itself.
Pairing two different shades or colors this way also gives customers a reason to want the second item instead of a plain duplicate, and the same approach works for pairing a bestseller with a smaller or slower-moving product to give it some visibility.
Note: Each bundled product keeps its own identity behind the scenes. Reporting, downloads, and license data for every item in the bundle continue to track correctly even after they are grouped together into one listing.
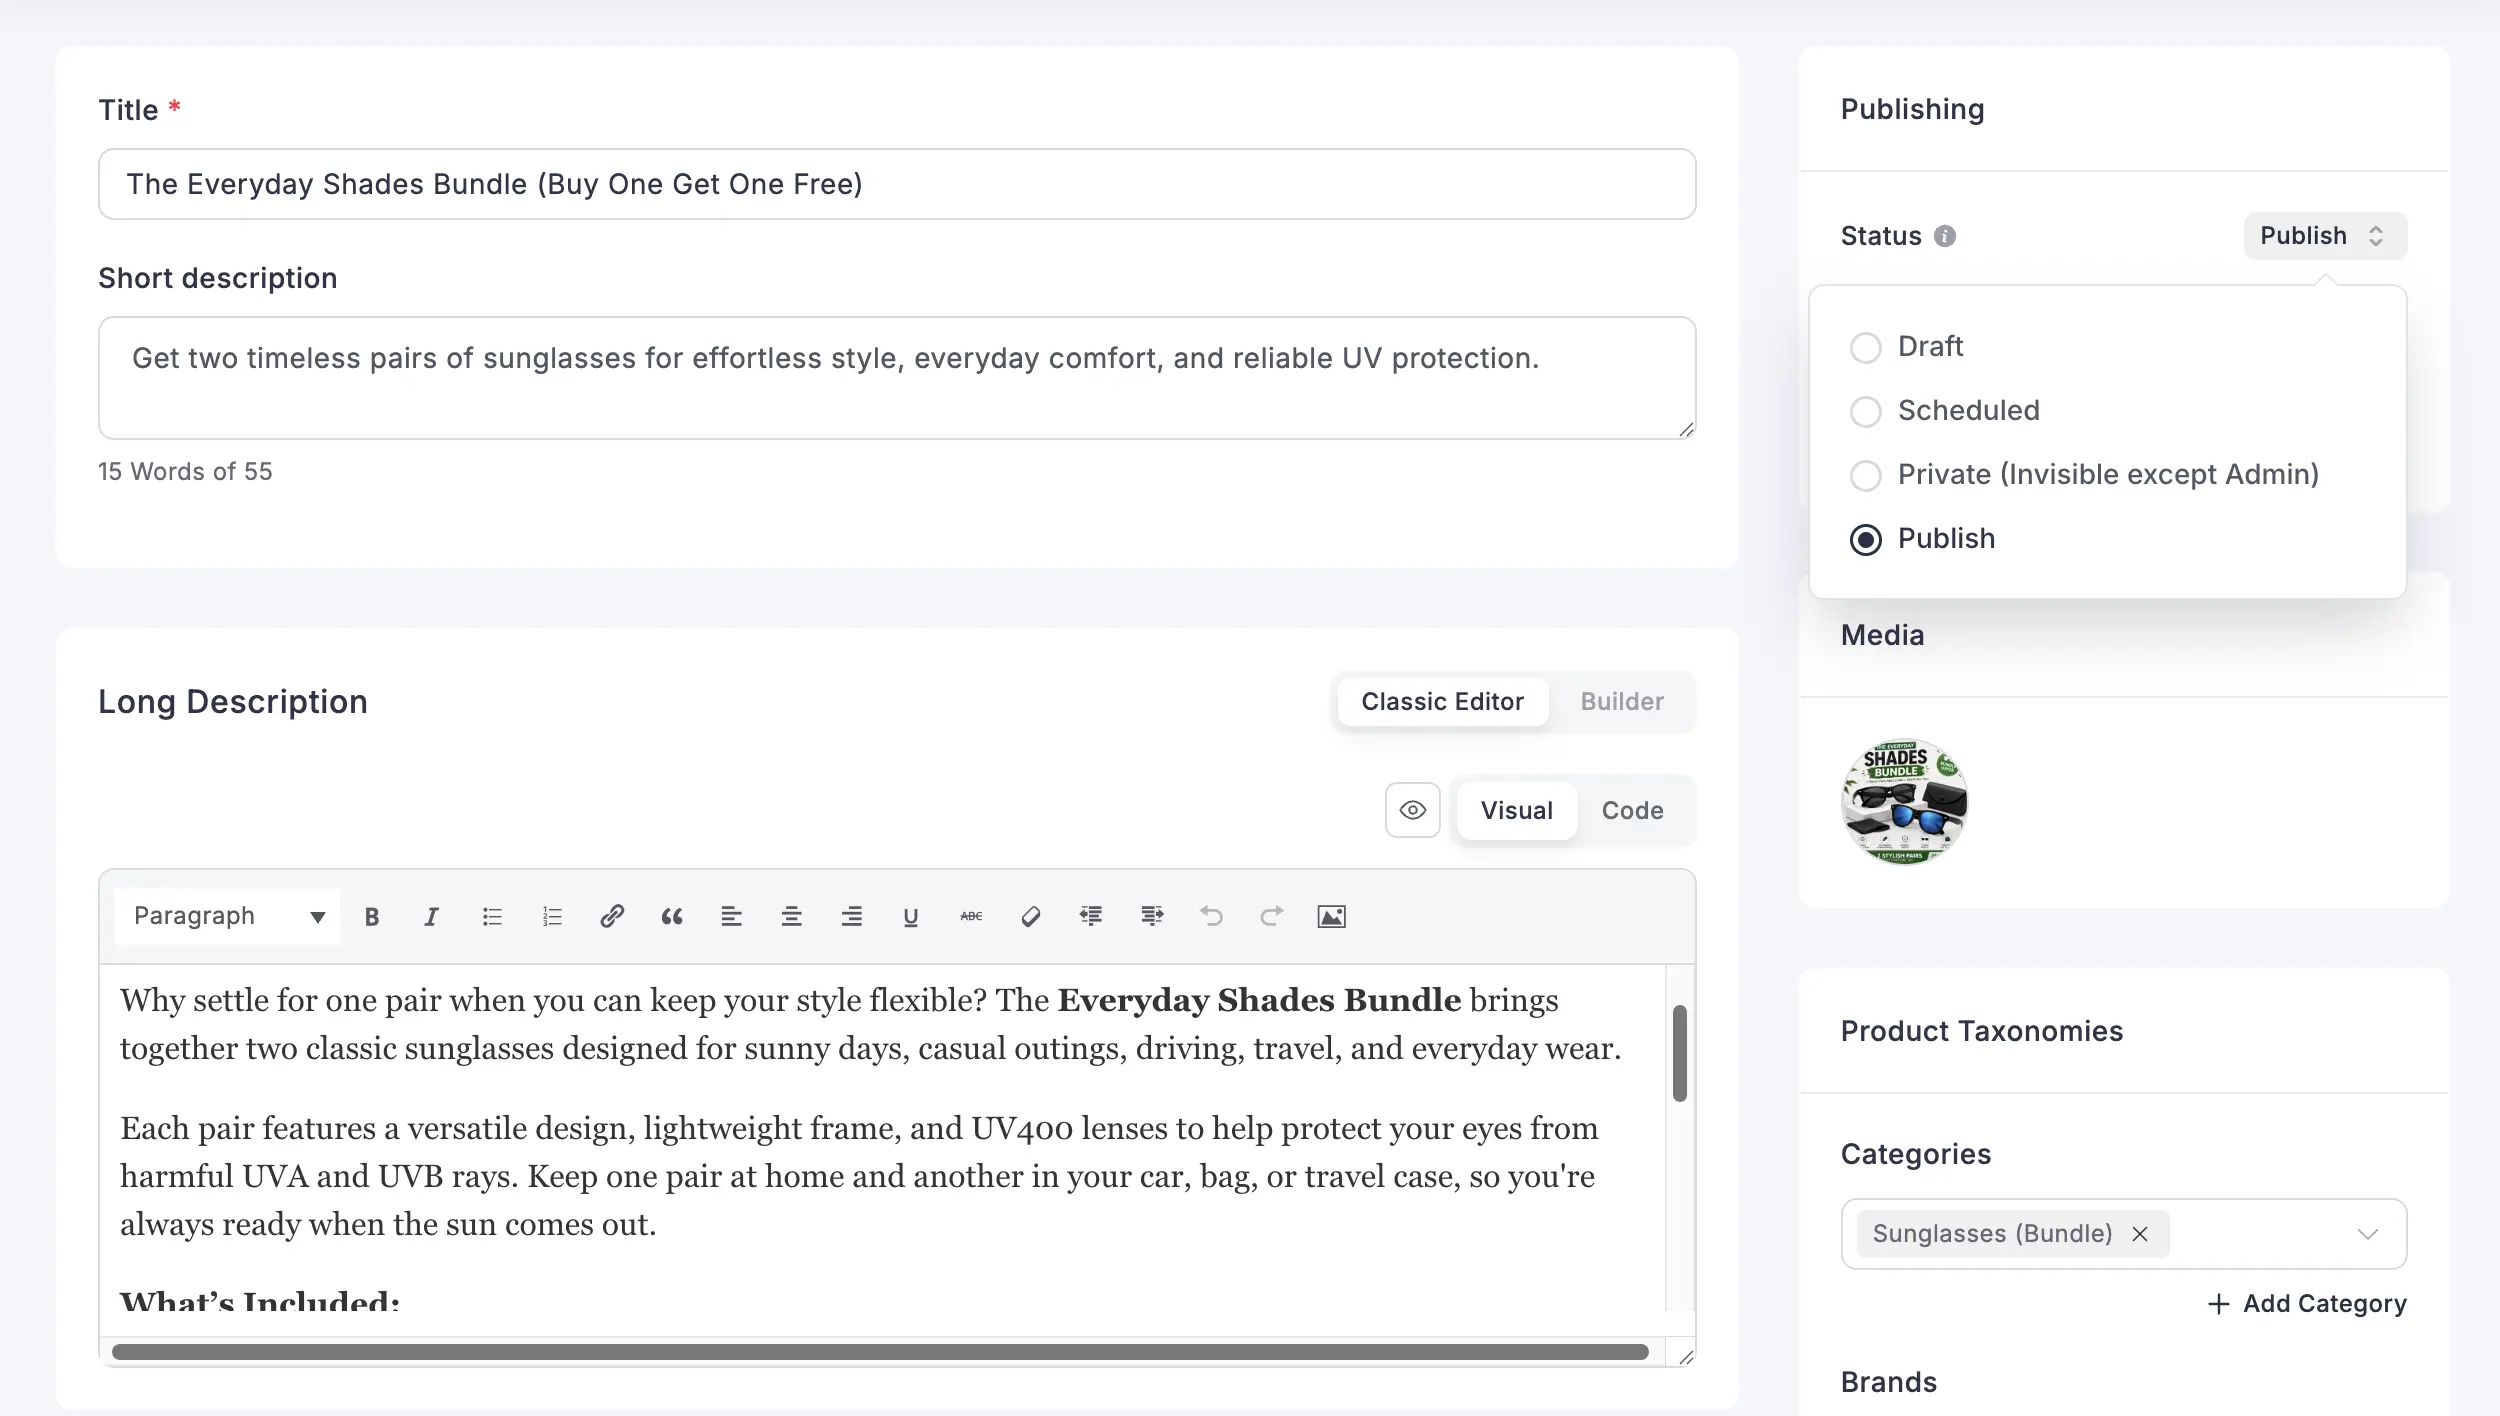
Step 3: Set the Price
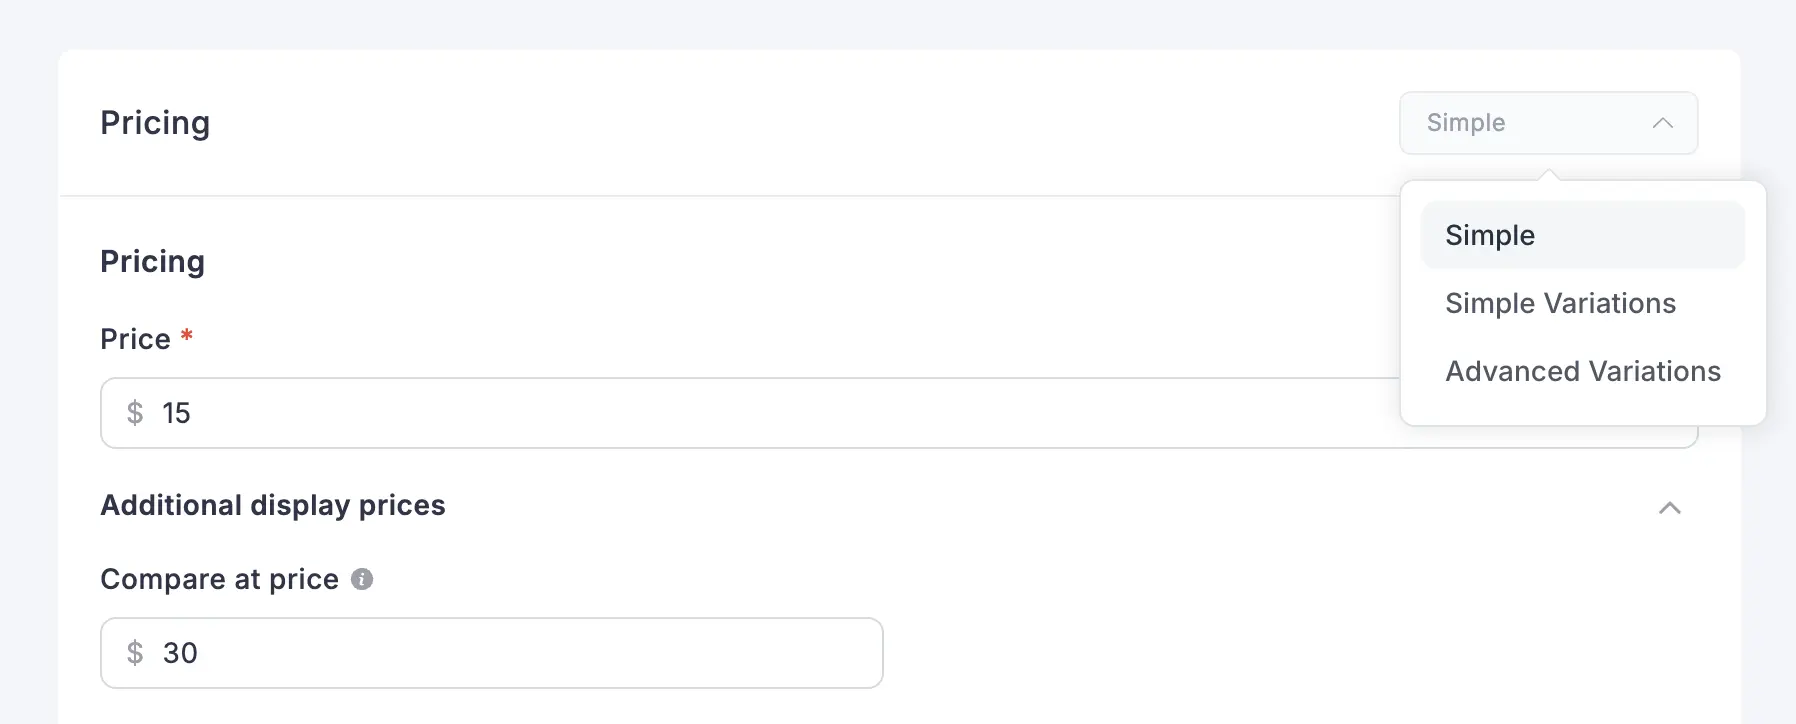
Open the Pricing panel and choose Simple pricing, since a single BOGO bundle is one fixed offer at one price. Set the Price field to the cost of one unit, since that is what the customer will actually pay for both items combined.
Then expand Additional Display Prices and set Compare at Price to the combined cost of two units. FluentCart shows this second number with a strikethrough next to your bundle price, which is what visually communicates the deal without needing extra copy on the page.
Note: If you want multiple BOGO tiers instead, small size versus large size, or single item versus multi-pack, Simple Variations handles all of those from one product instead of requiring a separate bundle listing for each tier. Advanced pricing is also available in the same panel for more complex setups beyond that.
Step 4: Publish
Fill in the remaining product details, images, category, description, the same as any other product, and set Status to Publish. The bundle now behaves like a normal listing.
Customers see one product, one price, and the strikethrough showing what they are saving.
Method 2: Building BOGO with Order Bump
Order Bump works differently from Bundles. Instead of creating a new product, it adds a checkout offer on top of an existing one. The customer has to actively accept the offer, so this version of BOGO behaves more like an upsell than a silent discount.
Step 1: Turn On Order Bump
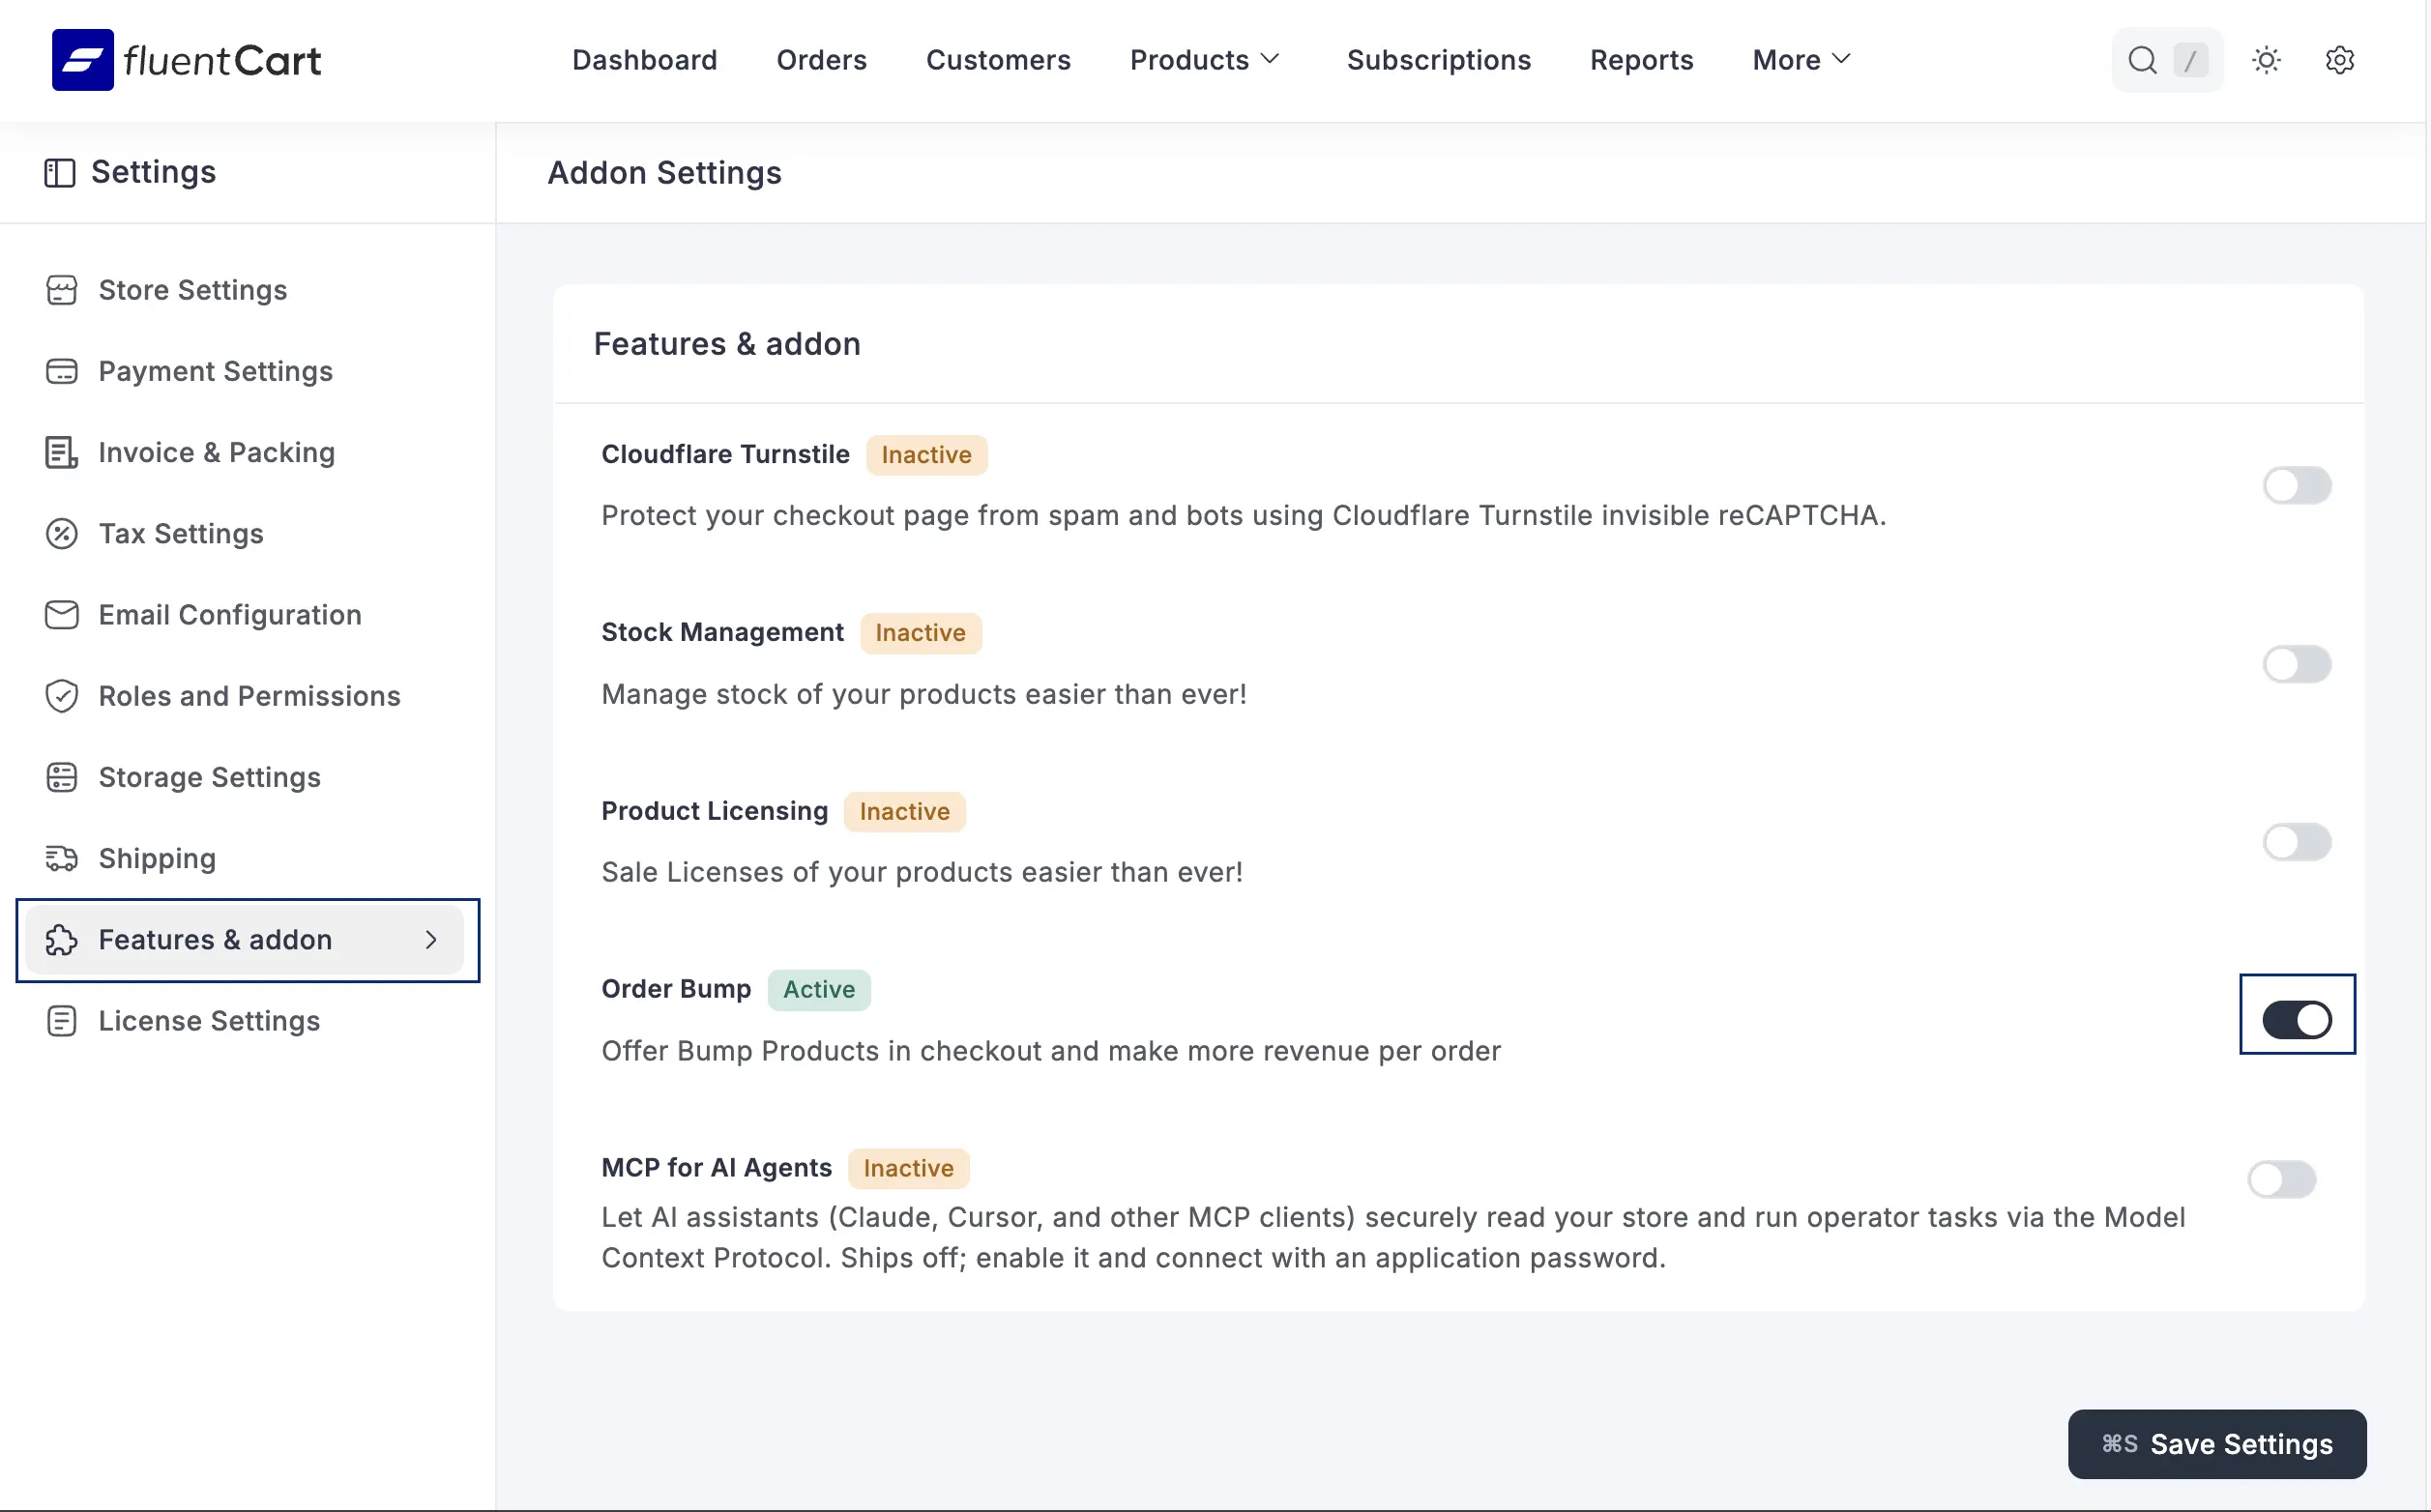
Go to Settings, then Features & Addon, and switch the Order Bump toggle to Active. Click Save Settings. This only needs to be done once, not per offer.
Step 2: Create the Offer
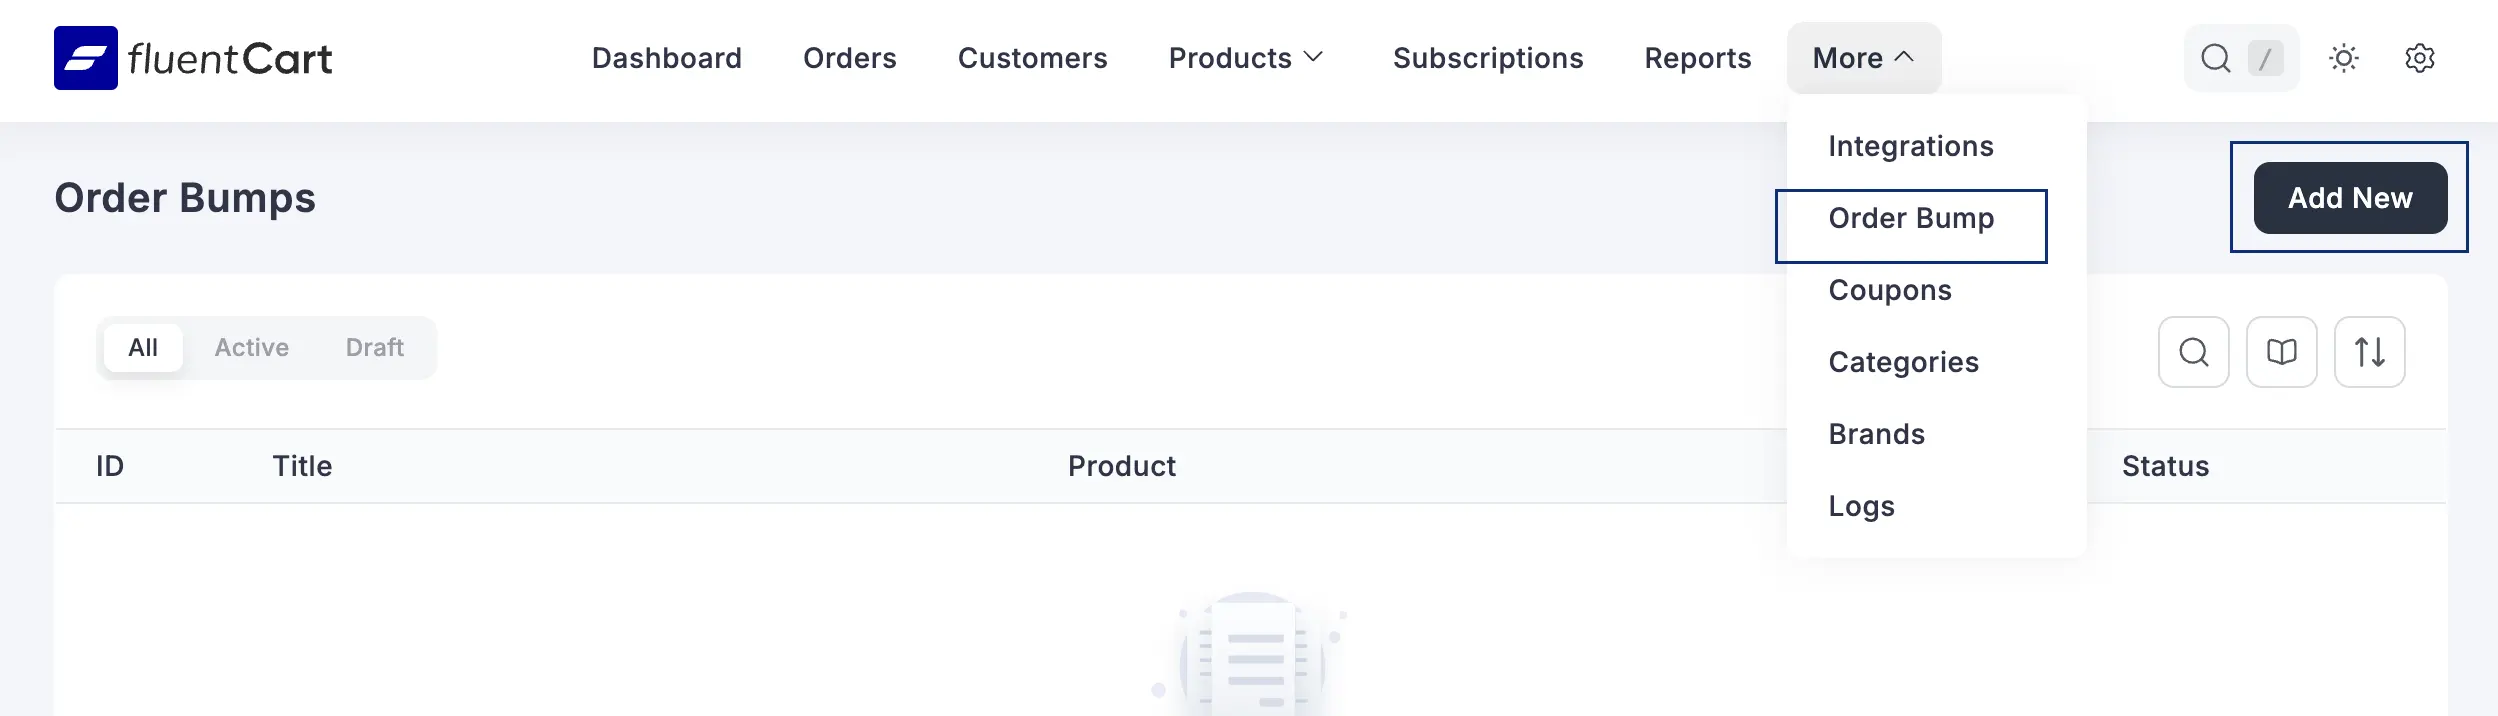
From the main menu, hover over More and click Order Bump. Click Add New.
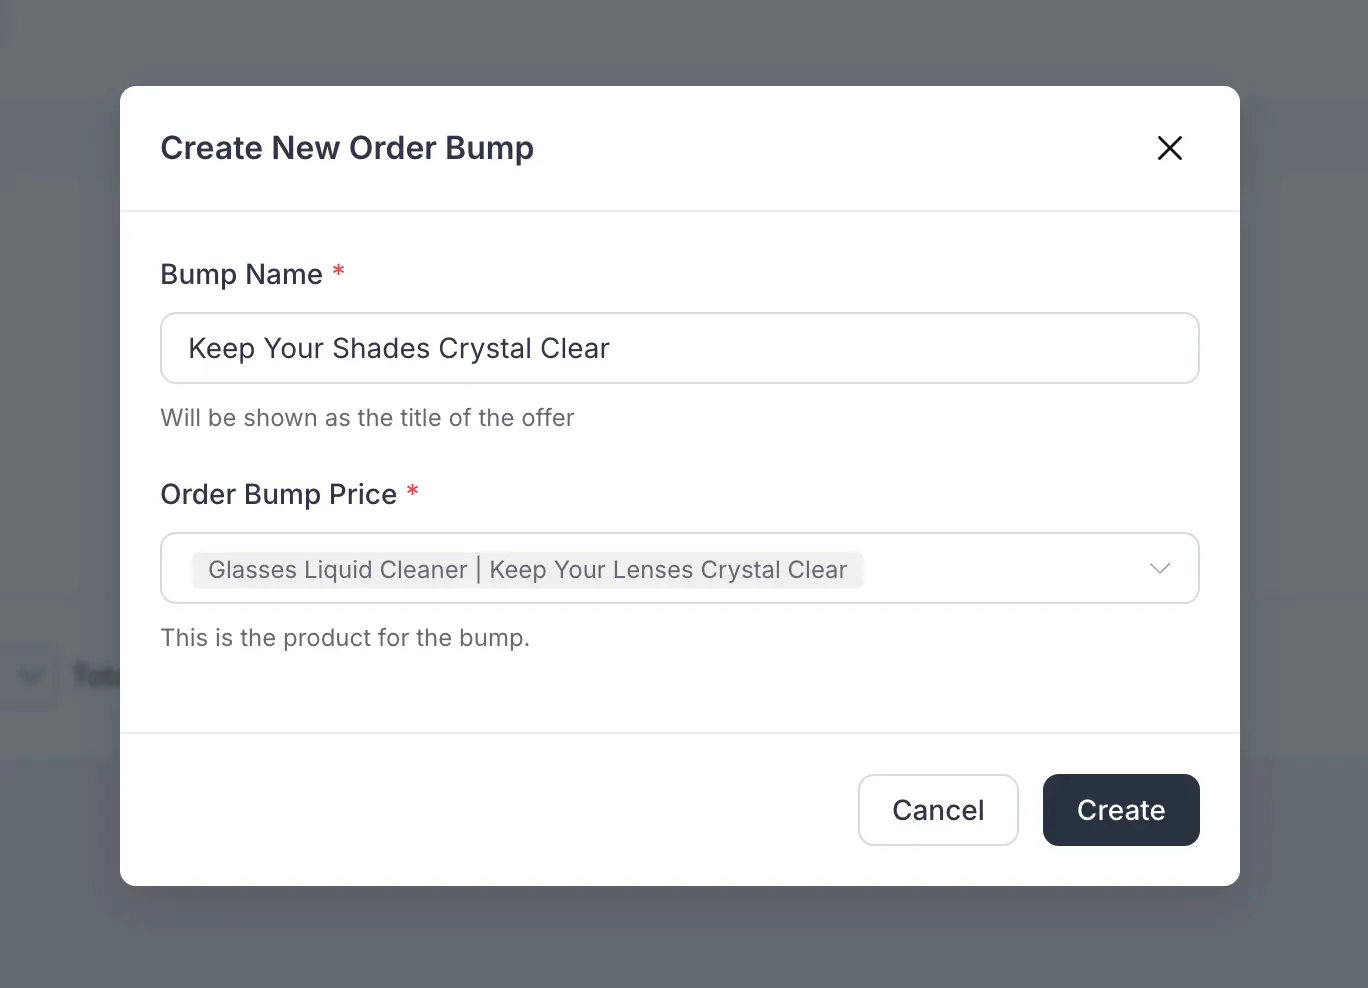
In the popup, give the offer a name and select the same product you want to give away as the Order Bump Product. Click Create.
Step 3: Write the Offer Copy
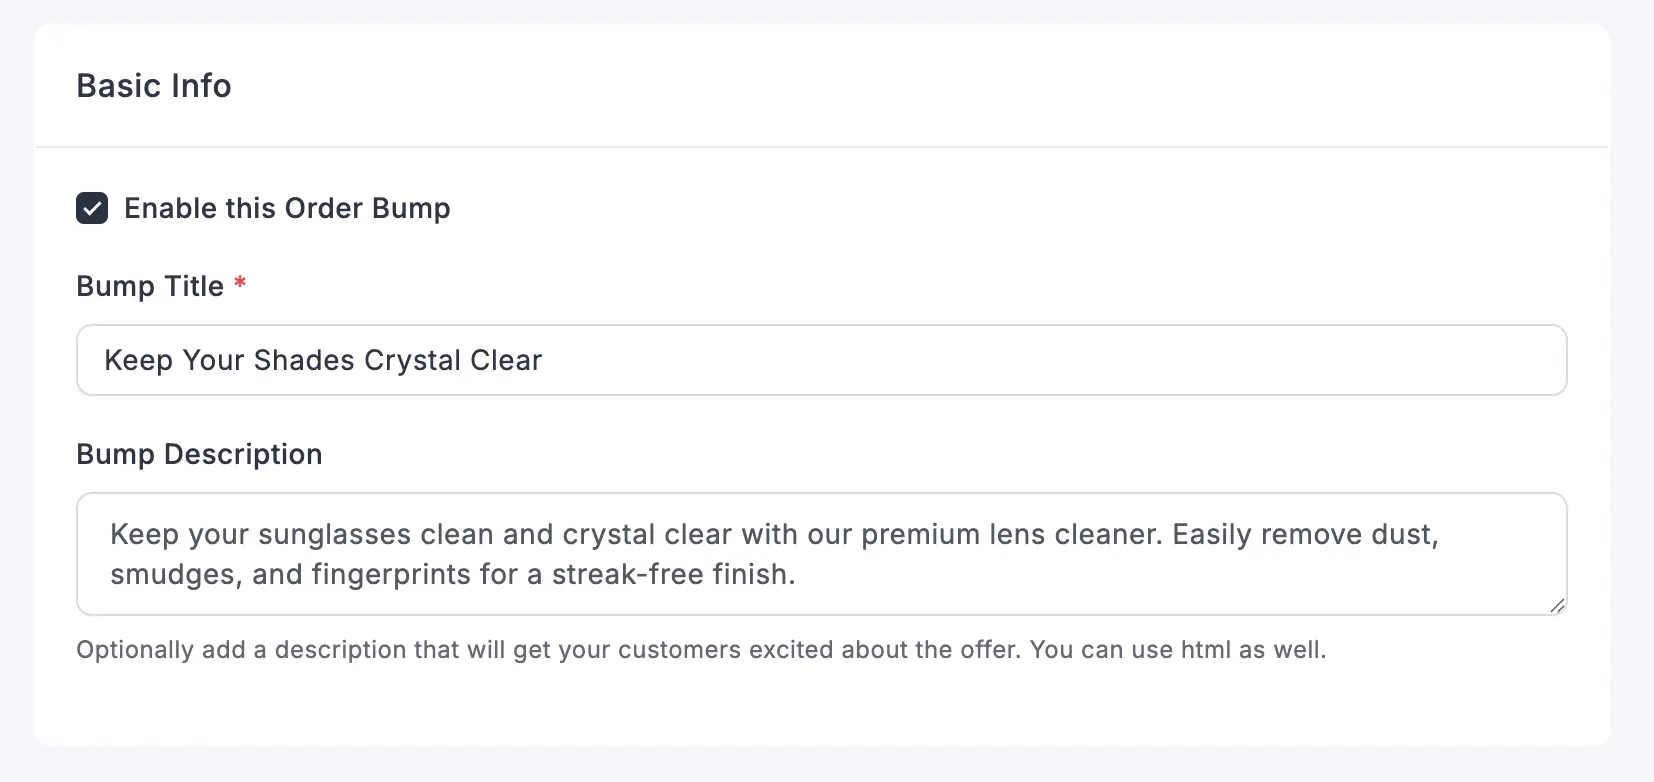
On the configuration screen, fill in the Bump Title, this is the headline customers see at checkout, and a short Bump Description explaining the offer. Something direct works better here than something clever. Customers are scanning checkout quickly.
Make sure that the “Enable this order Bump” is ticked.
Step 4: Set the Discount to Free
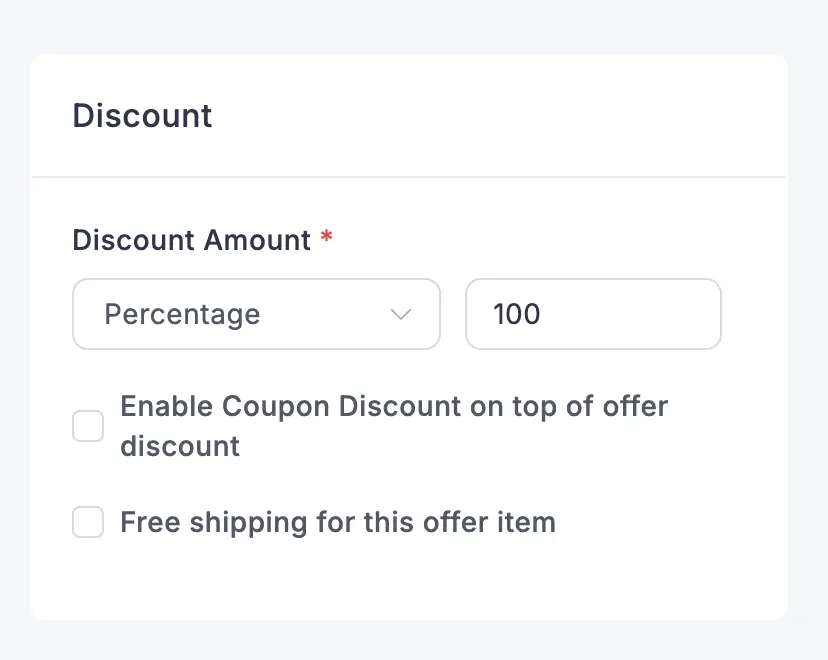
In the Discount section, set the discount type to Percentage and the amount to 100. This makes the bump product completely free when a customer accepts it.
Step 5: Set the Trigger Condition
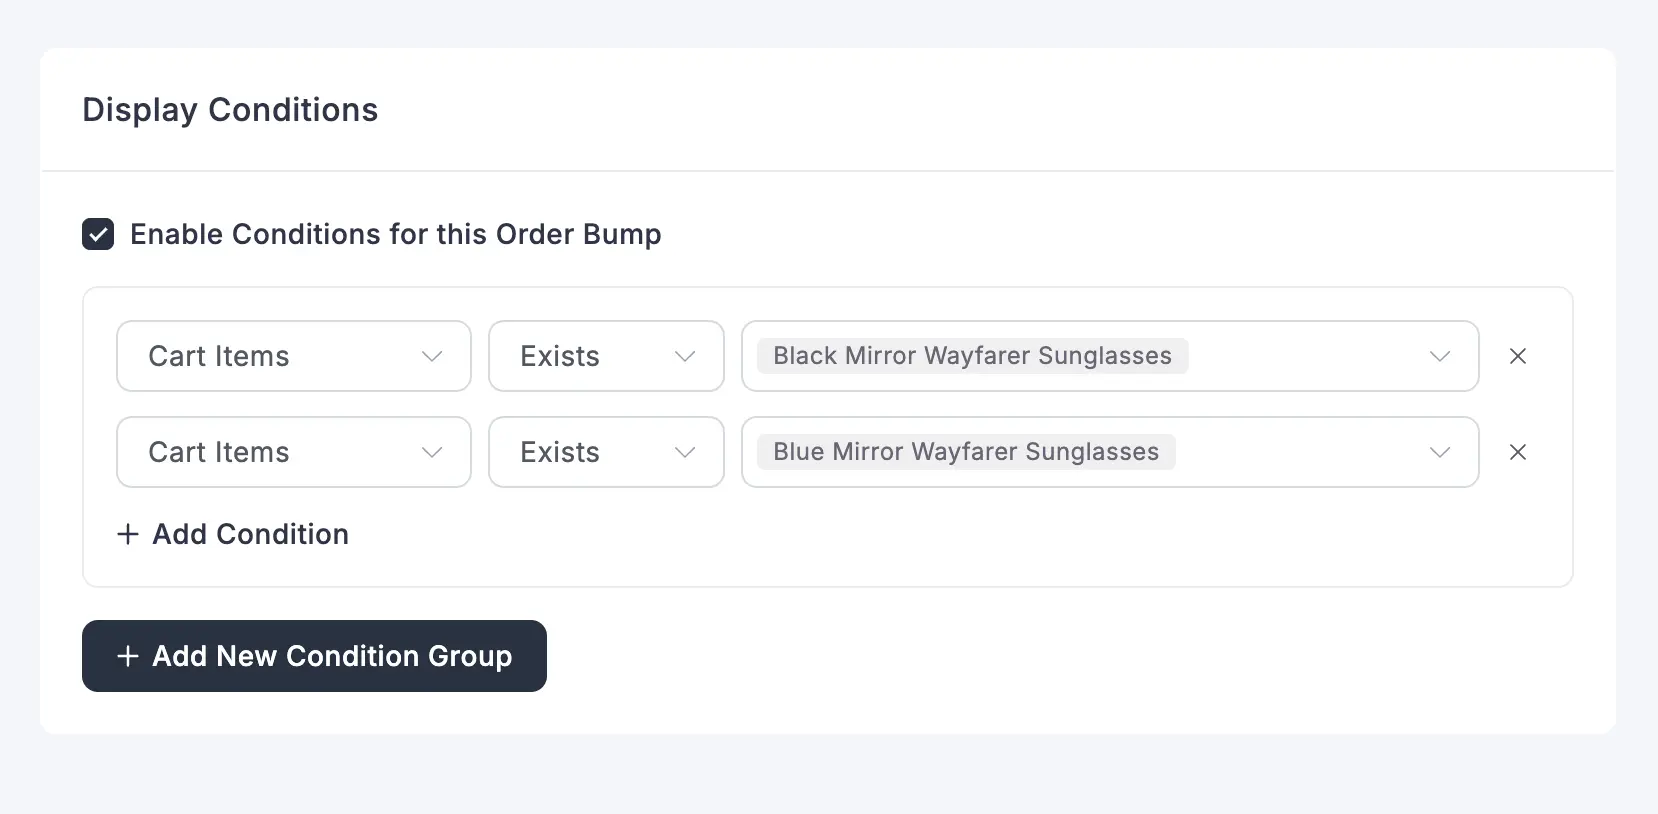
Under Display Conditions, check Enable Conditions, then add a condition for Cart Items where the same product Exists in the customer’s cart. This makes sure the offer only appears to customers who already have the qualifying product in their cart, not to everyone at checkout.
Step 6: Save and Test
Save the offer, then go through your own checkout as a test customer with the product in your cart. Confirm the bump appears, the discount actually brings the price to zero, and the copy reads the way you intended.
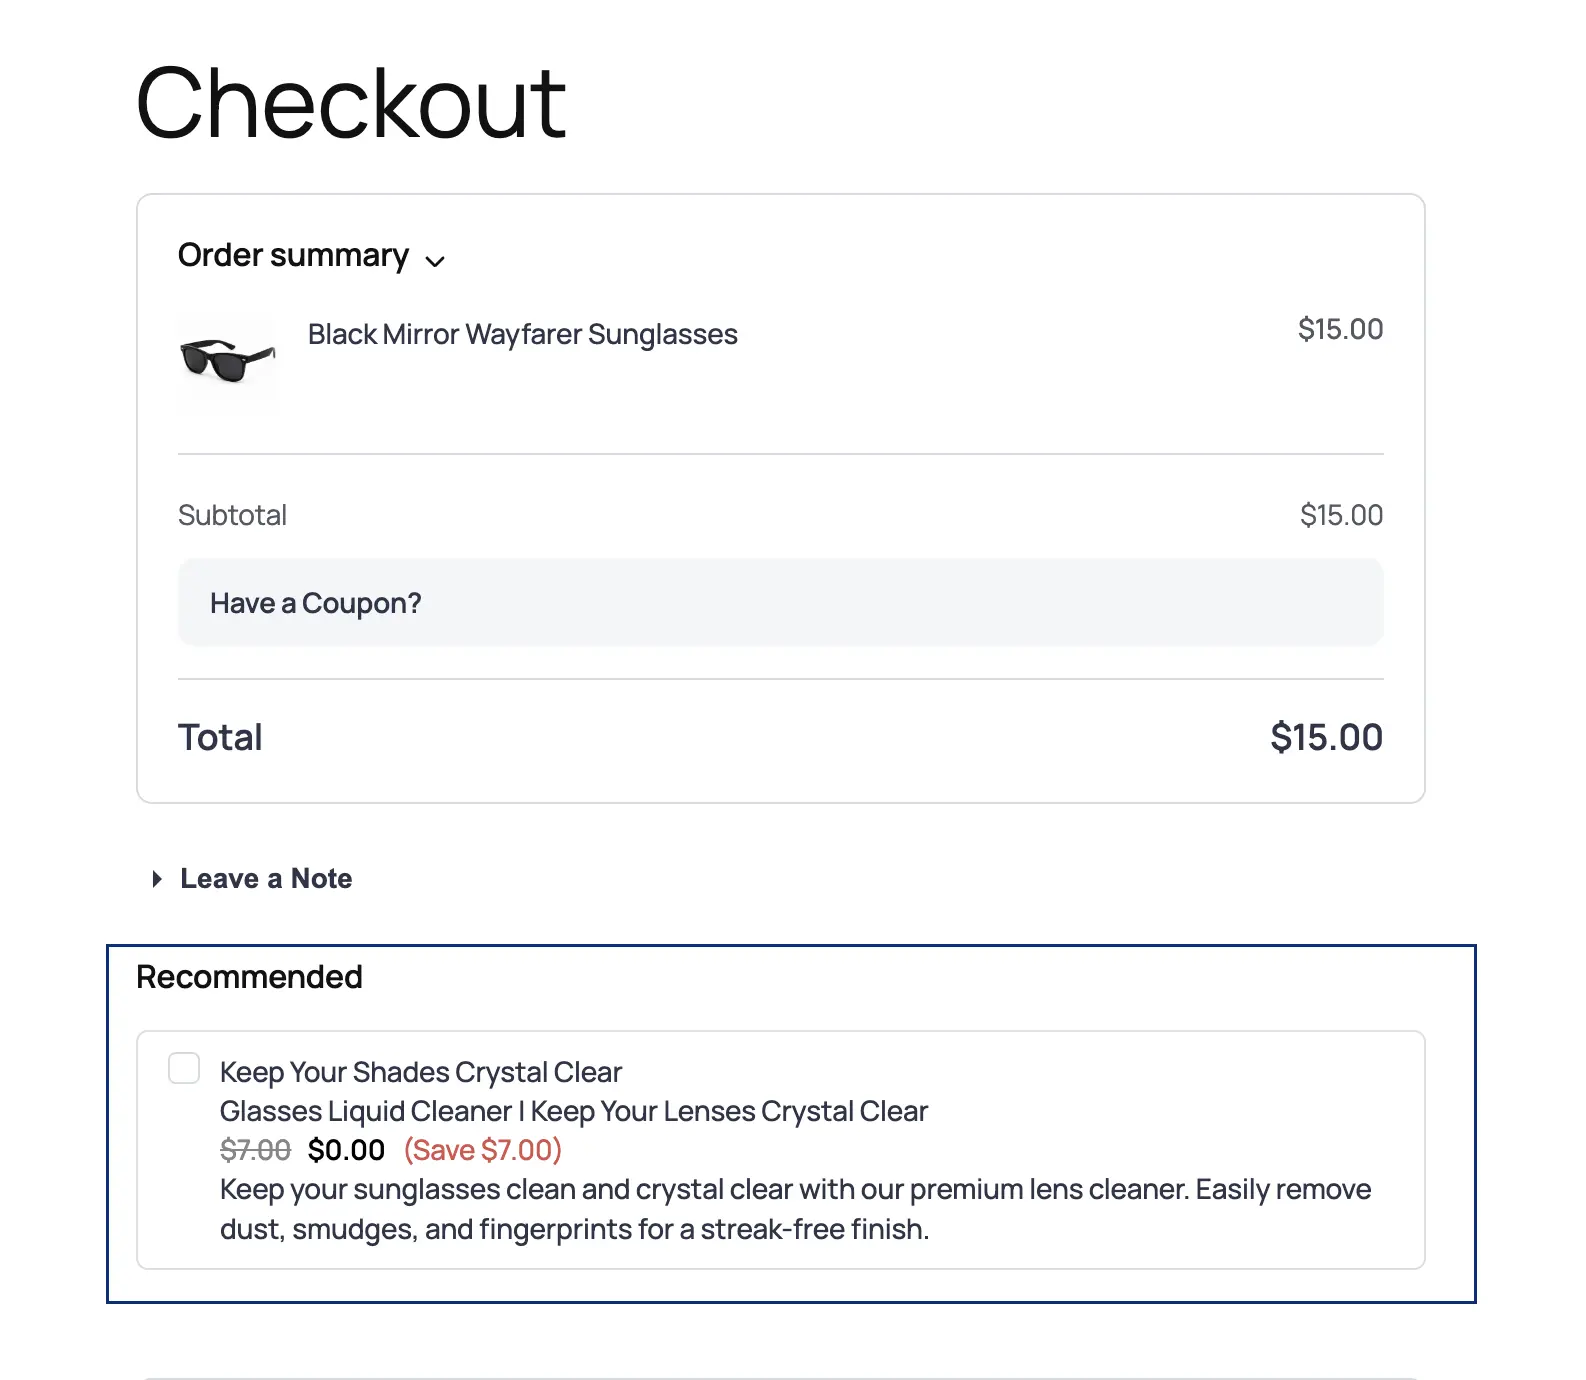
At checkout, customers see the offer and just need to tick a box to add it. That small extra step works in your favor: presenting the free item as an active choice right when someone is deciding whether to complete their order gives them one more reason to stay instead of abandoning the cart.
Method 3: Building BOGO with Coupons
The third method does not touch products or checkout logic at all. It uses FluentCart’s existing coupon system, configured in a specific way that keeps the discount from over-applying at higher quantities.
Step 1: Create a Fixed Amount Coupon
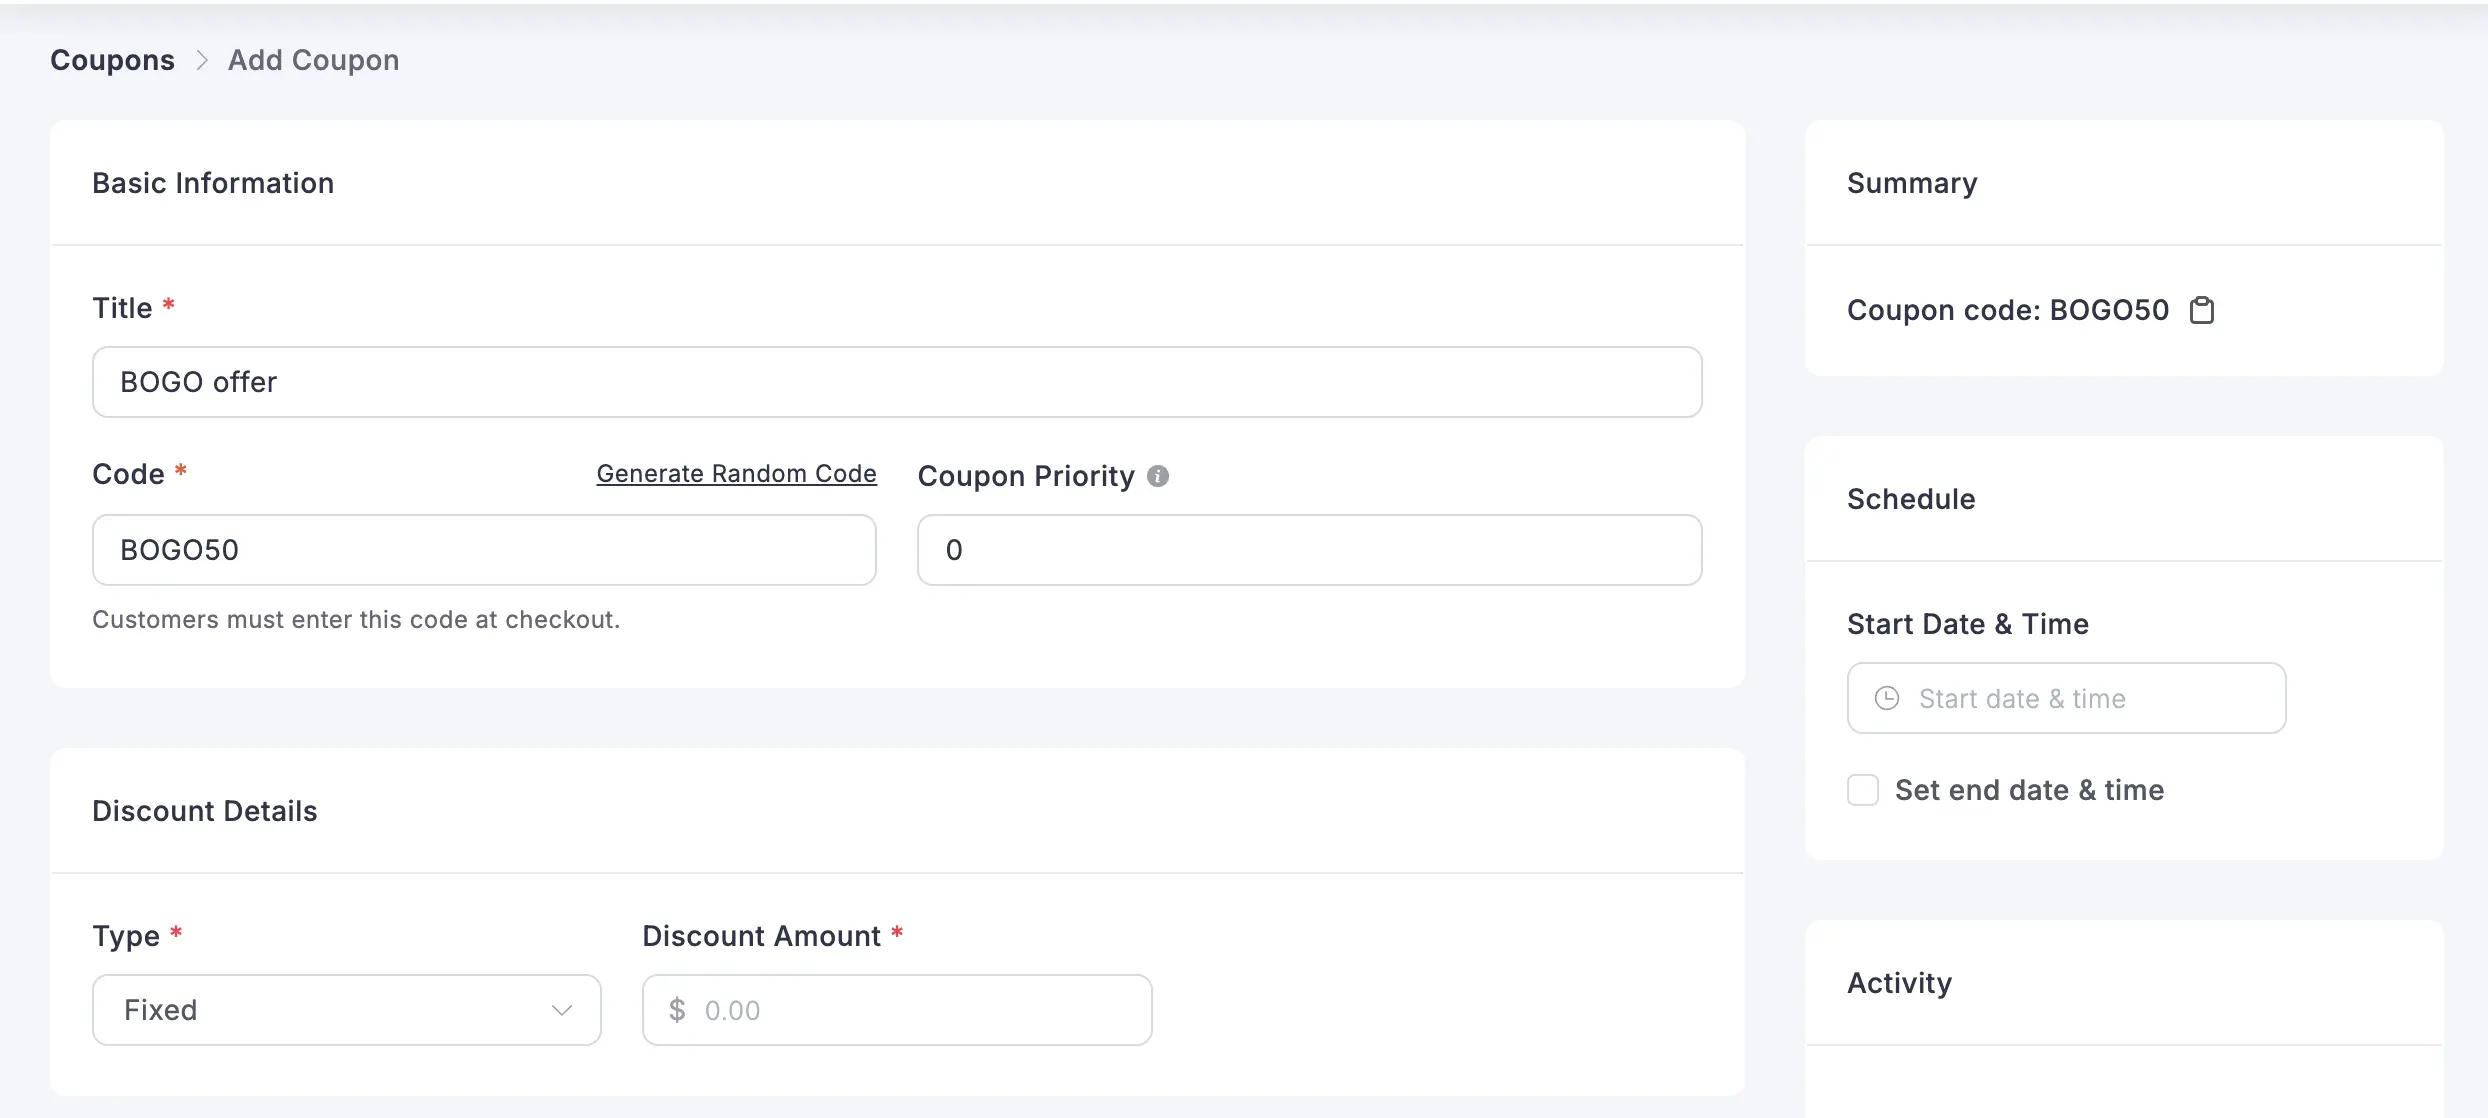
Go to Coupons and click Add Coupon. Give it an internal title and a code customers will enter, or generate one automatically.
Under Discount Value, set Type to Fixed, not Percentage.
This matters: a fixed dollar amount off cannot scale past the value you set, which is what keeps the discount from over-crediting a customer who buys three or four instead of two.
Step 2: Set the Discount Amount
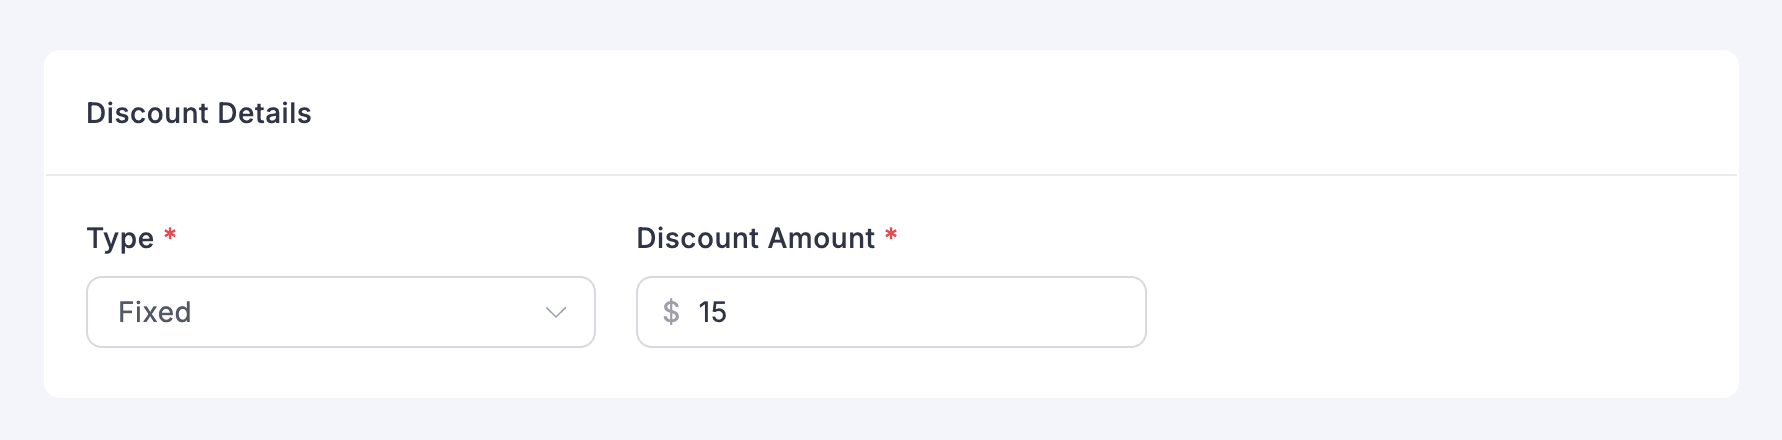
Set Discount Amount to the exact price of the product. If the product sells for $15, enter 15. This is the dollar value removed from the order when the coupon applies.
Step 3: Set the Minimum Spend
Under Usage Restrictions, set Min Spend Amount to double the product’s price, $30 in this example. This forces the customer to have two units in their cart before the coupon does anything.

Step 4: Restrict It to the Right Product
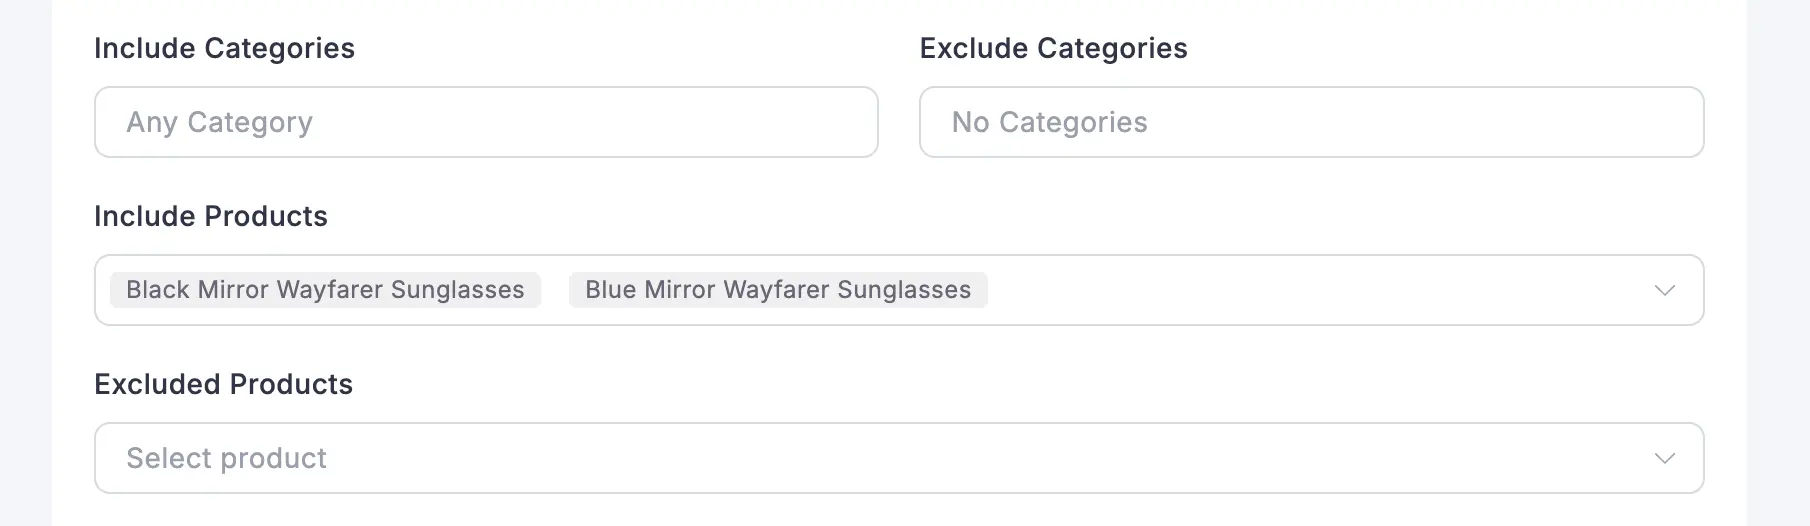
Still under Usage Restrictions, use Include Products to limit the coupon to only the product you are running the offer on. Without this, the coupon would trigger off any $30 cart, not specifically two units of the item you intend.
Note: You can also set it by Excluded product/Include Categories/Exclude Categories
Step 5: Set the Remaining Restrictions
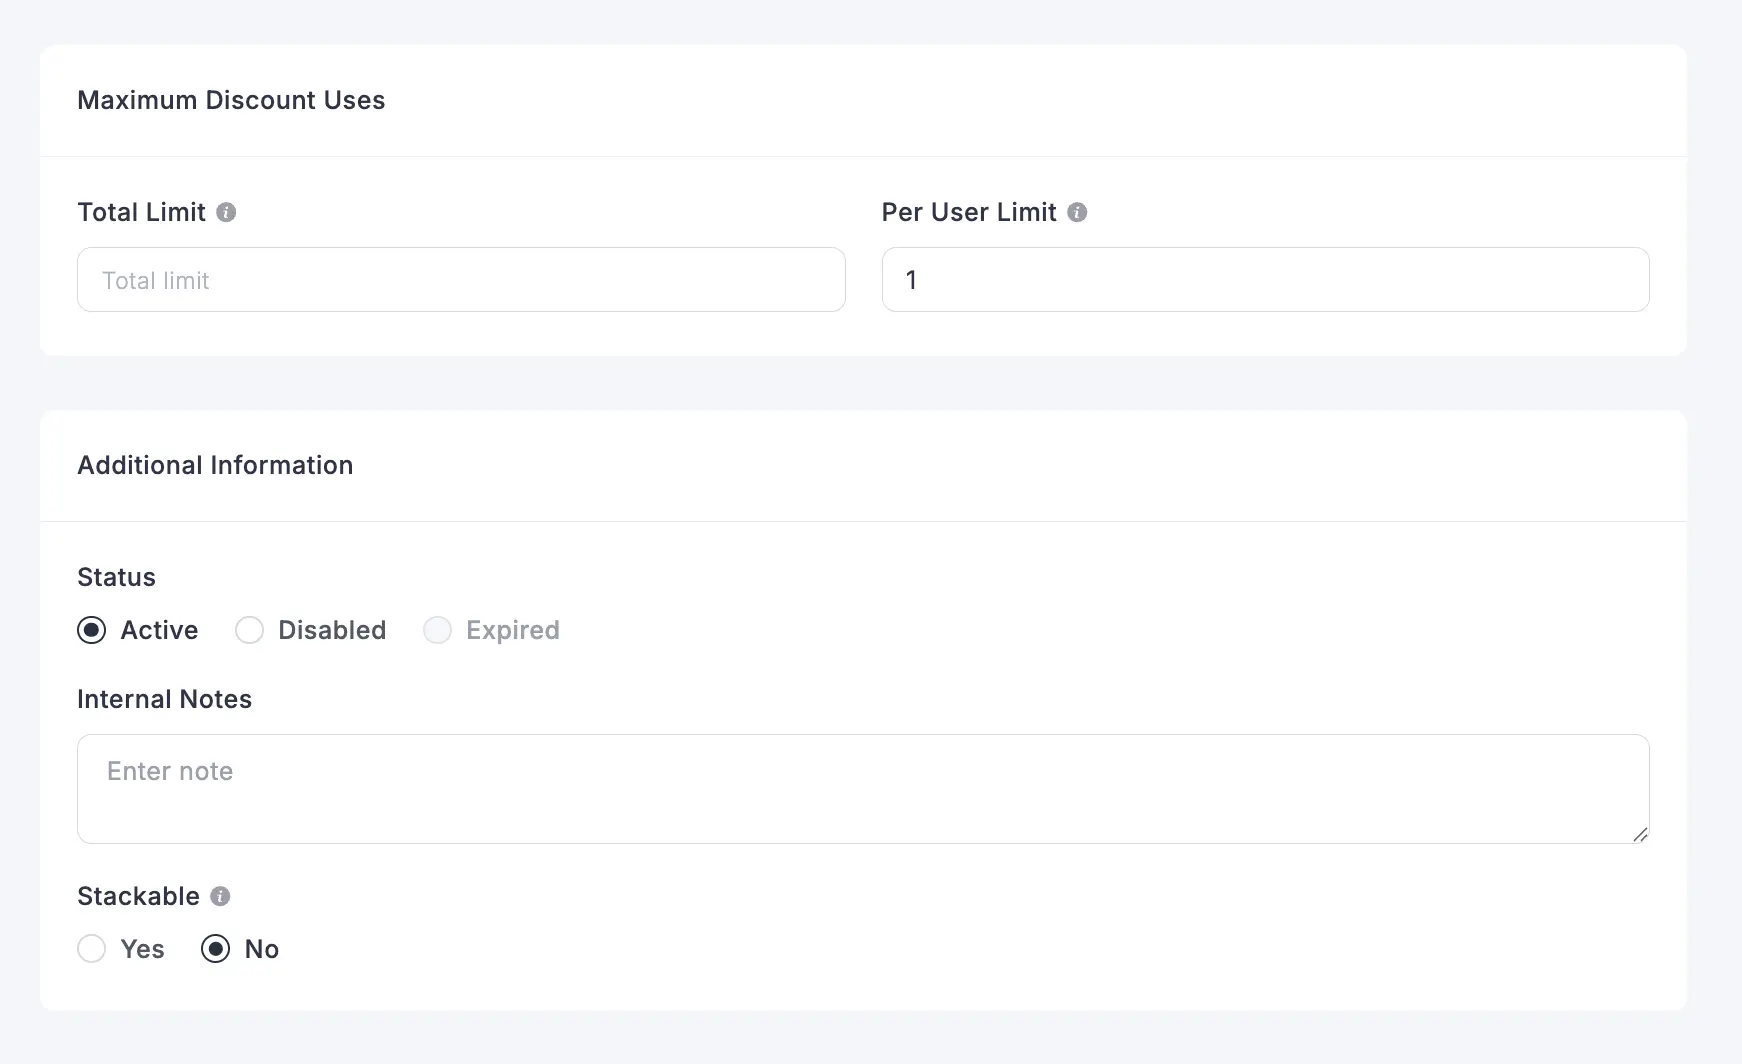
A couple of settings are worth setting deliberately here too. Under Maximum Discount Uses, set Per User Limit to 1, so the same customer cannot reuse the BOGO code on every order. Under Additional Information, set Stackable to No, so customers cannot combine the BOGO code with another active promotion and end up with a bigger discount than intended.
Also make sure the Status is “Active”
Step 6: See It From the Customer’s Side
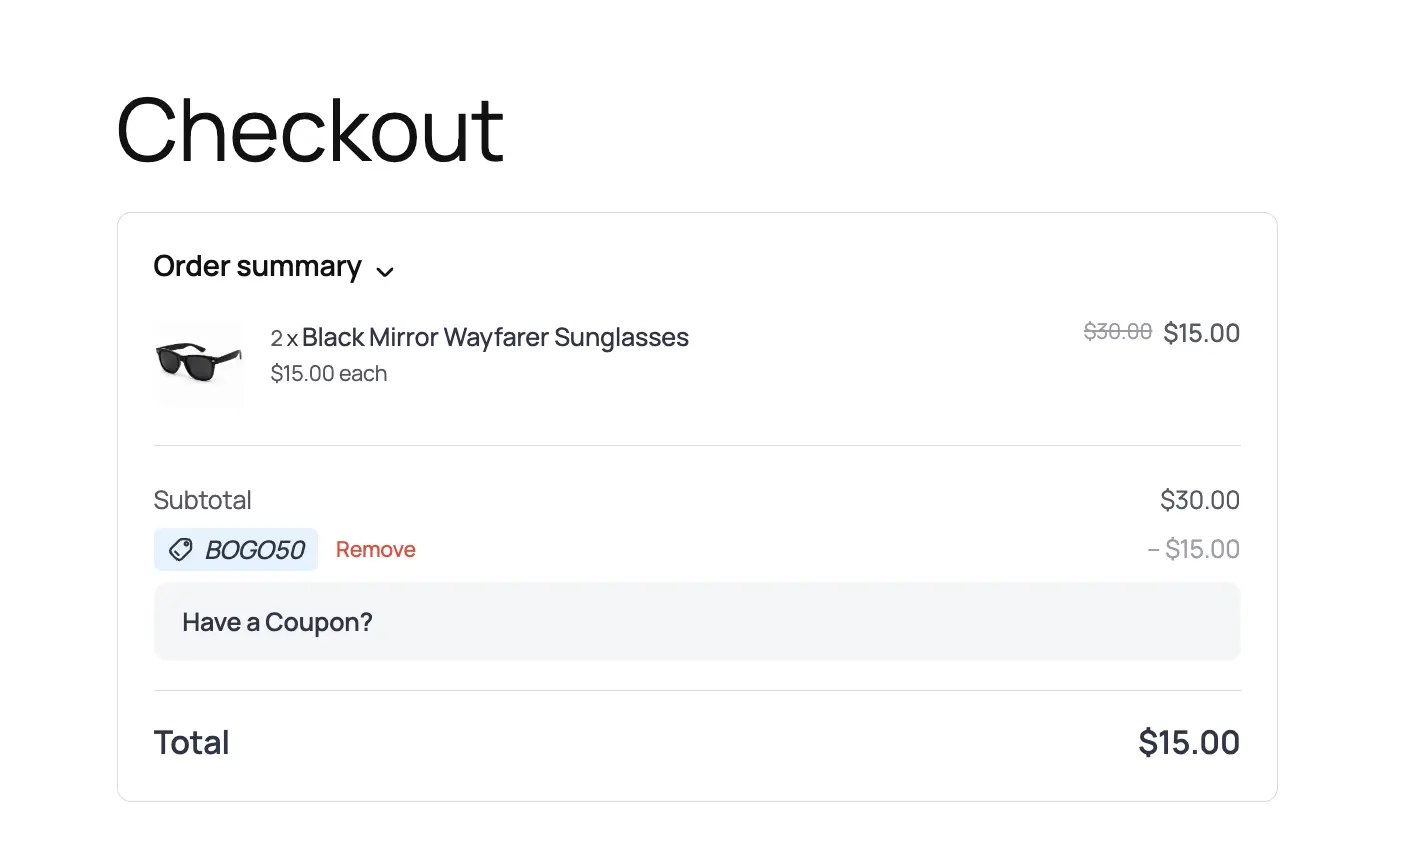
Save the coupon, then go through your own checkout as a test customer. Add one unit to the cart and confirm the code does not apply yet. Add a second unit, apply the code, and confirm the price drops by exactly one unit’s worth. Checking it this way catches a misconfigured Min Spend Amount before a real customer runs into it.
Step 7: Apply the Coupon Through a URL
Typing a coupon code is one more thing standing between a customer and checkout, and it’s an easy point to lose them. FluentCart lets you skip that step by attaching the coupon straight to a checkout link.
Add the coupons parameter to the product’s checkout URL: https://yourdomain.com/?fluent-cart=instant_checkout&item_id=209&quantity=1&coupons=BOGO50. Swap in your product’s variation ID for item_id and your coupon code for coupons, and anyone who clicks the link lands on checkout with the discount already applied.
This works well for email campaigns, social posts, or paid ads where the BOGO deal should feel instant rather than something the customer has to hunt for. You can also stack more than one code by separating them with commas, coupons=CODE1,CODE2.
One limitation worth knowing: this only works on the full checkout page, not the Modal (popup) checkout. You can check which one your store uses under Cart & Checkout Settings. If the link ever fails, expired code, usage limit hit, wrong product, the customer isn’t left staring at a silently full-price cart. Checkout shows a clear notice explaining why the coupon didn’t apply, so they can still complete the purchase or try a different code.
Which Method Fits Your Store
Here is how the three methods compare once the offer is actually live.
| Method | Feels Like | Setup Effort | Best For |
|---|---|---|---|
| Bundles | Automatic, baked into one listing | Moderate, new product to manage | A permanent, dedicated BOGO deal page |
| Order Bump | Opt-in checkout upsell | Moderate, one-time setup plus per-offer setup | An enticing add-on rather than a blanket rule |
| Coupons | Code or link-triggered discount | Low, no new product needed | Short-term or campaign-specific promotions |
Deciding between Bundles, Order Bump, and Coupons often comes down to specifics only your own store can answer. The FluentCart community is where store owners talk through exactly that, share how they priced their own BOGO offer, and answer questions from people still deciding.
Real store owners. Real problems. Real answers. Join the FluentCart Community.
Worked Examples for Each Method
Take a $40 candle with a $12 cost per unit and run it through all three methods. Same numbers each time, three different shapes for the offer.
Bundles: One Listing, One Price
Running BOGO through Bundles means creating a “Buy One Get One” bundle priced at $40, with Compare at Price set to $80, so a customer paying $40 gets two candles instead of one. Two candles cost the store $24 to produce, so the $40 sale still nets $16 in profit, less than selling two candles individually at full price would net ($56 profit), but still solidly profitable, and likely to move more units than a straight discount would.
Order Bump: The Optional Extra
The same offer through Order Bump would list the candle at its normal $40 price, then offer a second candle free at checkout to anyone who already added one to their cart. Fewer customers take the offer compared to Bundles, since it requires an extra click, but the ones who do are actively choosing to buy more, which tends to be useful data for a store still testing whether BOGO is worth running permanently.
Coupons: The Code That Does the Math
The same offer through Coupons would use a Fixed Amount discount of $40, restricted to the candle, with Min Spend Amount set to $80 so a customer needs two candles in their cart before the code does anything. This method takes the least setup of the three, no new product to build and no checkout offer to configure, which makes it a good fit for a short-term promotion that only needs to run for a week or two. The trade-off is that it only works cleanly because the candle has one fixed price, a product with different-priced variants would need a different approach.
Common Mistakes to Avoid
FAQs
Wrapping Up
Bundles, Order Bump, and Coupons all reach the same buy-one-get-one-free result through different mechanics. The right pick comes down to how automatic you want the offer to feel and how much setup you are willing to maintain.
Already got a BOGO offer live, or running into something unexpected while setting one up? The FluentCart community is where store owners compare notes on what actually happened once the offer went out, not just how to configure it.
Real store owners. Real problems. Real answers. Join the FluentCart Community.

Hi, this is Sajid, a Marketing Strategist who creates content and visuals designed for maximum audience engagement. I also love exploring different tech tools, always curious to see what’s out there.

Subscribe now
Related Articles and Topics
-
Wholesale Pricing: A FluentCart Guide for WordPress Store Owners
Learn how to set up wholesale pricing. Using FluentCart for this, you get five practical methods, from simple…
-
How to Build an Online Community With FluentCart
Learn how to build an online community with FluentCart and FluentCommunity, from planning access levels to testing the…
-
FluentCart Ecommerce Plugin: Smartest WordPress Store
Before you build your online store, see why FluentCart eCommerce plugin solves the problems that quietly kill new…




Add your first comment to this post