
How to Build an Online Community With FluentCart
Learning how to build an online community usually starts with picking the right platform.
A one-time sale ends the relationship the moment it closes. A paid community keeps customers inside your site instead, since they come back for the discussions, courses, and updates they are already paying for.
FluentCart, paired with FluentCommunity, is that platform: it turns a WordPress site into a place people pay to belong, not just buy from.
This guide covers the complete process:
- planning what customers get access to
- building the community itself in FluentCommunity
- creating the product in FluentCart
- connecting the two through an integration feed
- testing that access works correctly in both directions
- getting the community actually running once real members start joining.
What Is the FluentCart and FluentCommunity Integration?
Selling access to a community involves more than collecting a payment. Someone has to create the customer’s account, place them in the right spaces, enroll them in the right courses, and eventually remove access when their entitlement ends.
Doing that by hand does not scale past a handful of members.
The FluentCommunity integration is a product-level connection built directly into FluentCart.
It works locally between the two plugins on the same WordPress installation, so there is no external API key to manage.
When the configured integration trigger runs, typically after an order is paid, FluentCart resolves the customer’s WordPress account, synchronizes their FluentCommunity profile, and applies the configured access rules.
The exact behavior depends on which event trigger you select, covered in Step 6.
This makes the FluentCart and FluentCommunity combination suitable for paid membership communities, coaching groups, customer-only spaces, premium discussion areas, courses, and multi-tier memberships, whether access is sold as a one-time purchase or a subscription.
What You Need Before You Start
Install and activate:
During this guide, you will create at least one FluentCart product.
Before configuring the integration, you should already have at least one FluentCommunity space, and any courses you plan to sell if course access is part of the offer.
Course-related fields only appear in the integration once the course module is enabled.
A payment gateway is needed for accepting or testing payments, not for creating the integration itself.
You can start this setup now
Download FluentCart for free and follow along with the steps below on your own site.
Step 1: Plan the Community Offer
Before touching either plugin, decide exactly what a customer receives after purchasing. Write it out plainly. For example:
Starter Membership grants access to the Starter Members space.
Pro Membership grants access to the Pro Members and Resources spaces.
Course Bundle grants access to the Student space plus specific courses.
Coaching Program grants access to a private coaching space and a training course.
Creating a separate FluentCart product or variation for each access level keeps the automation easier to manage later.
At this stage, decide whether access will be ongoing through a one-time purchase, available for a limited period, or maintained through an active subscription.
One-time access may still be revoked manually or following a full refund or cancellation of a previously paid order.
This decision shapes both the product setup in Step 3 and the trigger choice in Step 6.
Step 2: Build the Community Structure in FluentCommunity
Set up the community itself before connecting anything to a product. Depending on the offer you planned in Step 1, create a general space, private spaces for paying members, tier-specific spaces, course discussion spaces, or one or more courses.
Give every space and course a clear, descriptive name. FluentCart displays these names later when you configure the integration feed, so vague names become confusing fast once you have several products pointing at several spaces.
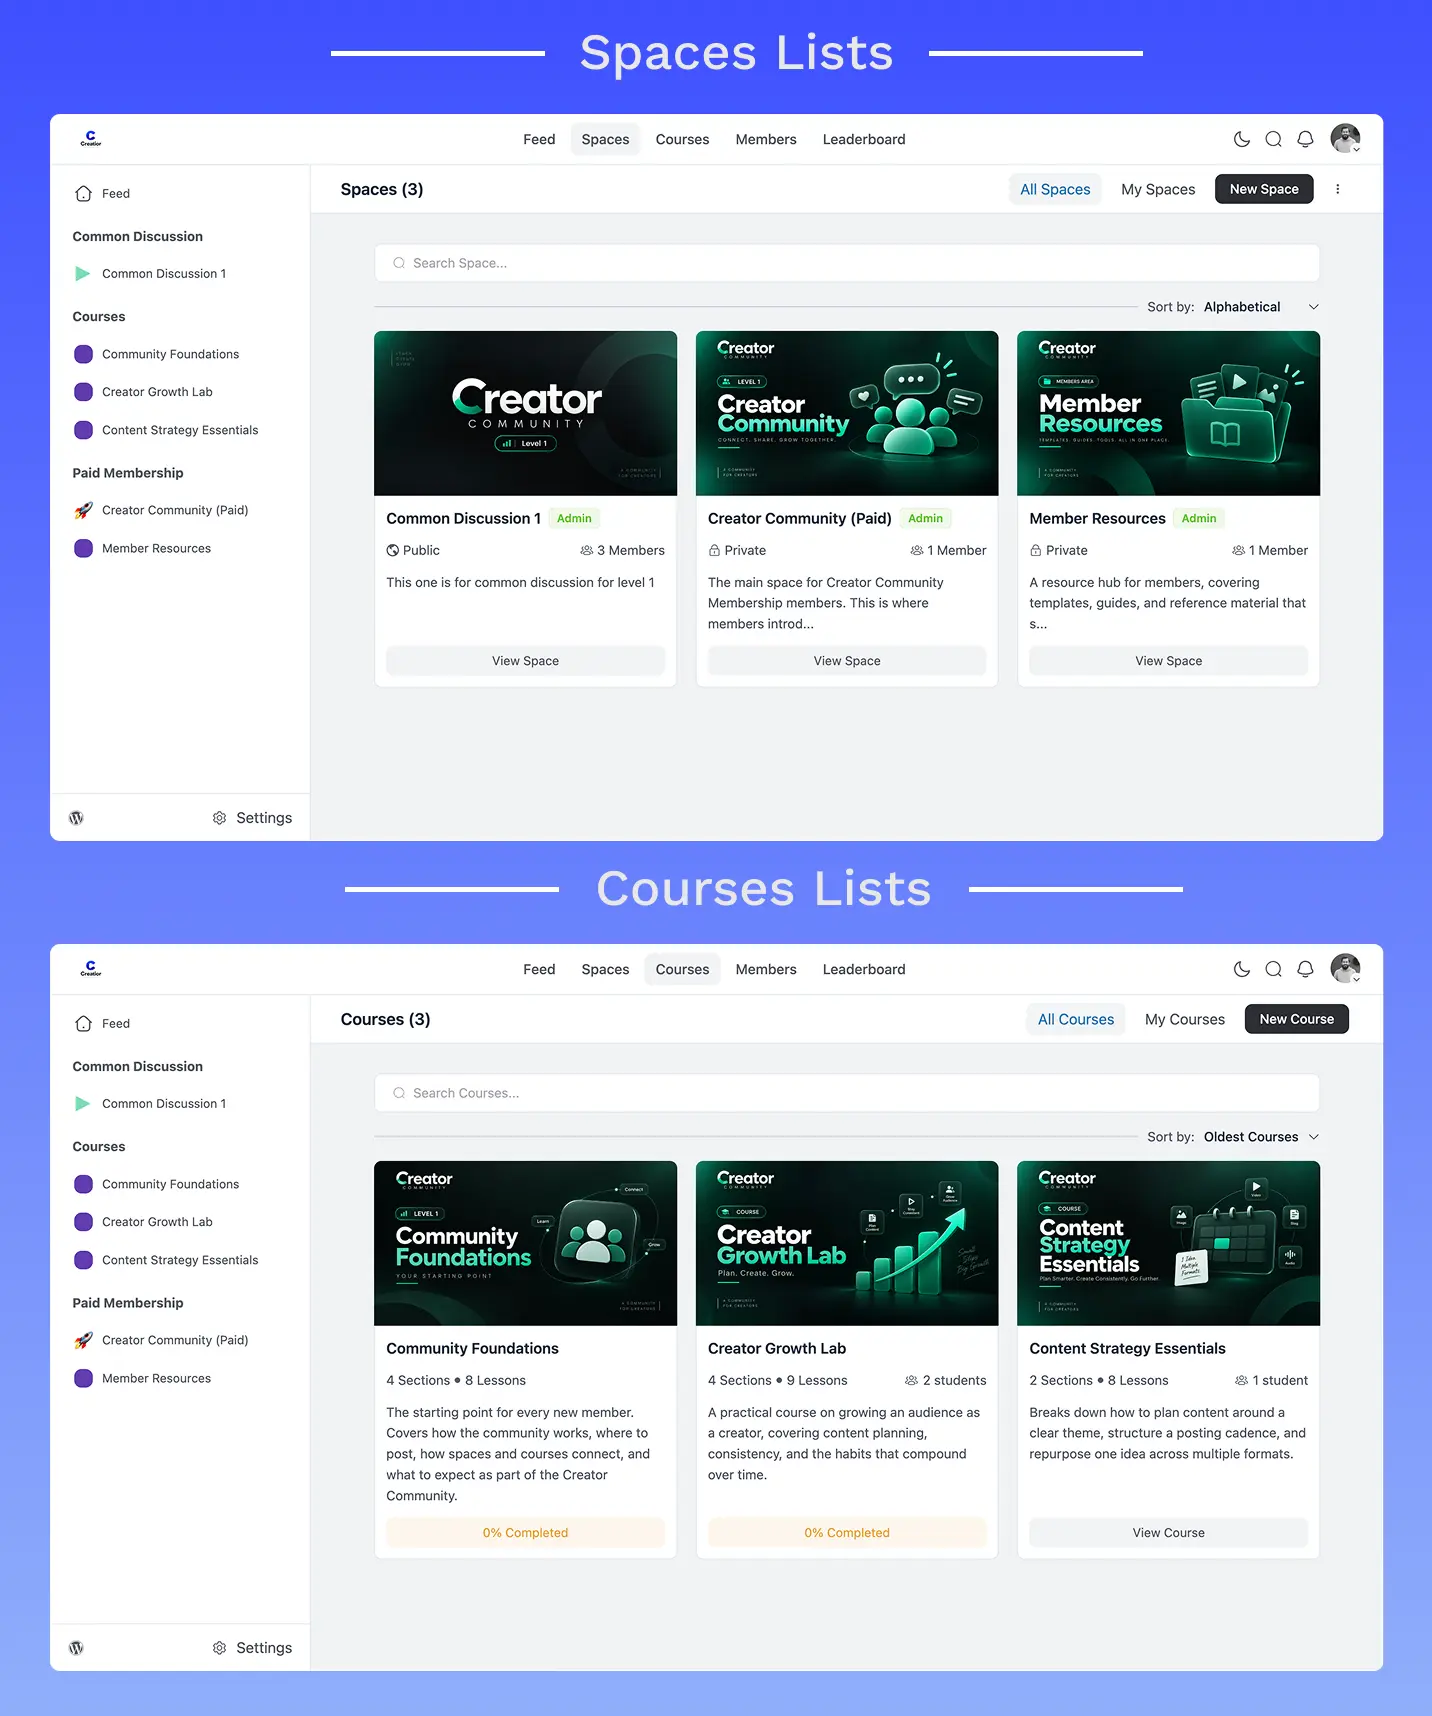
Before selling anything, test the community manually. Sign in as a member, open the intended spaces, and confirm the course content loads the way you expect. Fixing structure problems now is far easier than fixing them after customers have already purchased.
Step 3: Create the Product in FluentCart
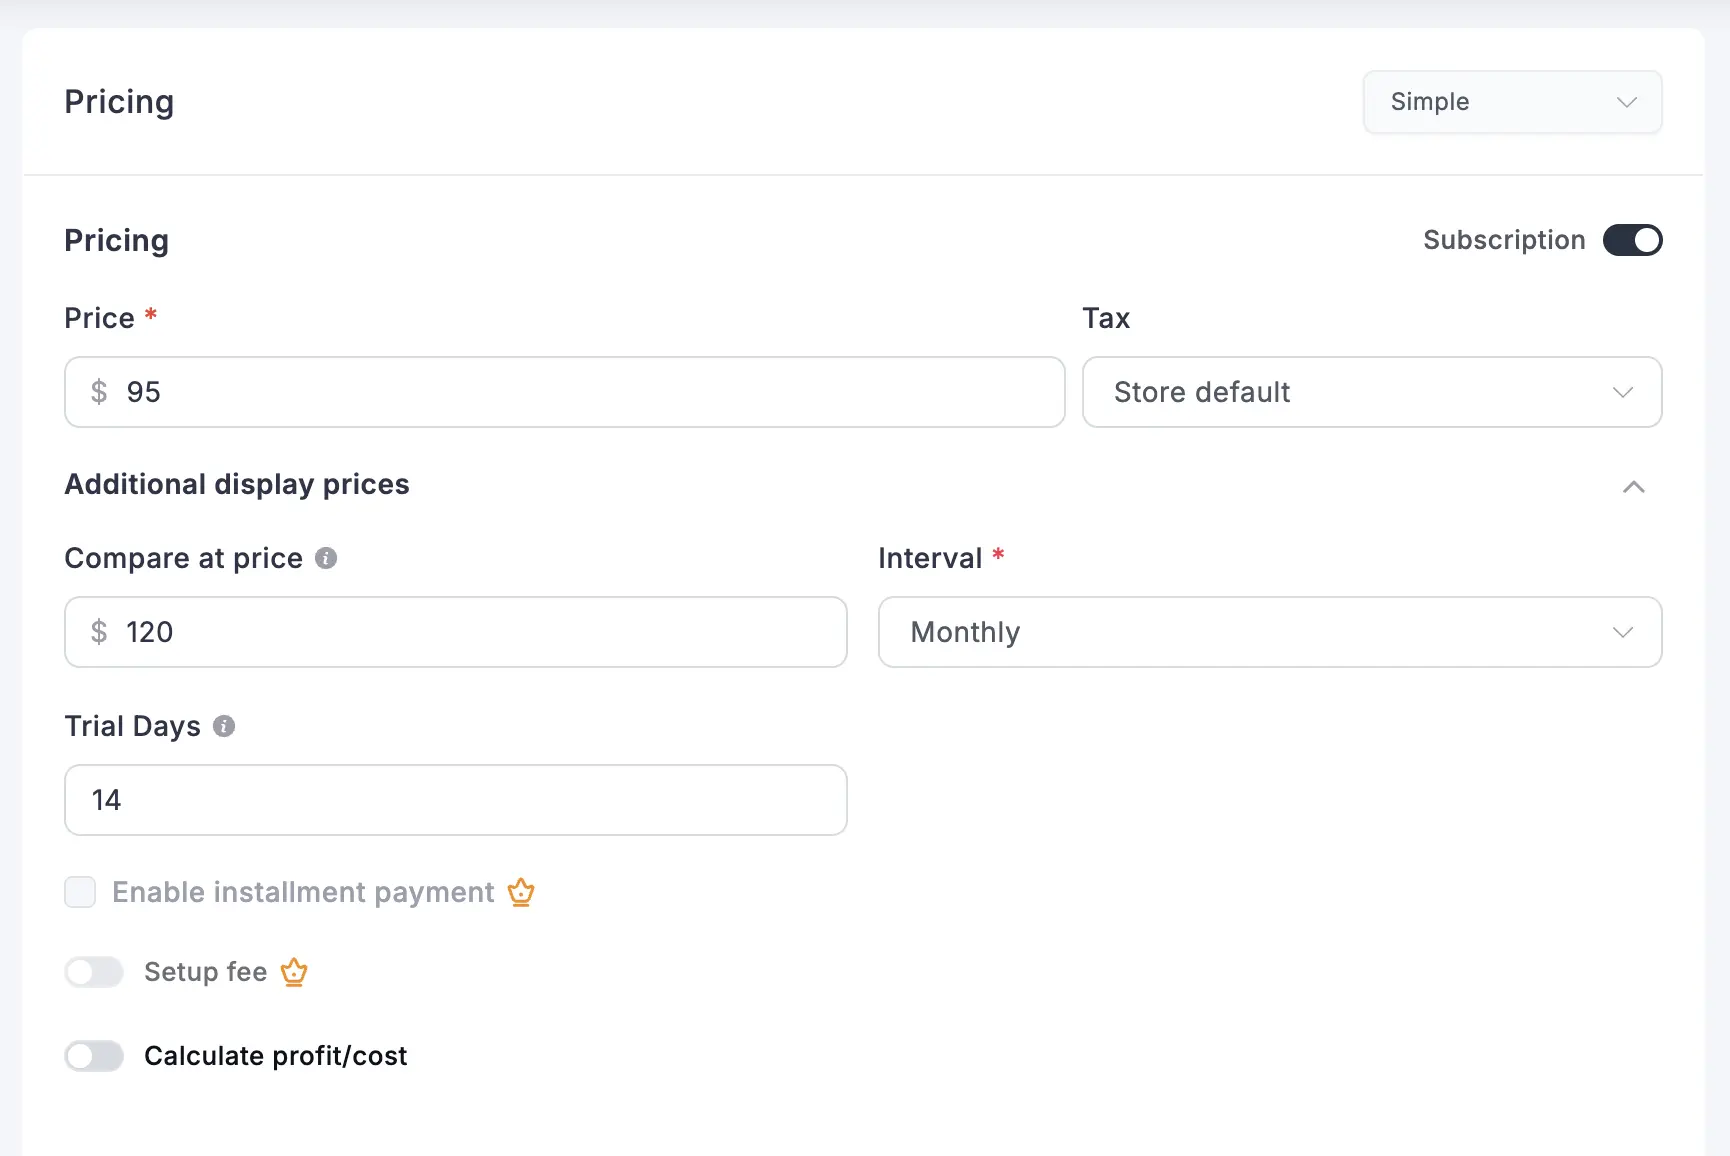
With the community structure in place, create the product customers will actually buy. Configure the product name and description, pricing, one-time or recurring billing, a product image, checkout information, applicable taxes, and the payment gateway.
For a recurring community, set up a subscription product with a billing schedule that matches the membership period you decided on in Step 1.
Use the product description to clearly explain what the purchase includes: which community areas become available, which courses are included, whether access is provided through a one-time purchase, for a limited period, or through a subscription, and when access may be removed.
Customers who understand this upfront generate fewer support questions later.
Step 4: Add the FluentCommunity Integration to the Product
Open the product inside FluentCart and locate the Product Integrations tab. Click Add Integration, then choose FluentCommunity from the list.
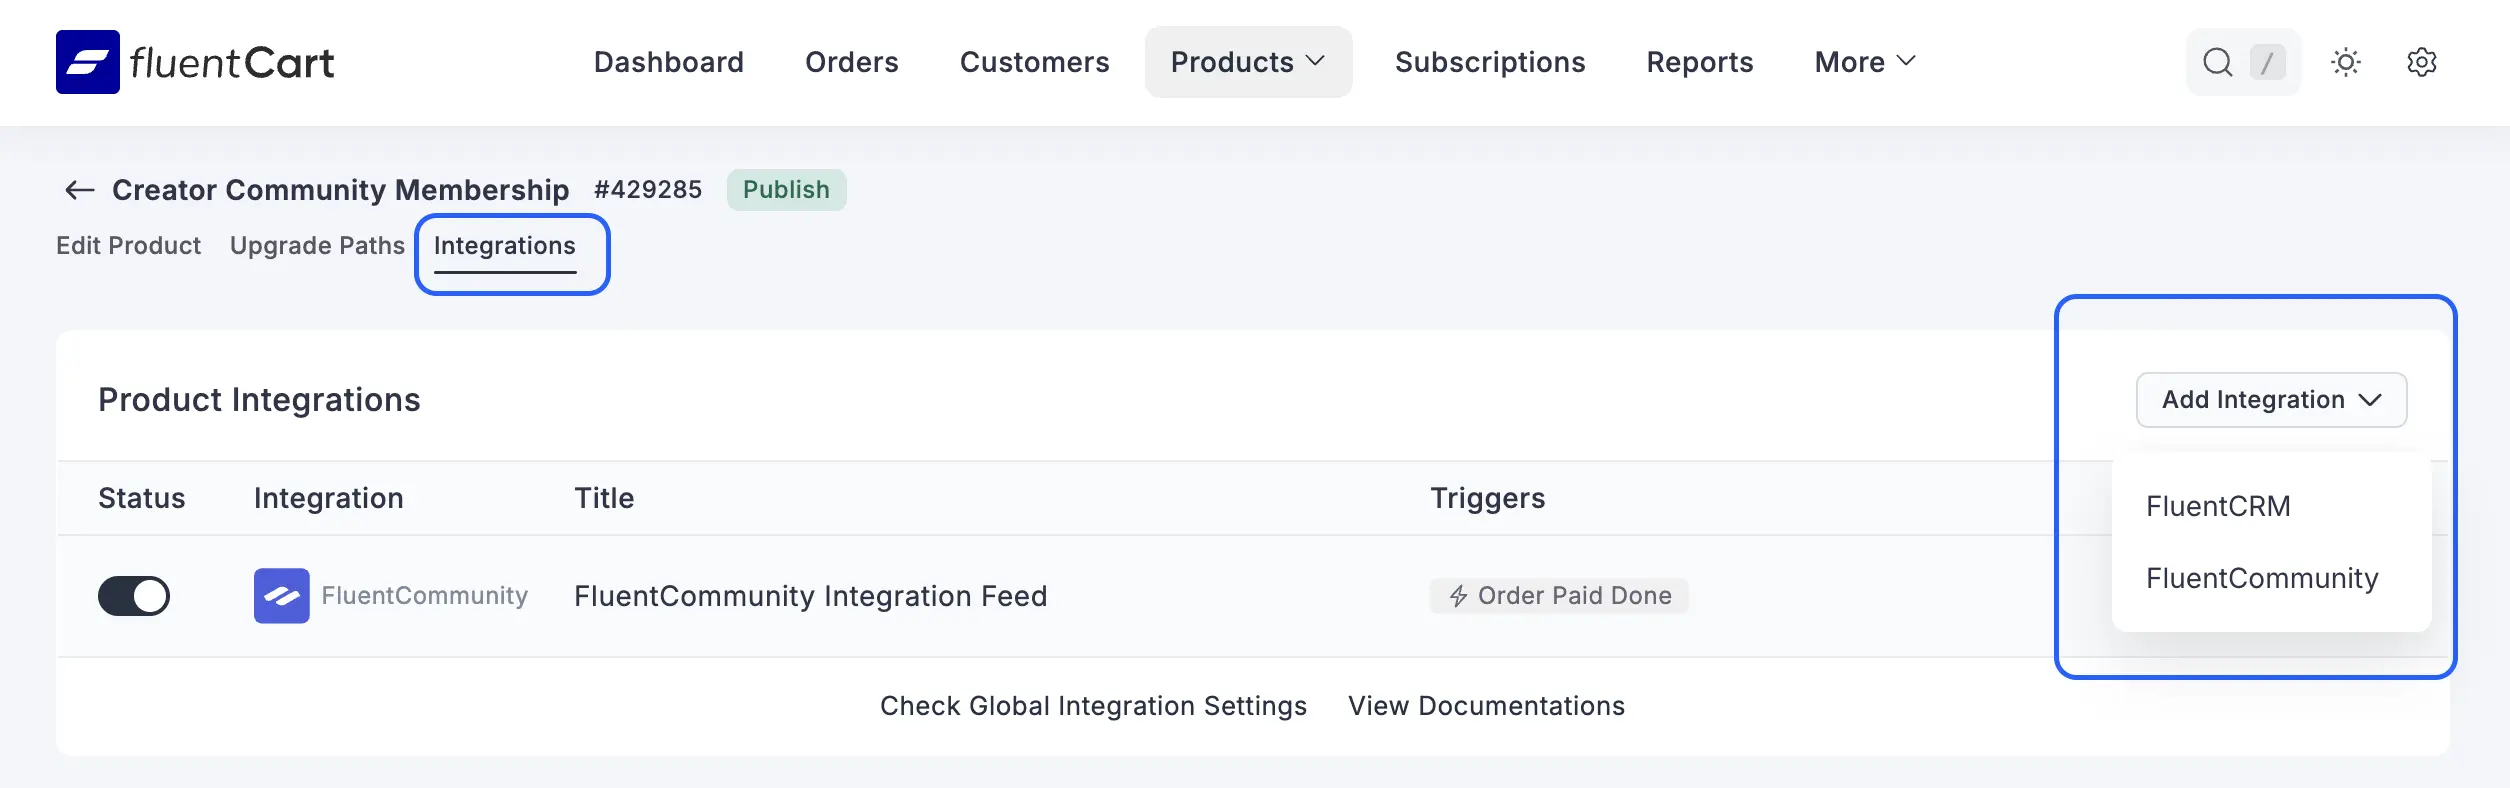
If FluentCommunity does not appear as an option, check that the FluentCommunity plugin is installed and active on the same site.
Since this integration runs locally between the two plugins, there is no separate connection or API key step required. Menu wording and placement may vary slightly between FluentCart versions. Look for Product Integrations while editing the product.
Step 5: Configure the Integration Feed
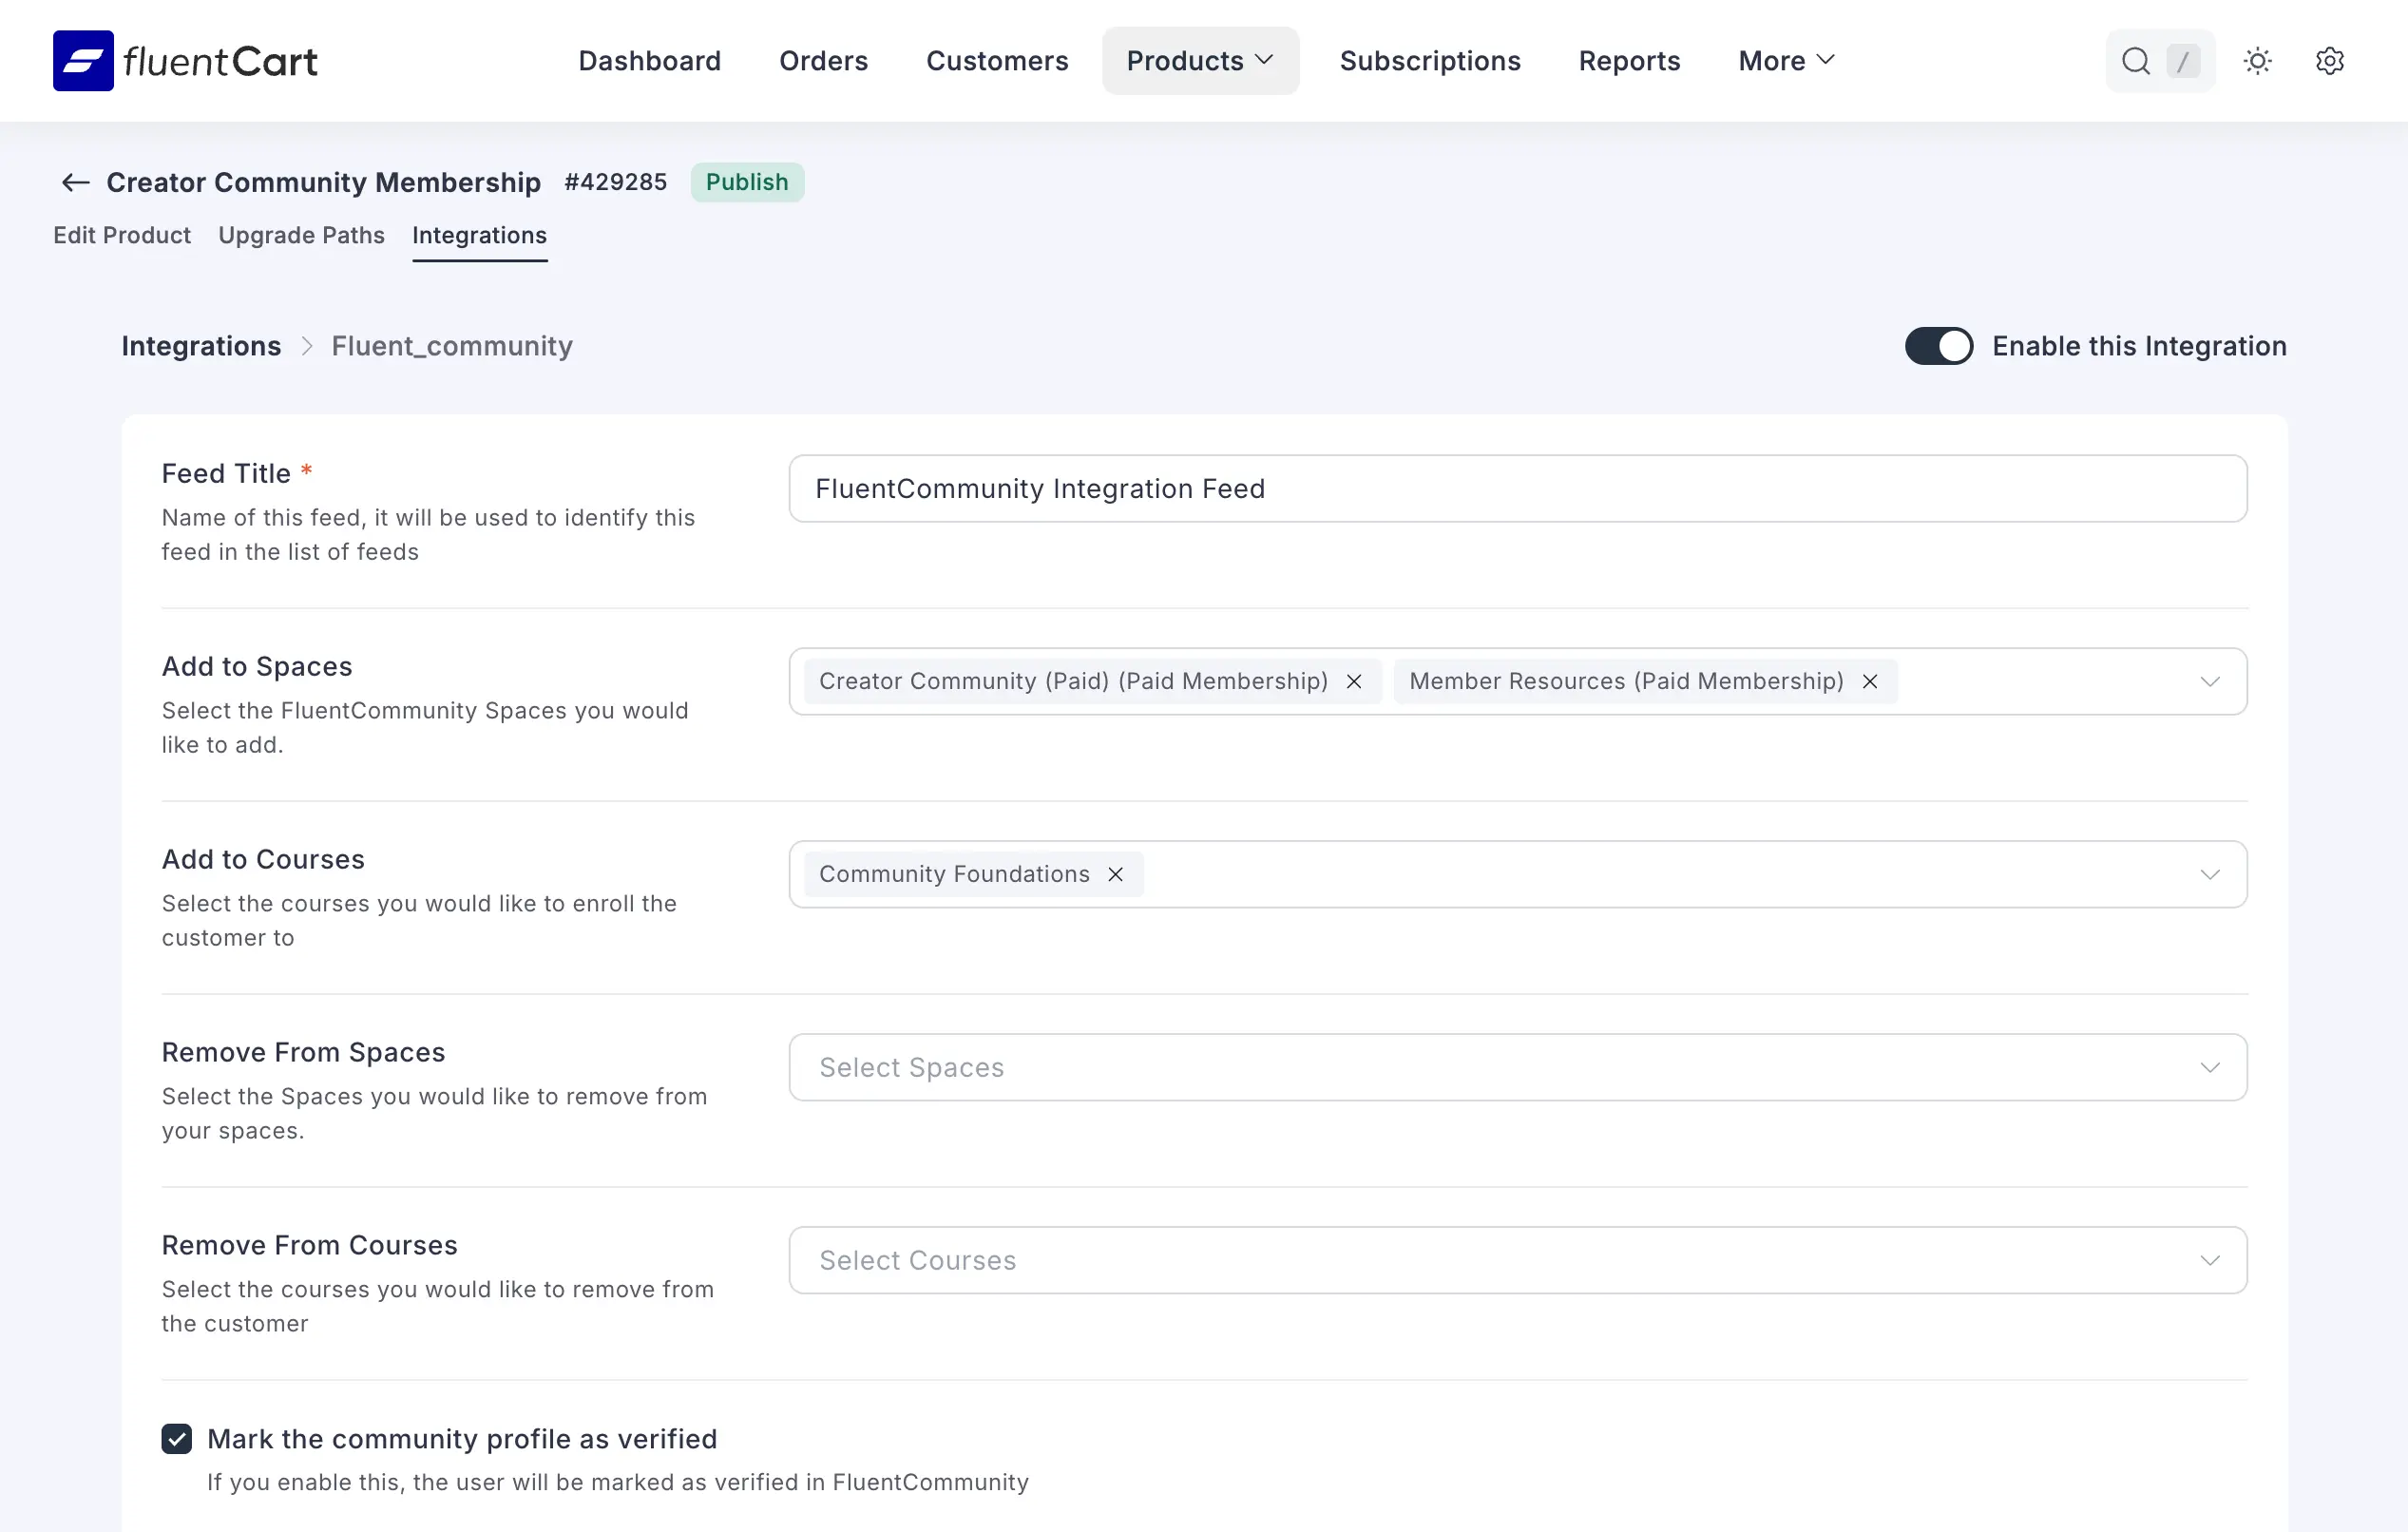
This is where you define exactly what happens after a purchase. The feed offers the following settings:
Feed Title. An internal name for the automation, such as “Add Starter Community Access” or “Grant Pro Membership.” This name is for administrators and does not affect the public product name.
Add to Spaces. The FluentCommunity spaces a customer joins after the feed runs. They are added as members.
Add to Courses. If the course module is enabled, the courses a customer is enrolled in after the feed runs. They are added as students.
Remove From Spaces. Removes the customer from selected spaces when the feed runs. This is useful for upgrades, where a customer is removed from a Starter space and added to a Pro space in the same feed.
Remove From Courses. Removes the customer from selected courses when the feed runs, useful when a new purchase should replace an earlier access package. Note that these two “Remove From” settings are separate from the automatic refund and expiration handling described next.
Mark the Community Profile as Verified. Enable this only when a completed purchase is a good enough reason to mark that customer’s profile as verified.
Remove Access on Refund or Expiration. Enable “Remove from selected Courses/Spaces on Refund or Subscription Access Expiration” to turn on automatic revocation for access this feed granted.

When this option is enabled, FluentCart treats a full order refund, cancellation of a previously paid order, and subscription access expiration as revocation events. A partial refund does not trigger it.
Canceling a subscription does not by itself trigger automatic access removal. FluentCart automatically revokes access when the subscription reaches the Expired / End of Access Validity event.
Step 6: Choose the Right Trigger
The feed can run on a range of events, grouped into order events (Order Paid, Order Canceled, Order Refunded in Full), subscription events (Subscription Activated, Reactivated, Canceled, Renewed, End of Term, Expired or End of Access Validity), and shipping events (Order Shipped, Order Delivered).
For a feed that grants community access, do not select Order Canceled, Order Refunded, or Subscription Canceled as the triggering event.
Selecting one of these as a normal trigger runs the feed’s regular add and remove actions, which is not what you want when the goal is revoking access. Use Order Paid to grant access, and rely on the separate automatic-revocation setting from Step 5 to remove it.
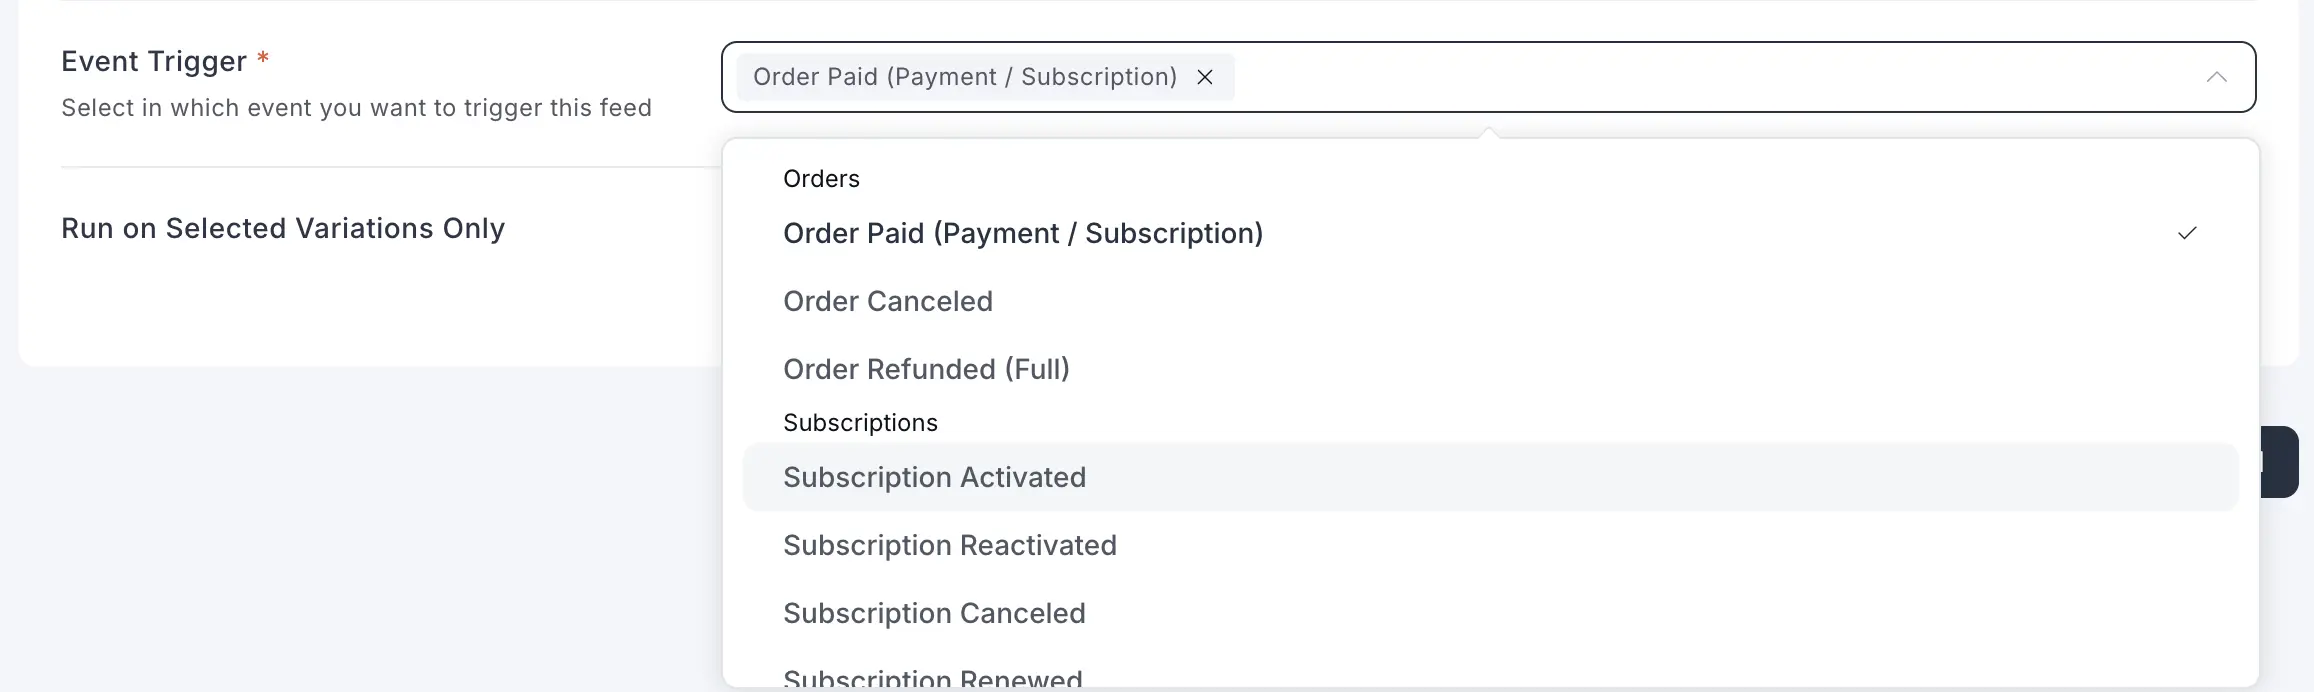
For most paid communities, Order Paid is the safest trigger for granting access, since it only fires once FluentCart confirms the payment succeeded.
Subscription products may need an activation or reactivation trigger as well, depending on the workflow. Only select a trigger that reflects a deliberate rule you actually want enforced. Automatic revocation runs separately, governed by the setting from Step 5, not by the trigger list here.
Step 7: Save and Enable the Feed
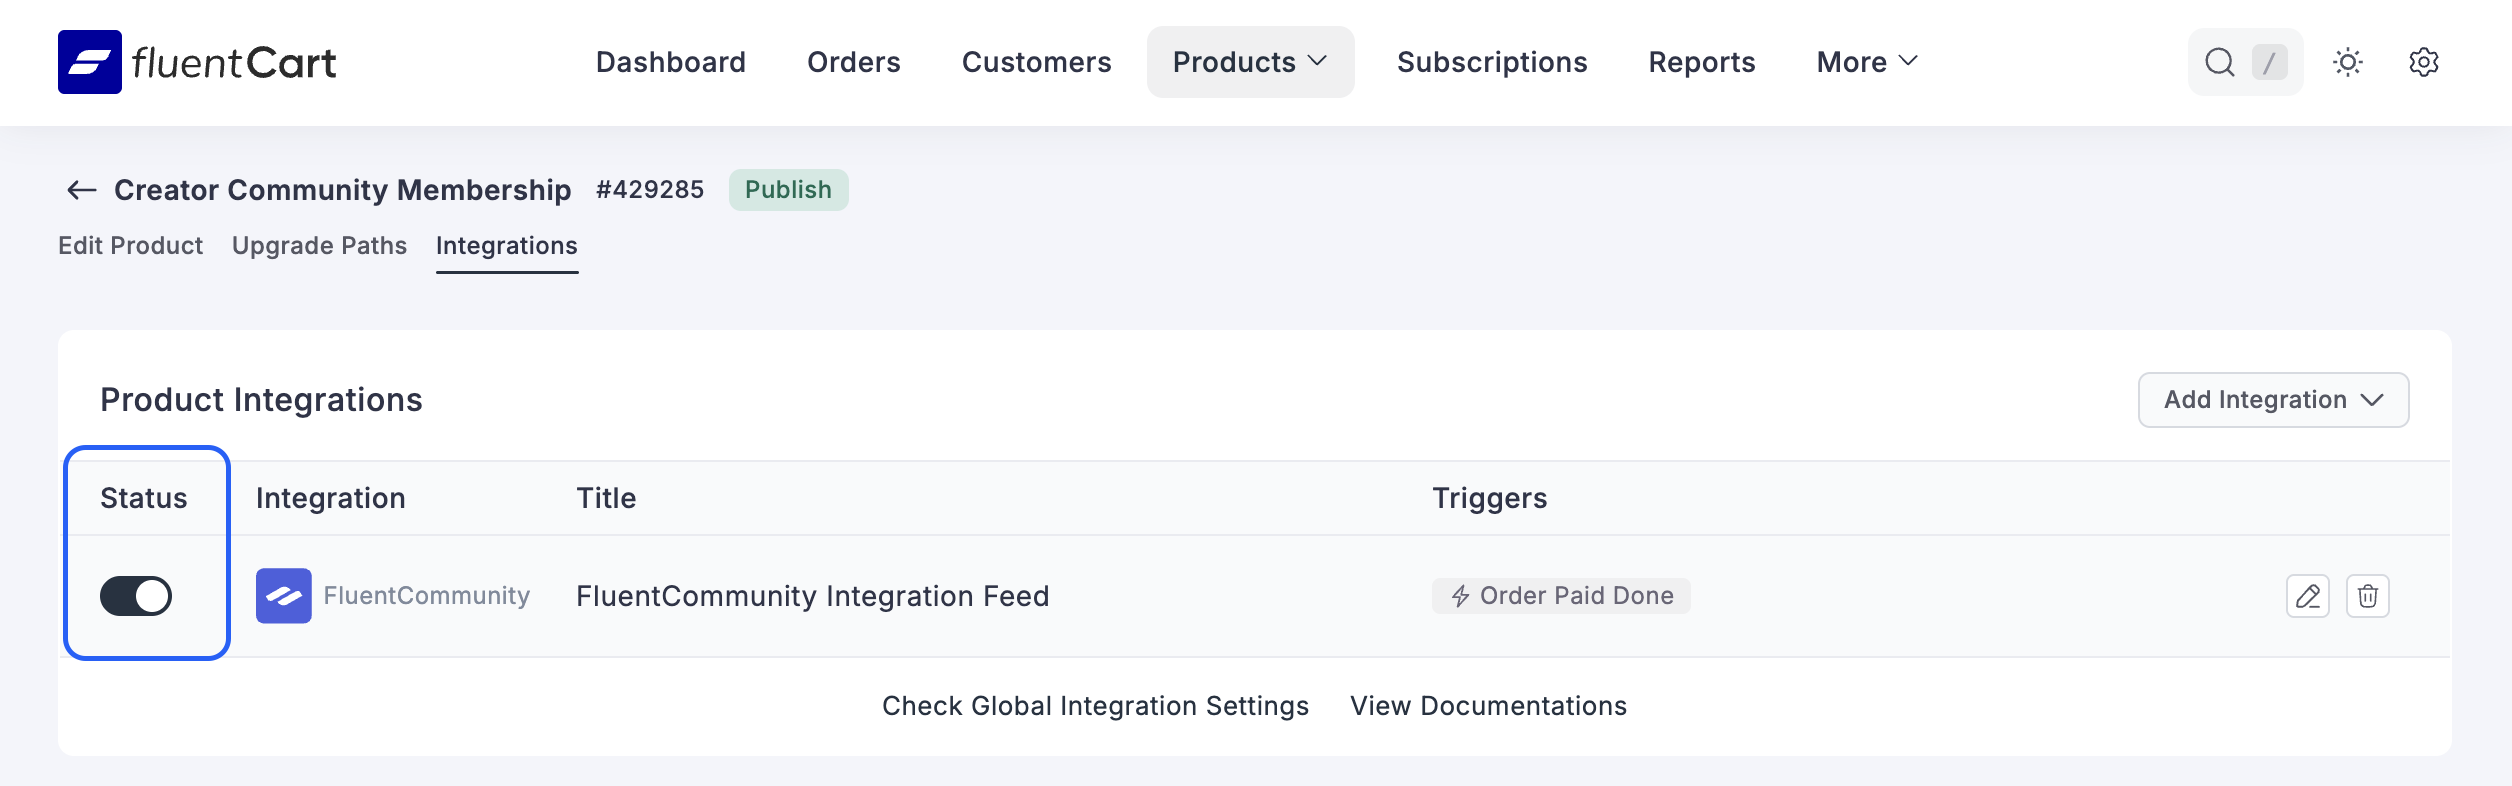
Save the feed and confirm its status is enabled. A single product can carry more than one feed.
For example, one feed could grant access to the main community, a second could enroll the customer in a course, and a third could handle moving an upgrading customer between spaces.
Even so, keep the setup as simple as the offer allows. For a standard membership product, one clearly named feed is usually enough.
Step 8: Test the Complete Purchase and Revocation Flow
Never publish the offer without testing it end to end.
Place a test order using an email address not already tied to an administrator account, then confirm that the payment completes, a WordPress account is created or matched, a FluentCommunity profile exists, the customer lands in the correct spaces and courses, verification is applied if enabled, the customer can sign in and reach the protected content, and FluentCart logs a successful integration entry on the order.
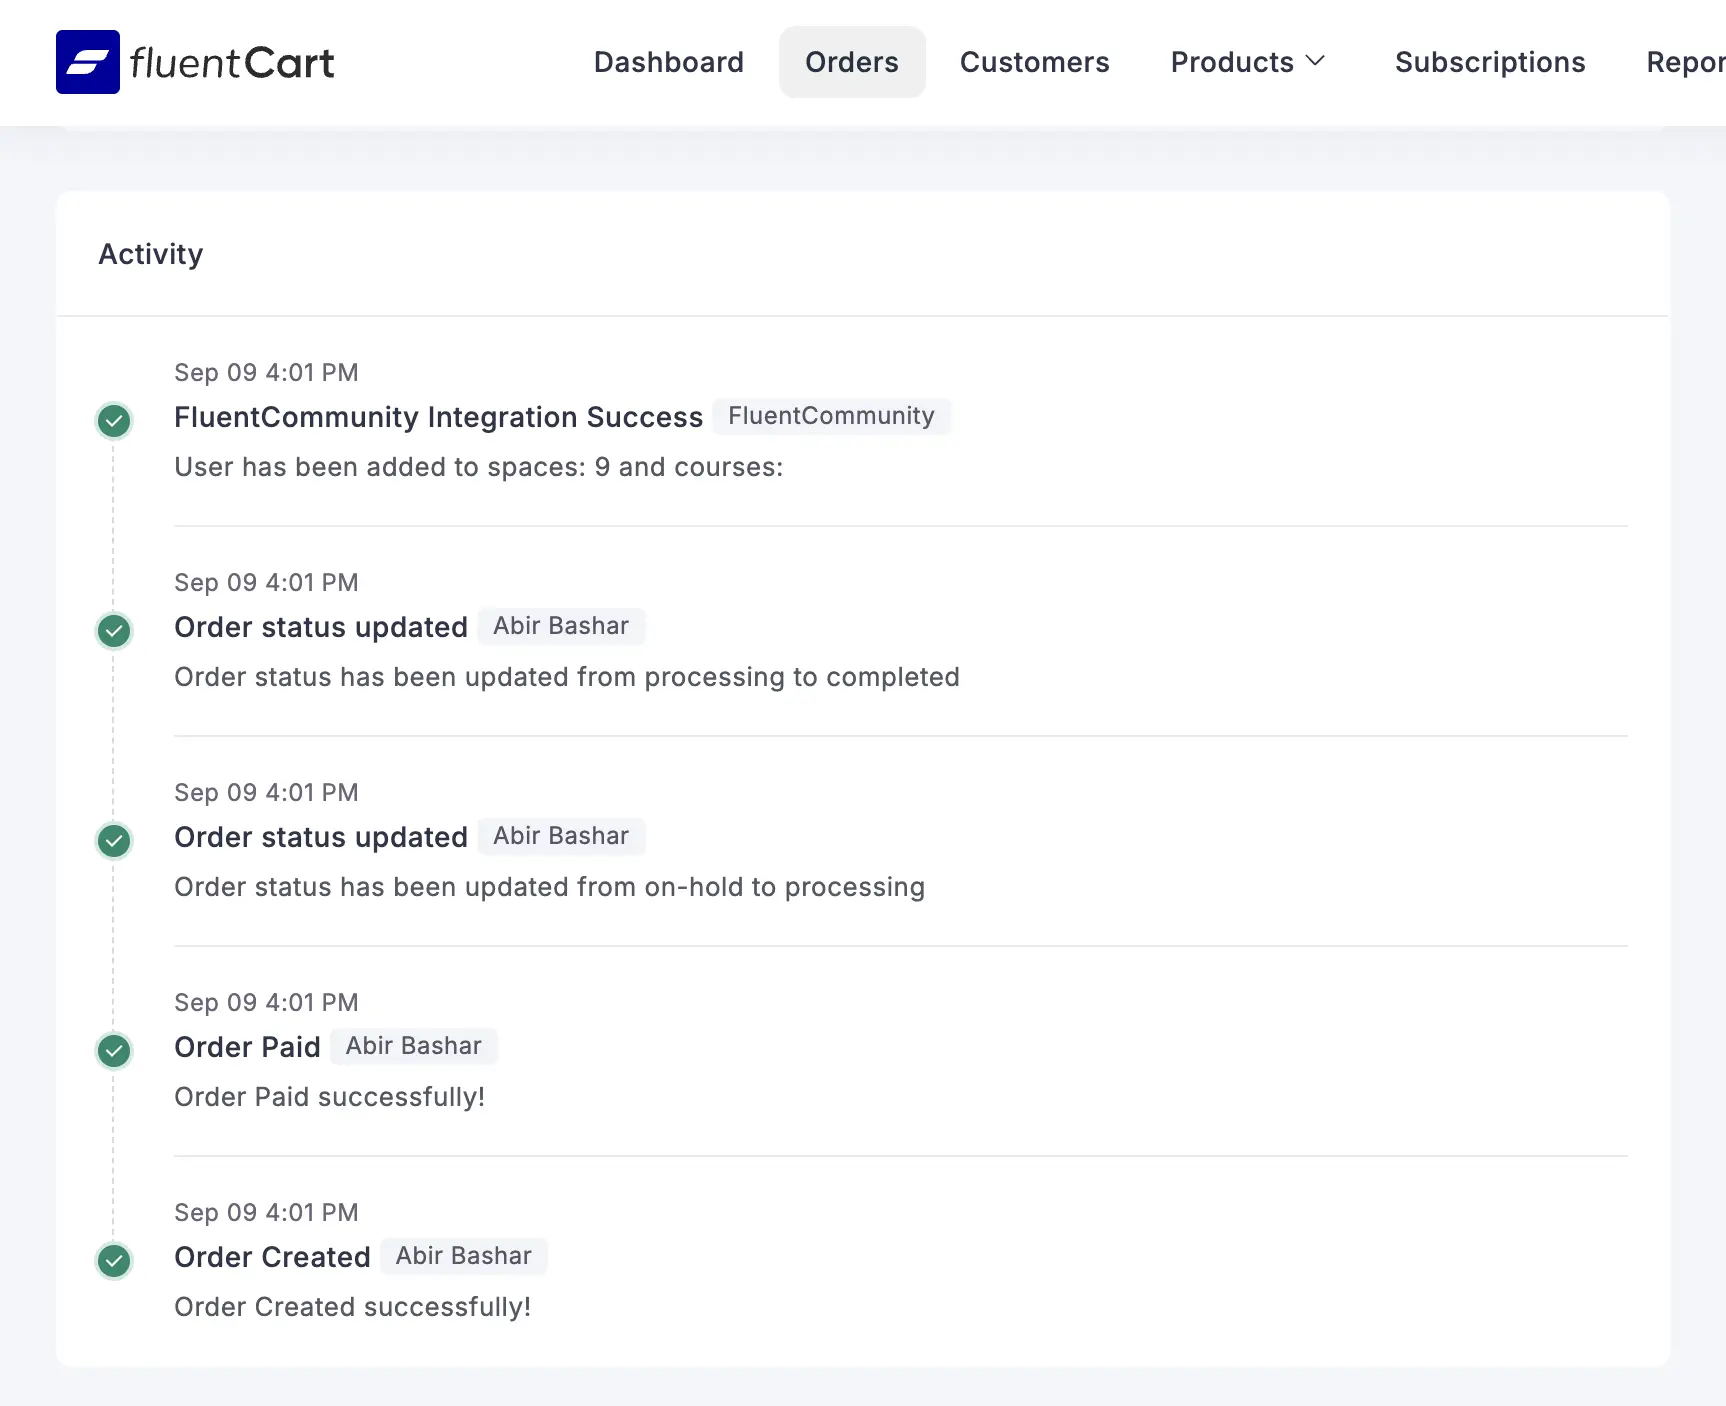
Then test the other direction. Fully refund the test order, or let a test subscription reach expiration (or cancel order), and confirm the customer is removed from the spaces and courses that order granted. Check the order log for the access-removal entry to be sure it fired correctly.
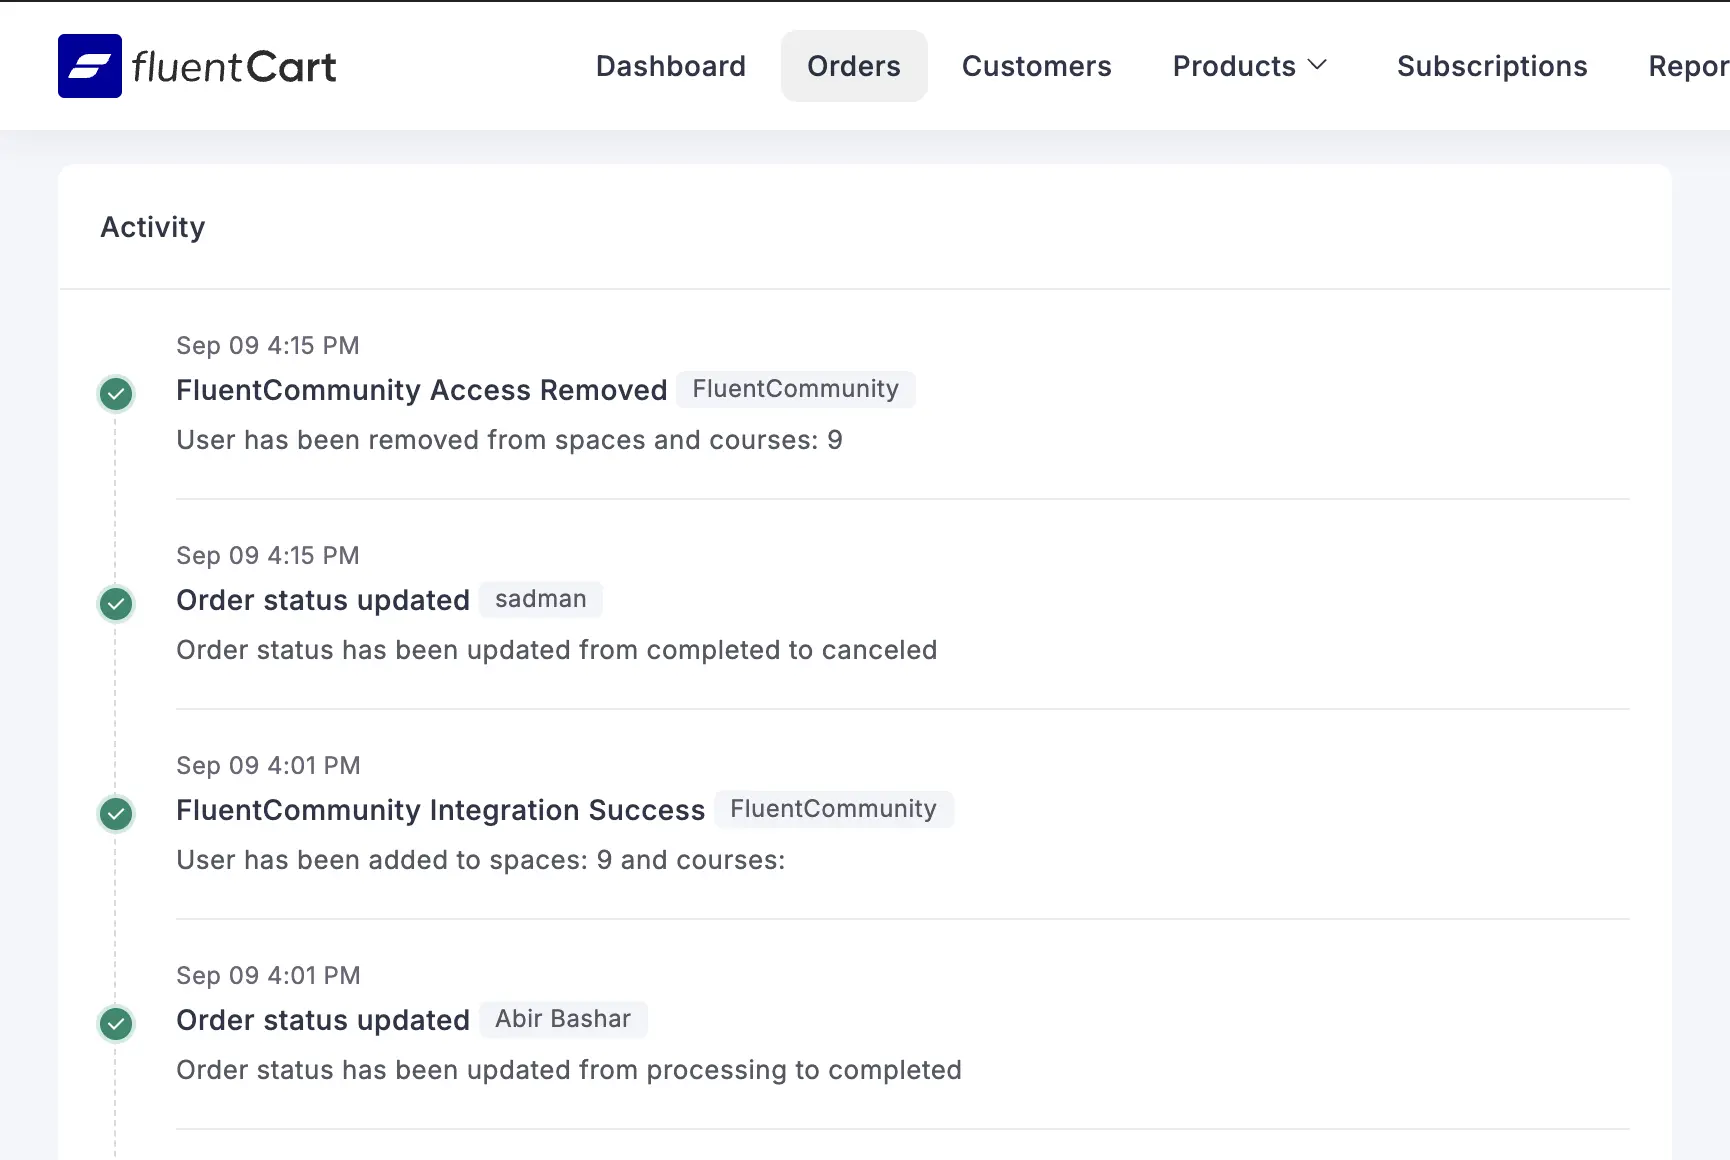
How Account Creation Works Behind the Scenes
When the feed runs, FluentCart resolves the customer’s WordPress account using their checkout email, creating one if none exists, then syncs the FluentCommunity profile before assigning access.
If account creation fails, FluentCart logs the error and does not grant access. This is why the checkout email matters: it connects the FluentCart customer, the WordPress account, and the FluentCommunity profile.
Advanced Note: Overlapping Purchases
FluentCart stores order references on existing FluentCommunity access records when subsequent purchases grant the same access.
This helps prevent one revoked order from removing access still associated with another tracked order.
Nevertheless, stores using bundles, repurchases, upgrades, or multiple products that grant the same space or course should test every refund and expiration sequence carefully.
Overlapping purchases, bundles, and upgrade paths rarely play out exactly the same way twice, and every store ends up handling its own version of them.
The FluentCart community is where store owners talk through the situations that don’t quite match any example in a guide.
Real store owners. Real problems. Real answers. Join the FluentCart Community.
A Complete Example
Say you sell a recurring product called Creator Community Membership. Customers should receive the Creator Community space, the Member Resources space, and enrollment in the Community Foundations course.
The feed for this product would look like:
- Feed Title: Grant Creator Membership
- Add to Spaces: Creator Community, Member Resources
- Add to Courses: Community Foundations
- Remove From Spaces: None
- Remove From Courses: None
- Mark profile as verified: Optional
- Remove access on refund or expiration: Yes
- Primary trigger: Order Paid
- Status: Enabled
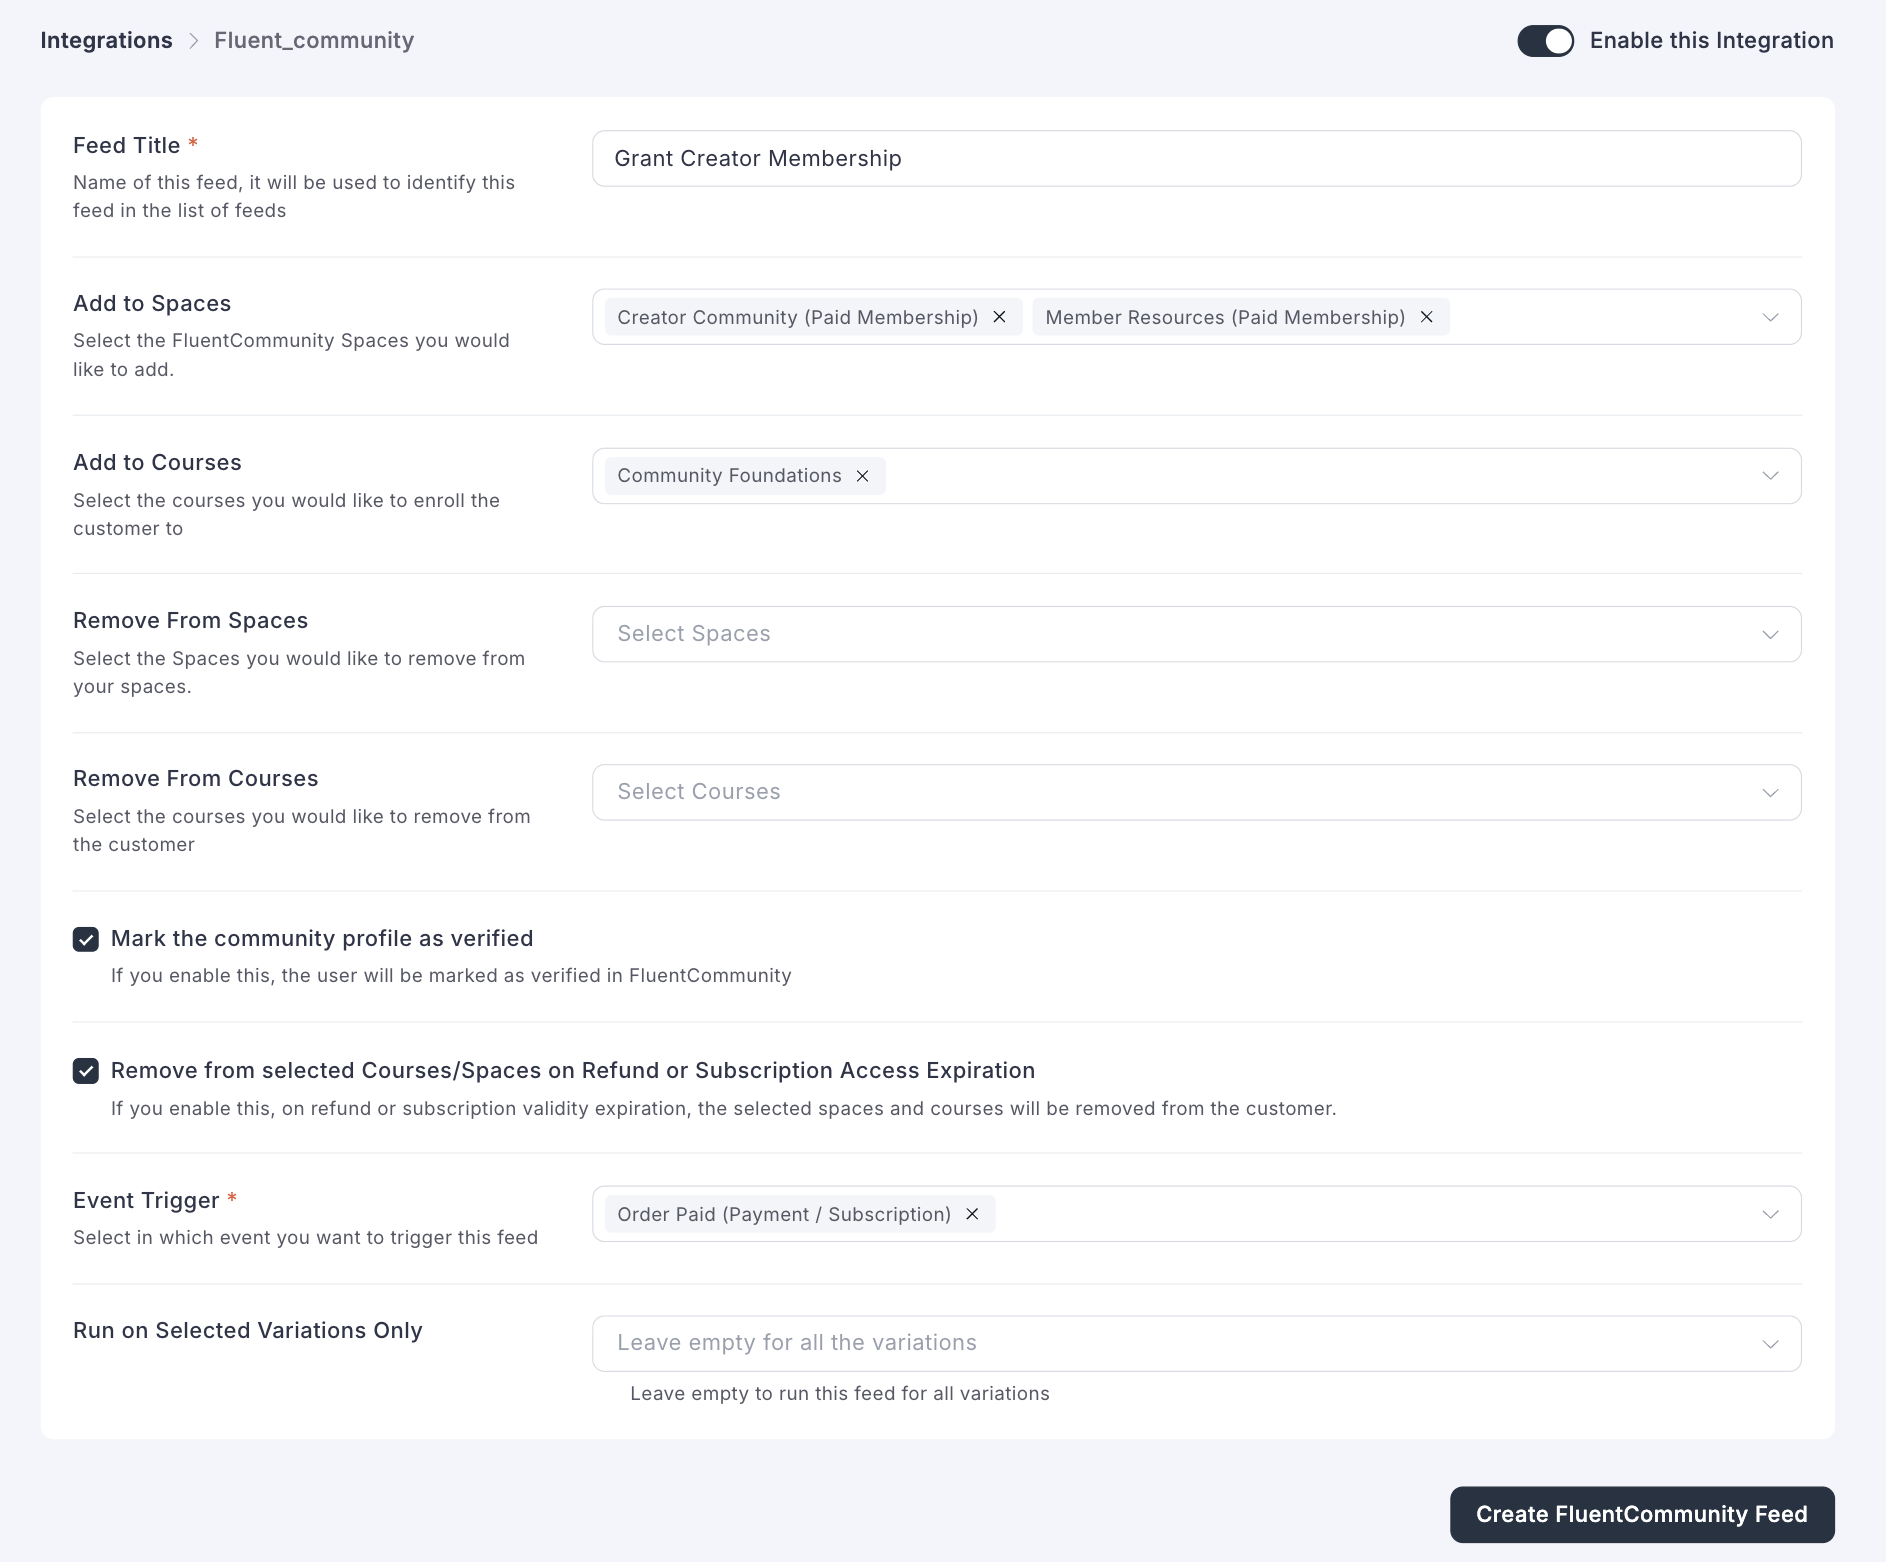
After a successful payment, FluentCart creates or resolves the customer’s account and grants the space and course access defined above.
If that order is later fully refunded or the subscription reaches the end of its access validity, FluentCart attempts to remove the selected space and course access associated with that integration feed.
Running the Community After Launch
Getting the integration working is only half the job. An empty space with perfect automation still feels empty to the first few people who join it.
Before opening the offer to real customers, seed some activity. Post a welcome message in each space, pin an introduction explaining what the space is for and how to get started, and add a few genuine posts or discussion prompts so new members do not land in a blank feed.
The same applies to courses: make sure the first lesson is genuinely ready, not just uploaded.
Once members start joining, a short cadence of checking in matters more than any single feature. Reply to introductions, ask a question in the space every so often, and notice when a course goes unused so you can find out why. None of this needs to be elaborate.
A community that gets a little consistent attention from its owner in the first few weeks tends to keep that momentum on its own after that.
Best Practices to Keep the Setup Manageable
Use one product for each distinct access package rather than building one complicated feed to cover several tiers at once.
Name every feed descriptively, since “Grant Gold Membership” tells you far more six months from now than “Community Feed 1” will.
Grant access on Order Paid rather than an earlier event that can fire before payment is actually confirmed.
Enable automatic revocation on subscription products, since otherwise an expired customer keeps their access until someone removes it by hand.
Base removal on access expiration rather than cancellation alone, since a canceled subscription can still have paid time left on it.
Test upgrade paths and overlapping purchases specifically, to confirm that removing one entitlement does not accidentally remove access supplied by a different order.
Check the order logs whenever something looks off, since FluentCart records successful runs, failed account creation, and access removal there.
Finally, tell customers plainly in their confirmation email which address to sign in with, how to set or recover their password, and where to find the community.
Where to Go When You Hit an Edge Case
Every store ends up with a scenario the documentation does not spell out exactly, an upgrade path that behaves unexpectedly, or a refund edge case worth double checking before it happens to a real customer.
If access is not granted or removed as expected, start with the FluentCart order log. Confirm the feed is enabled, the intended event trigger actually fired, FluentCommunity is active, and the customer has a valid WordPress account.
Test any change on a separate test account before applying it to a live membership product.
A step-by-step checklist for launching a paid community with FluentCart and FluentCommunity.

Hi, this is Sajid, a Marketing Strategist who creates content and visuals designed for maximum audience engagement. I also love exploring different tech tools, always curious to see what’s out there.

Subscribe now
Related Articles and Topics
-
Wholesale Pricing: A FluentCart Guide for WordPress Store Owners
Learn how to set up wholesale pricing. Using FluentCart for this, you get five practical methods, from simple…
-
FluentCart Ecommerce Plugin: Smartest WordPress Store
Before you build your online store, see why FluentCart eCommerce plugin solves the problems that quietly kill new…
-
Buy One Get One Free: A FluentCart Guide for WordPress Store Owners
A complete buy one get one free setup guide in FluentCart, using three methods, so you can pick…




Leave a Reply