FluentCart + FluentCommunity Integration: A Complete Solution for Course and Community
If you’re selling online courses, memberships, or digital products, you know how tricky it can be to manage who gets access to what. Manually adding and removing members from your community? Tedious and obviously inefficient.
That’s exactly why we rolled out FluentCommunity integration with FluentCart. It lets you automatically grant and revoke access to spaces and courses based on your customers’ purchases. All without any manual work.
In this guide, we’ll walk through how this integration works, when to use each type, and how to set it up step-by-step inside your WordPress dashboard.
What Is the FluentCommunity Integration in FluentCart?
Connecting FluentCart with FluentCommunity gives you a fully automated system for managing your customers’ access to online courses, spaces, and memberships.
When you activate the integration and someone makes a purchase from your website:
- They’re instantly added to the right space or course in FluentCommunity.
- If their payment fails, they cancel, or request a refund, access is automatically revoked.
This automation is perfect for:
- WordPress course creators
- Membership website owners
- Community-driven stores and brands
In short, this integration keeps your store and community perfectly in sync, ensuring customers always have access to what they’ve paid for — and nothing more.
Two Ways to Integrate FluentCart with FluentCommunity
FluentCart gives you two distinct integration options: Global and Product-Specific. Let’s break down what they mean and when to use them.
1. Global Integration (Applies to All Products)
Use this when you want an automation rule to apply to every paying customer, no matter what they buy.
Example: Add all paying users to a general “Welcome Space” or “All Customers” group in your community.
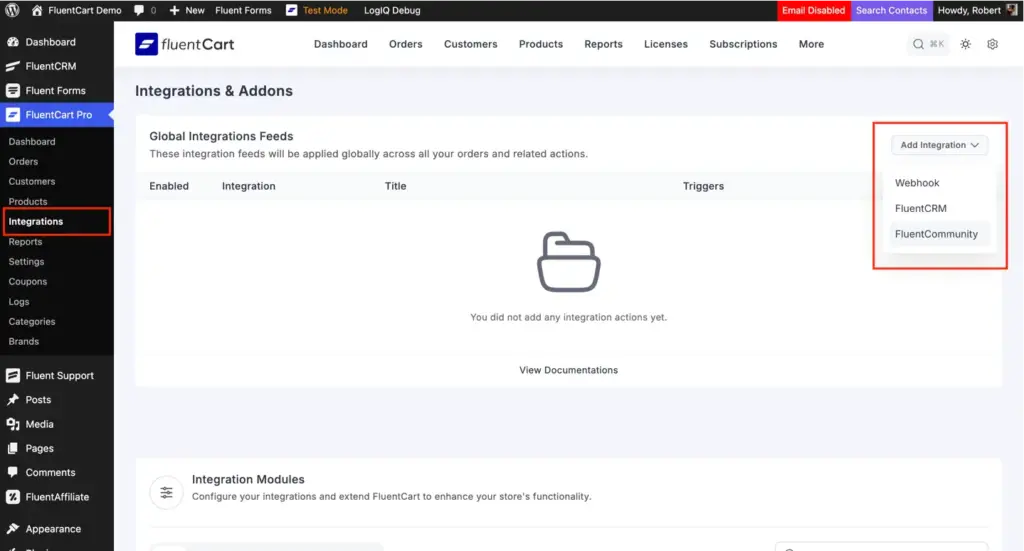
How to Set Up a Global Integration:
- Go to your WordPress dashboard → FluentCart → Integrations.
- Click “Add Integration.”
- Choose FluentCommunity from the dropdown list.
- You’ll see a configuration screen. This is where you define what happens after a purchase.
That’s it. Once saved and enabled, this automation applies to all future orders.
2. Product-Specific Integration (Applies to Selected Products)
A product-specific integration lets you create unique rules for specific items in your store. This is perfect for courses, programs, or membership tiers.
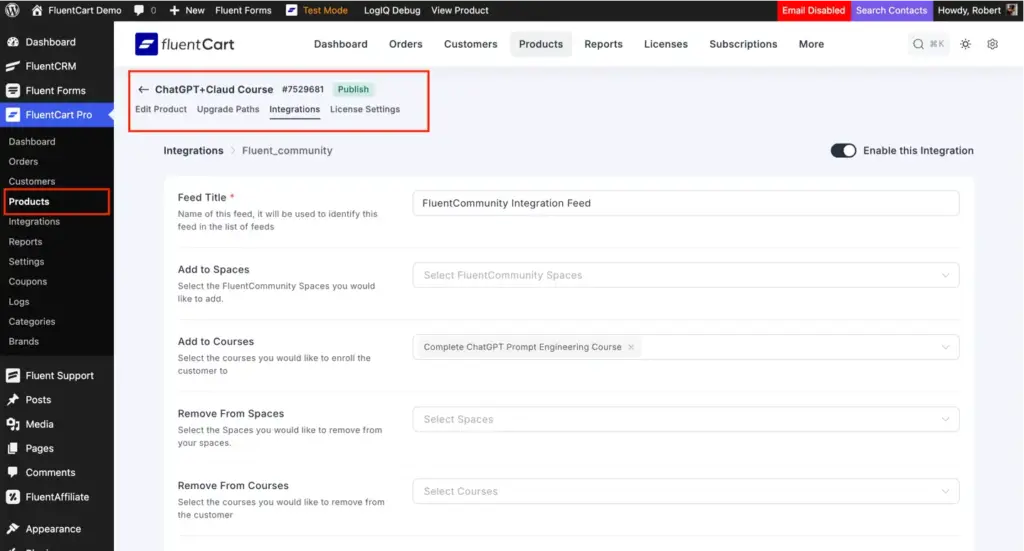
How to Set Up a Product-Specific Integration:
- Go to FluentCart → Products.
- Open the product you want to connect.
- Click the Integrations tab.
- Choose FluentCommunity Feed and configure your automation.
Example: If someone buys your “Beginner’s Yoga Course,” they’re automatically enrolled in your “Yoga Students” space and granted course access inside FluentCommunity.
Pro Tip: If a product has its own integration feed, it always takes priority over global integrations.
Step-by-Step: Configuring the Integration Feed
Whether you’re creating a global or product-specific feed, the configuration options are almost identical. Here’s what each setting means:
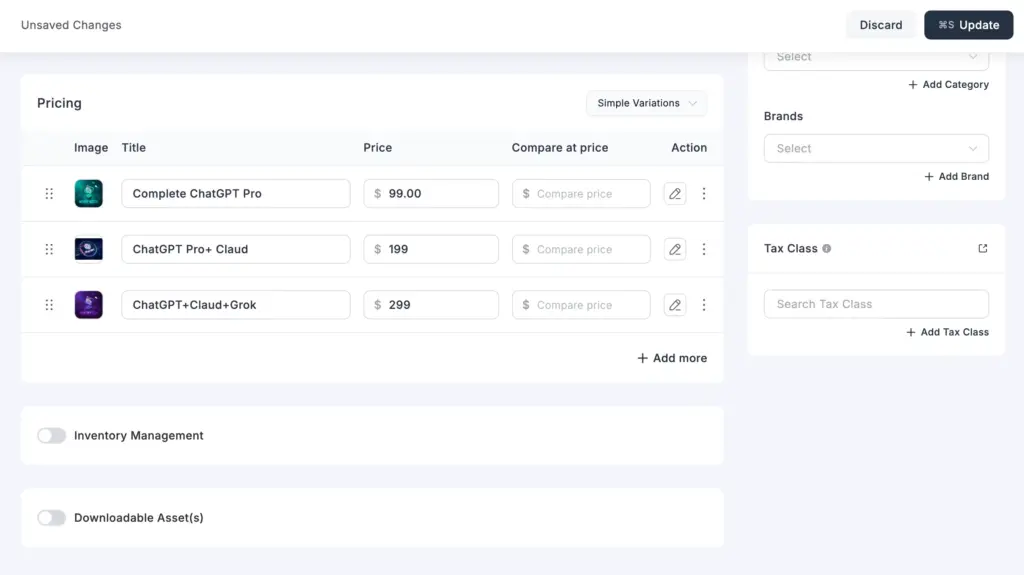
- Feed Title: Give it a descriptive name like “Enroll in Beginner’s Course” or “Add Members to Welcome Space” to keep things organized.
- Add to Spaces: Select the FluentCommunity Spaces, and new customers should join automatically after their purchase.
- Add to Courses: Pick the FluentCommunity Courses to automatically enroll customers into.
- Remove from Spaces / Courses (Optional): If a user upgrades or moves to a new level, you can automatically remove them from older spaces or courses.
- Mark Profile as Verified: Automatically mark paying customers as verified members inside FluentCommunity.
- Remove Access on Refund or Expiration: Enable this to ensure customers lose access if their order is refunded or their subscription expires. It helps you with maintaining fairness and control.
- Event Triggers: Choose when the automation should run. You can trigger actions on:
- Order Paid (Payment or Subscription)
- Order Refunded / Canceled
- Subscription Activated / Renewed / Expired
- Order Shipped or Delivered
- Run on Selected Variations Only (For Variable Products): Apply the rule to specific variations (like “Lifetime Access” or “Annual Plan”) only — perfect for tiered memberships.
Finally, click Create FluentCommunity Feed and toggle Enable this Integration to On. Your automation is now active!

How FluentCommunity Integration Can Benefit
Let’s set up a full-fledged, automated course monetization system. Create paywalls, handle subscriptions, design checkout flows, and even manage student access. Additionally, let’s see how a store can use these product duos for its website.
How to Monetize a Course
Imagine you’re running an online learning platform built with WordPress. You create engaging courses and host your students inside FluentCommunity. But now you want to start monetizing them.
With FluentCart, that entire process becomes incredibly easy. Let’s walk through how you can turn your courses into revenue streams in just a few steps.
Create or Edit Your Course
Start by creating your course (or editing an existing one).
- Head to your course settings.
- Set it to Private to restrict access.
Open the new Paywall tab inside the course editor.
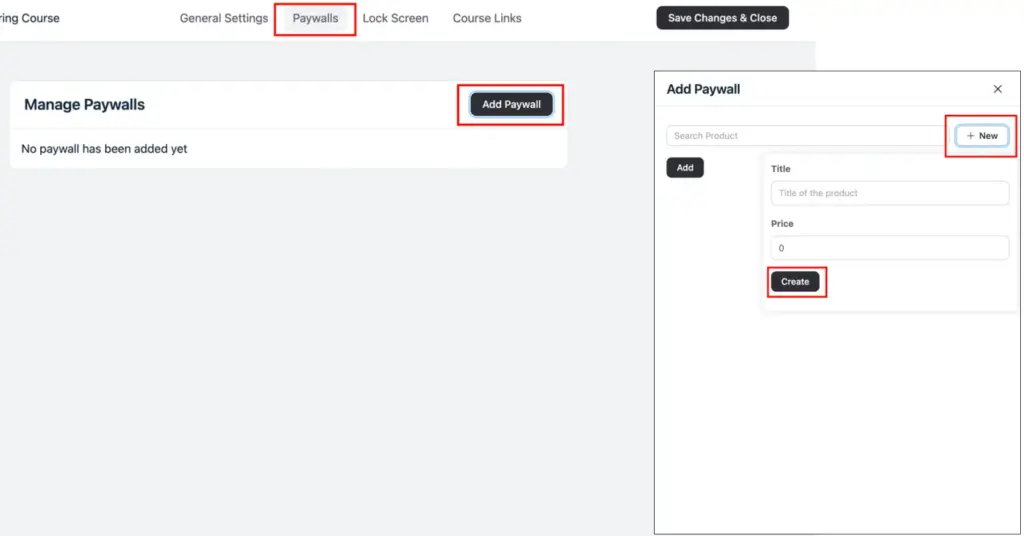
This is where the magic happens. FluentCart connects directly to your course settings. Create a Paywall for your course, and it will be added as a product inside your FluentCart dashboard.
Now set up your pricing structure and display the variations you created. FluentCart allows you to offer multiple purchase options like lifetime, annual, or monthly plans. It allows learners the flexibility to choose what works best for them.
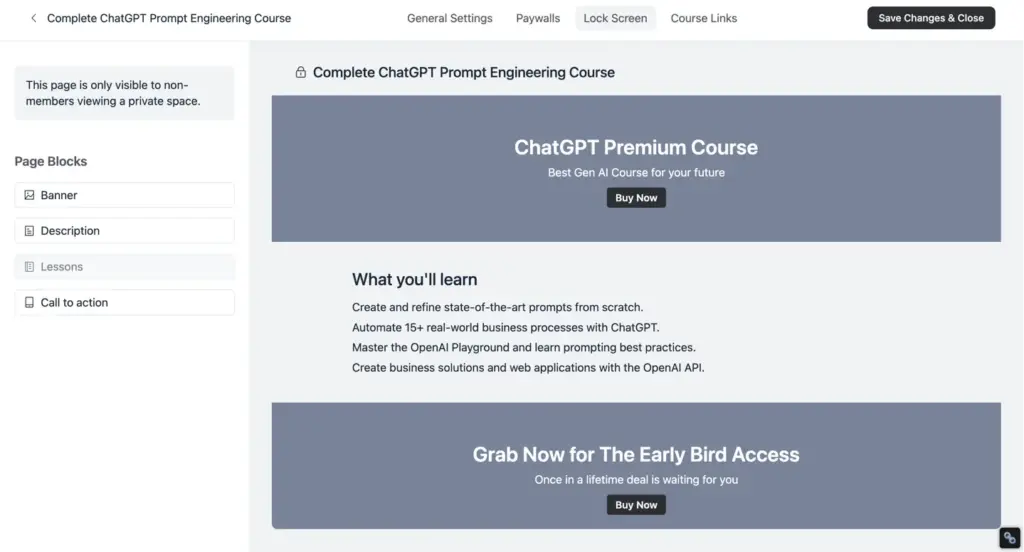
Design the Lock Screen
This is what visitors see before they purchase.
- Add a call-to-action like Unlock this course to start learning!
- Display available pricing plans.
- Customize the colors, fonts, and button styles to match your community theme.
The User Experience: Smooth & Seamless
When a visitor lands on your private course page, they’ll see:
- A course banner with details and description
- Clear purchase options
- A community-styled checkout embedded right inside the page
Key Advantage: The checkout process never redirects users to an external page. Everything, from browsing to checkout, happens within your community, keeping the experience consistent and conversion-optimized.
How a Store Might Use This
Imagine you run a WordPress-based clothing brand with a VIP membership program. Here’s how you can use FluentCart + FluentCommunity together:
- When someone buys your “VIP Membership” product → they’re automatically added to your “VIP Members” space in FluentCommunity.
- If they cancel their subscription → FluentCart removes them instantly.
- When they renew → they stay in the space without any manual updates.
This workflow ensures your membership experience is smooth, professional, and fully automated.
Benefits of FluentCart + FluentCommunity Integration
Instant Access: Customers get access right after payment without waiting or manual execution.
Automation: Automate every aspect and get no more manual adding or removing users.
Consistency: Take your consistency to the next level by automatically handling refunds, cancellations, and renewals.
Scalability: Scalability is not an issue. Easily manage hundreds or thousands of members.
Professional Experience: Give your users a complete professional experience. Segment verified members and clean user flows.
Final Thoughts
If anyone is running a WordPress-based course, membership, or community website, FluentCart + FluentCommunity integration is a complete game-changer.
Automate course enrollment, manage community spaces, and keep everything synced perfectly between your store and your members. You just need a few clicks to execute all these.
Try it today and watch your WordPress community grow and skyrocket on autopilot. For any kind of extended support, please reach out to our FluentCart support team.

WordPress, automation, eCommerce and growth marketing specialist, a Core Contributor and Media Corps member blending storytelling with technology to craft purposeful strategies in SEO, email marketing, and beyond.

Subscribe now
Related Articles and Topics
-
How to Sell WordPress Plugin: Complete Technical Guide
The WordPress ecosystem continues to expand every day. It powers over 61% of the CMS market. Within the…
-
FluentCart: The Story Behind the eCommerce Plugin
FluentCart isn’t just another eCommerce plugin. A an online business system that’s carefully crafted by WPManageNinja, an experienced…


Leave a Reply