

Custom Checkout Page: How to Build One That Converts
Your shopper picked a product, opened the cart, and reached the payment step. Then they left. Nothing broke. The checkout simply asked for one thing too many.
This guide walks you through building a custom checkout page that fits what you sell: what checkout customization covers, the main types of checkout, when a custom build is worth it, the exact steps to do it in WordPress with FluentCart’s checkout builder, and the habits that keep it converting after launch.
TL;DR
What is a Custom Checkout Page?
A custom checkout page is a checkout you have changed from the platform default so it matches your brand, asks only for the information you need, shows the payment methods your buyers use, and follows a flow that suits your products. It covers both how the checkout looks and how it behaves.
Most platforms ship a generic checkout on purpose, because it has to work for every kind of store. Think of a shop selling one downloadable template. The default form still asks for a shipping address and a phone number. None of that helps the sale.
Visual customization vs Functional customization
Checkout customization splits into two jobs.
Visual customization is the look: logo, colors, fonts, and button text. The checkout should feel like the same store the shopper was browsing a minute ago.
Functional customization is the behavior: which fields appear, what payment methods show up, whether guests can buy, and where the summary sits. Most conversion gains live here.
Types of Checkouts
There are several types of checkout, and each one suits a different buying moment. The type you pick sets the ceiling for how much friction a shopper feels. Here are the common types of checkout you can build on a custom checkout page.
One-page Checkout
Contact details, address, payment, and the order summary all sit on one screen. It works for most stores, especially on mobile, because shoppers see the whole task at once.
Modal (popup) Checkout
The checkout opens in an overlay on top of the page the shopper is already on. It fits single-product pages, landing pages, and quick buys where sending someone to a new page feels like a detour.
Multi-step Checkout
The purchase splits into stages, such as details, shipping, then payment. It helps when you collect a lot of information, like B2B orders. The trade-off is more screens.
Embedded or In-line Checkout
The checkout lives inside a page you designed, such as a sales page or a pricing table. Buyers pick products and pay without leaving the content that convinced them.
Checkout links and Payment links
A direct link that drops the buyer straight into checkout with the product already loaded. These work well in emails, social posts, and invoices for custom work.
Guest checkout
Buyers pay without creating an account. It is more a setting than a layout, but forced account creation is a common reason buyers walk away.
Express checkout
Digital wallets and saved payment methods cut typing to a few taps. They suit repeat customers and mobile shoppers most.
| Checkout type | How it works | Screens / steps | Best for | Not ideal for | Mobile fit | Setup effort | Main friction it removes | Watch-outs | FluentCart support (tier) |
|---|---|---|---|---|---|---|---|---|---|
| One-page checkout | Contact, address, payment, and order summary on one screen | 1 page | Most stores; single-product stores; repeat buyers; mobile traffic | Orders that need a lot of extra information (custom or B2B quotes) | High | Low | Long, multi-screen forms | A long single page can still feel heavy; trim fields first | Yes, default checkout (Free) |
| Modal (popup) checkout | Checkout opens in an overlay on the current page | 1 overlay | Landing pages; single-product pages; quick or impulse buys | Large carts with many items to review | Medium to high | Low | Page redirects that break buying momentum | Test the overlay on small screens; keep fields short | Yes, modal / instant checkout (Free) |
| Multi-step checkout | Purchase split into stages such as details, shipping, then payment | 3 to 5 steps | B2B orders; complex or personalized products; heavy data collection | Impulse buys; low-cost items; mobile-first stores | Medium | Medium | Overwhelming forms (information shown in chunks) | Every extra step is another exit point; A/B test before committing | Not listed in FluentCart sources (one-page is the native layout) |
| Embedded / inline checkout | Product selection and payment sit inside a page you designed (sales page, pricing table) | 0 extra pages | Sales pages; course and software offers; pricing pages | Stores whose buyers browse and compare many products | High | Medium | Leaving the persuasive content to pay | Standard cart layout settings may not apply to the inline path | Yes, inline checkout with custom product selection (Pro) |
| Checkout / payment links | A shareable URL that opens checkout with the product or order preloaded | 1 click to checkout | Email campaigns; social posts; invoices for custom work; renewals | Shoppers who want to browse first | High | Low | Product-page and cart steps between click and payment | Links must stay current when prices or products change | Yes, payment links incl. guest-accessible {{order.payment_link}} (Free) |
| Guest checkout | Buyers pay without creating an account (a setting, not a layout) | No account step | First-time buyers; one-off purchases; privacy-conscious shoppers | Stores that need accounts at purchase (some memberships or licensed products) | High | Low | Forced account creation | Offer account creation after the order; plan how guests reach downloads or orders later | Yes, guest and logged-in checkout (Free) |
| Express checkout (wallets / saved methods) | Digital wallets or a saved card/PayPal fill payment details in a few taps | Few taps | Repeat customers; mobile shoppers; subscriptions and renewals | Buyers without a wallet or saved method | Very high | Low to medium | Typing card and address details | Accidental purchases are easier; saved methods need customer consent | Stripe wallets (Free); saved cards and PayPal accounts (Pro) |
*Table Powered by NinjaTables
When to Use a Custom Checkout
Use a custom checkout page when the default form asks for information you don’t need, hides costs until the last step, doesn’t match your brand, or can’t handle how you sell. If any one of these is true for your store, the default is costing you orders.
Here is the honest test. Open your own checkout on a phone and buy something. If you pause anywhere, your customers pause too.
A custom build pays off most in these situations:
The stakes are not small. Baymard Institute puts the average documented cart abandonment rate at 70.22%, based on 50 studies. Among shoppers who left during checkout, 18% said the site wanted them to create an account, and 17% said the checkout was too long or complicated . Both are checkout problems you can fix yourself.
The full picture goes beyond checkout though. Our guide on how to reduce cart abandonment covers recovery emails, pricing clarity, and shipping offers.
How to Customize a Checkout Page in WordPress
To customize a checkout page in WordPress with FluentCart, trim the built-in fields in settings, arrange the checkout block in the editor, set up how payment methods appear, add business and tax fields if you sell B2B, turn on spam protection, and add upsells. Developers can add custom inputs through checkout hooks.
Here is how each step works in practice.
Step 1: Trim the checkout fields
Go to Settings > Checkout Fields.
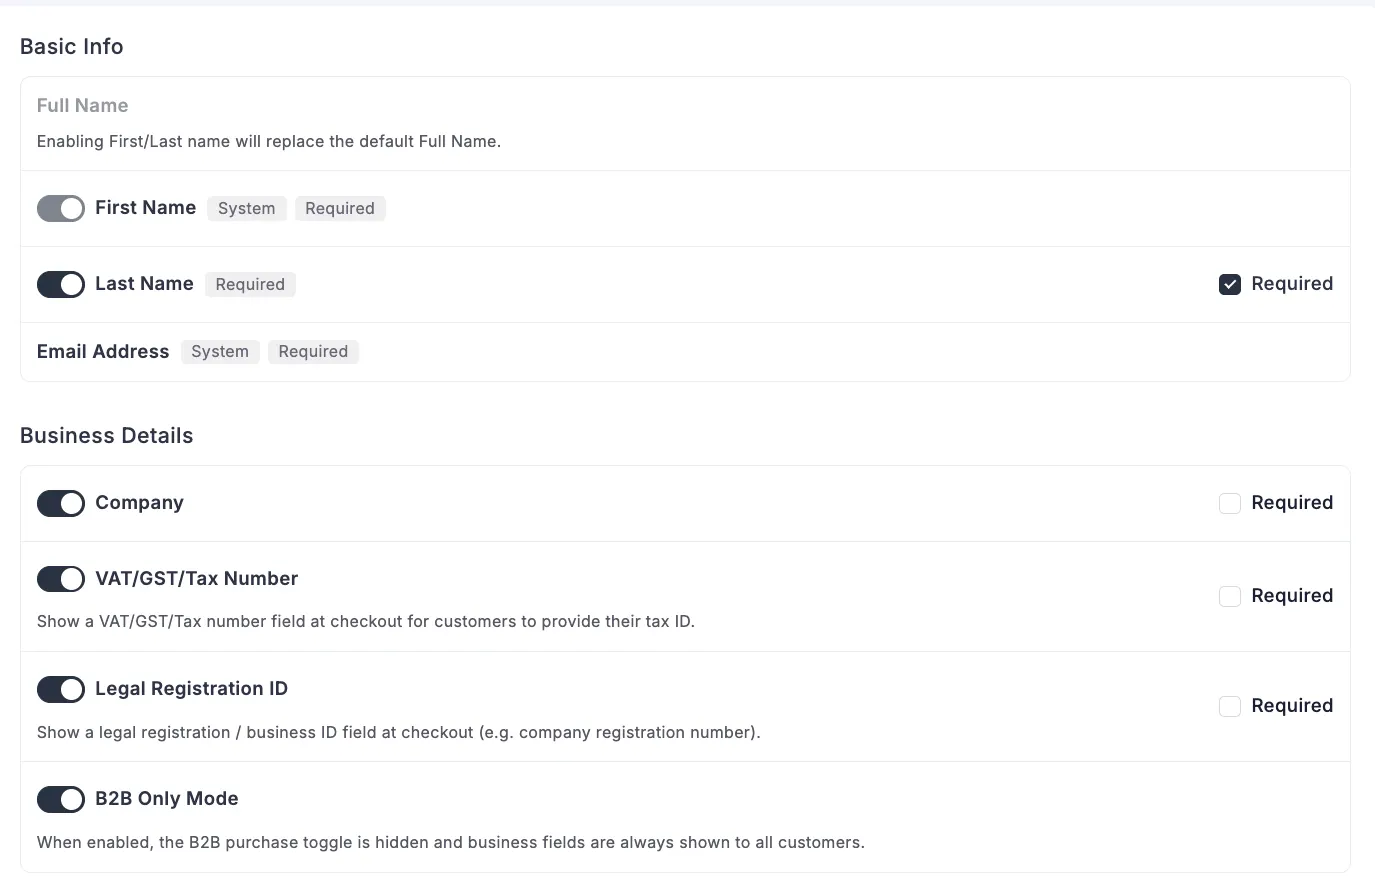
You can turn fields on or off and mark them required or optional. The list covers name fields, billing address, shipping address, business details, and the terms agreement.
Start with the easy wins. Use one full-name field unless you need first and last names. Drop the phone field unless your courier needs it. Turn on the terms checkbox only if your store needs one.
Email and name can’t be removed, since the store needs them to create the order. The checkout fields documentation walks through each option. Digital stores get a bonus: order notes stay hidden for digital-only carts by default.
Step 2: Arrange the checkout block
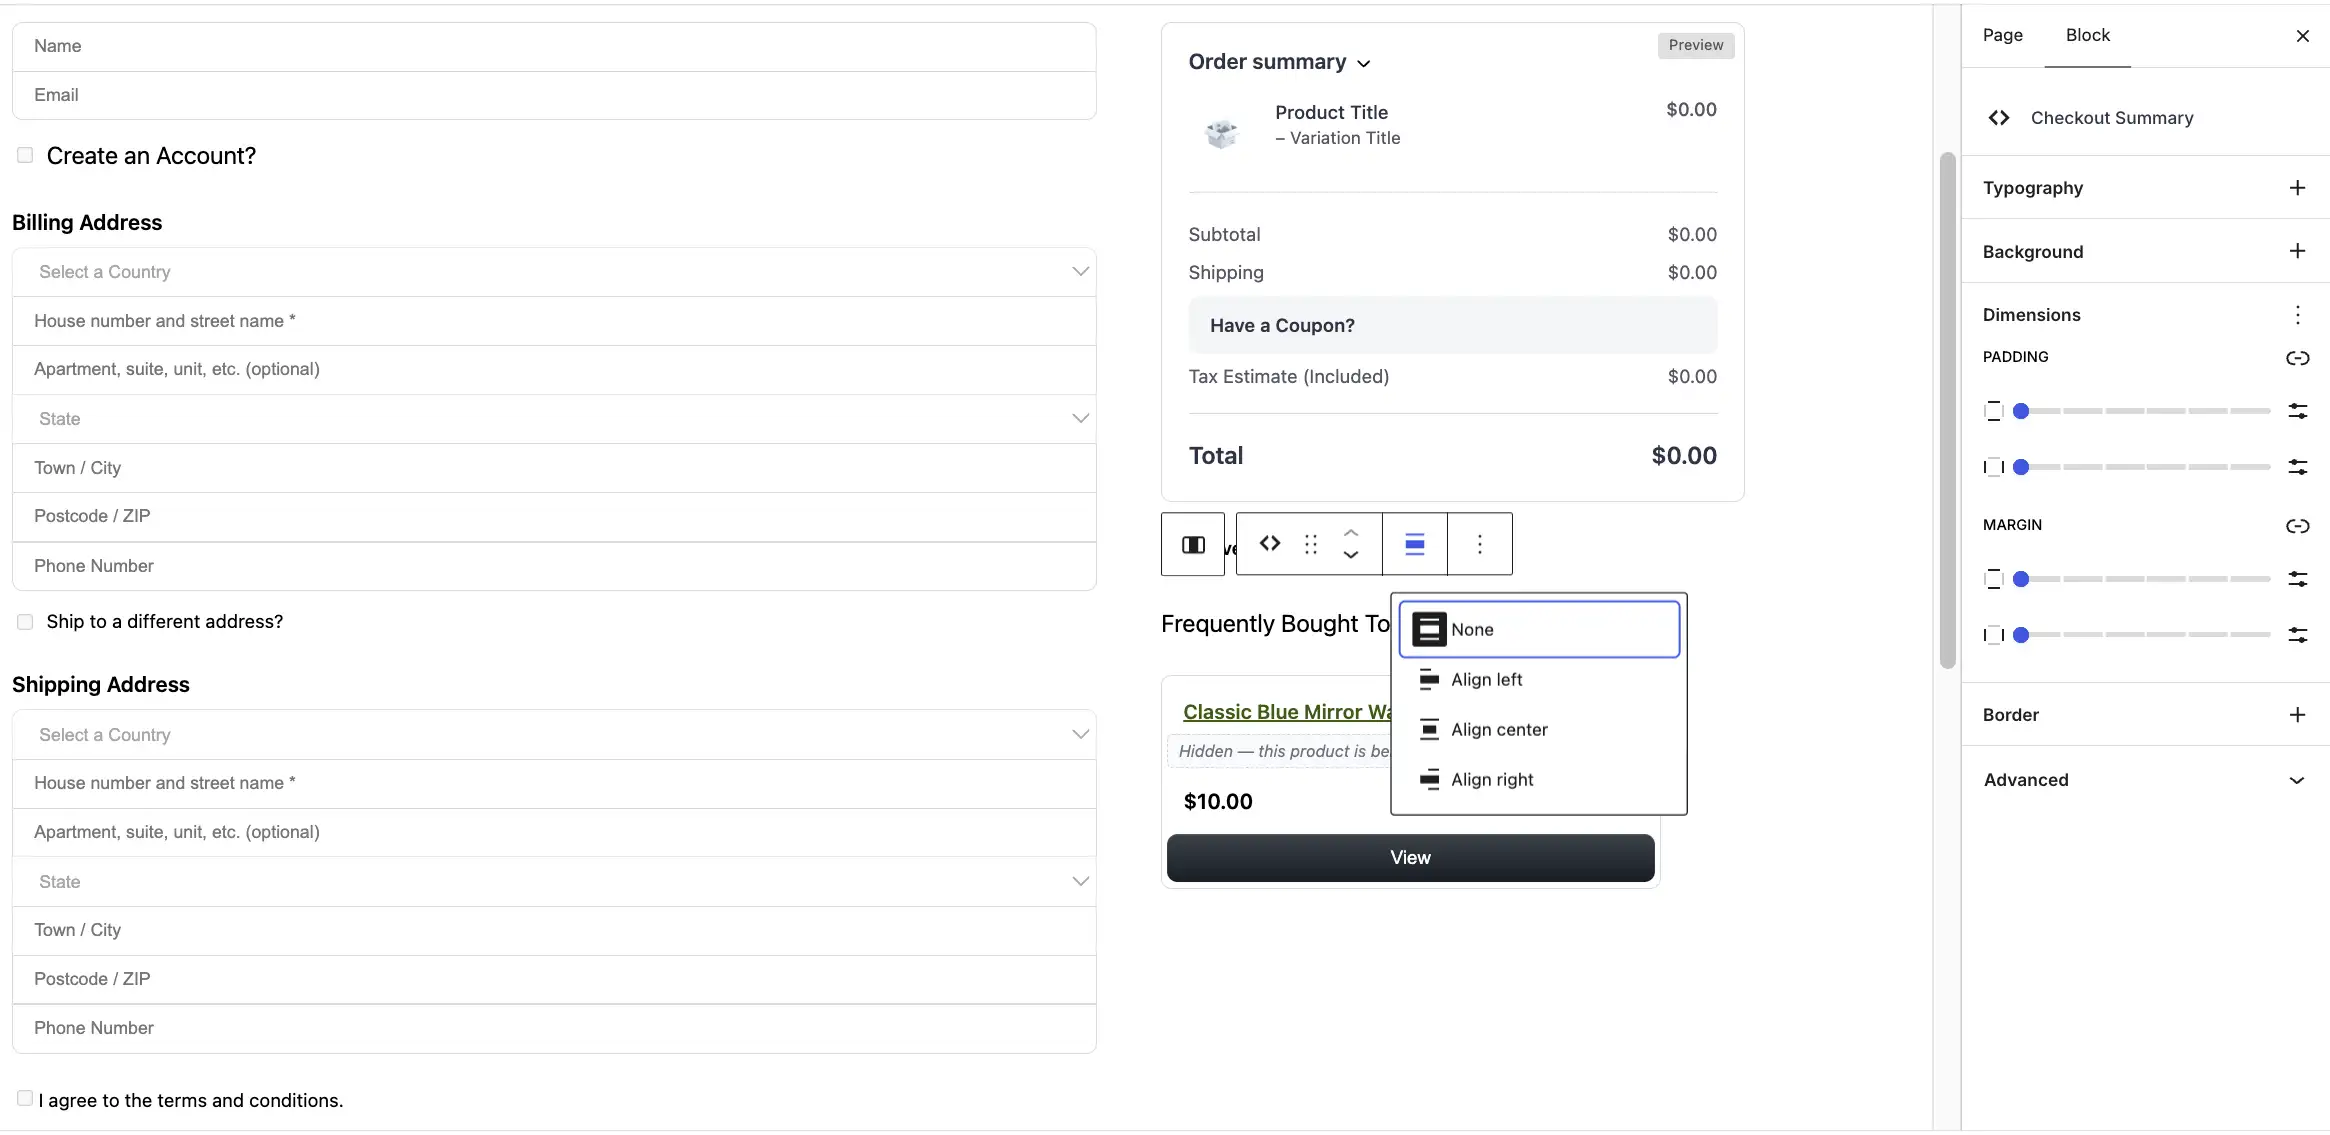
The FluentCart checkout is a Gutenberg block made of smaller inner blocks. You can move, remove, or restyle each part:
You can change the columns, headings, and helper text too. Field labels come in three styles: docked, floating, or placeholder only. Some blocks only show when they apply, so the shipping selector stays hidden for a digital-only cart.
Building with Elementor, Bricks, or Divi? The free FluentCart add-ons give you a dedicated checkout widget, with controls for column widths, section order, a sticky summary, and field styling in Elementor.
Step 3: Set up payment methods
Under payment settings, you can reorder gateways and set a custom label, logo, and checkout instructions for each one. Put the method most of your buyers use at the top.
Stripe and PayPal ship in the free plugin, and Stripe supports digital wallets for faster mobile payments. Cash on delivery and offline payments are free too. Pro adds Paddle, Mollie, and Authorize.Net, and official add-ons cover gateways like Razorpay, Square, and Mercado Pago. Our explainer on choosing a payment gateway helps if you are still deciding.
With Pro, returning buyers can pick a saved card or PayPal account at checkout and tick a box to save a new one.
Step 4: Add business and tax fields
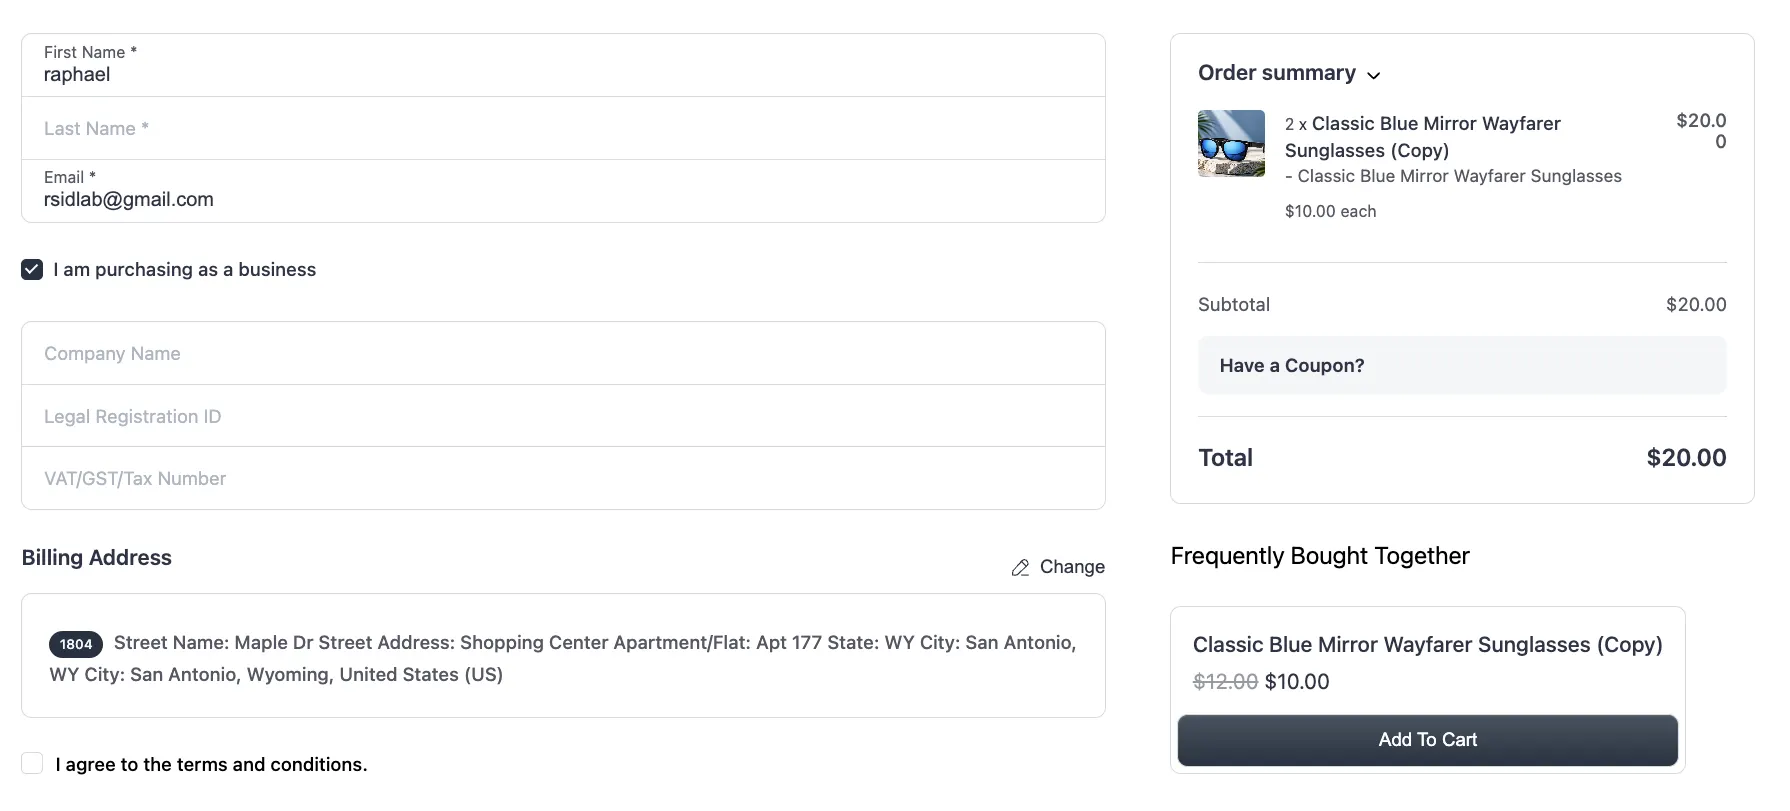
If you sell to companies, turn on business details. Shoppers then see an “I am purchasing as a business” checkbox. Ticking it reveals the company name, VAT or tax number, and business ID fields.
Selling only to businesses? Switch on B2B-only mode. The checkbox disappears and the business fields always show. For EU stores, FluentCart can validate VAT numbers and apply reverse charge for B2B buyers, all in the free plugin.
Step 5: Protect the checkout
FluentCart includes Cloudflare Turnstile for checkout, with an invisible mode that doesn’t show real buyers a puzzle. Duplicate order protection stops a double click from creating two orders.
Step 6: Add upsells and custom product selection
Two Pro features change what a checkout can sell:
Step 7: Add custom inputs with hooks (for developers)
The settings screen manages a set list of fields. It is not a drag-and-drop field builder, and creating an ACF field group won’t add fields to checkout on its own. To collect something new, like a gift message or a delivery date, you write a small extension.
The route has four parts:
Placement matters here. An input outside the checkout <form> won’t be submitted, and file uploads need extra work. The FluentCart developer hub lists the hooks, REST API, and template overrides.
Best Practices for a Custom Checkout Page
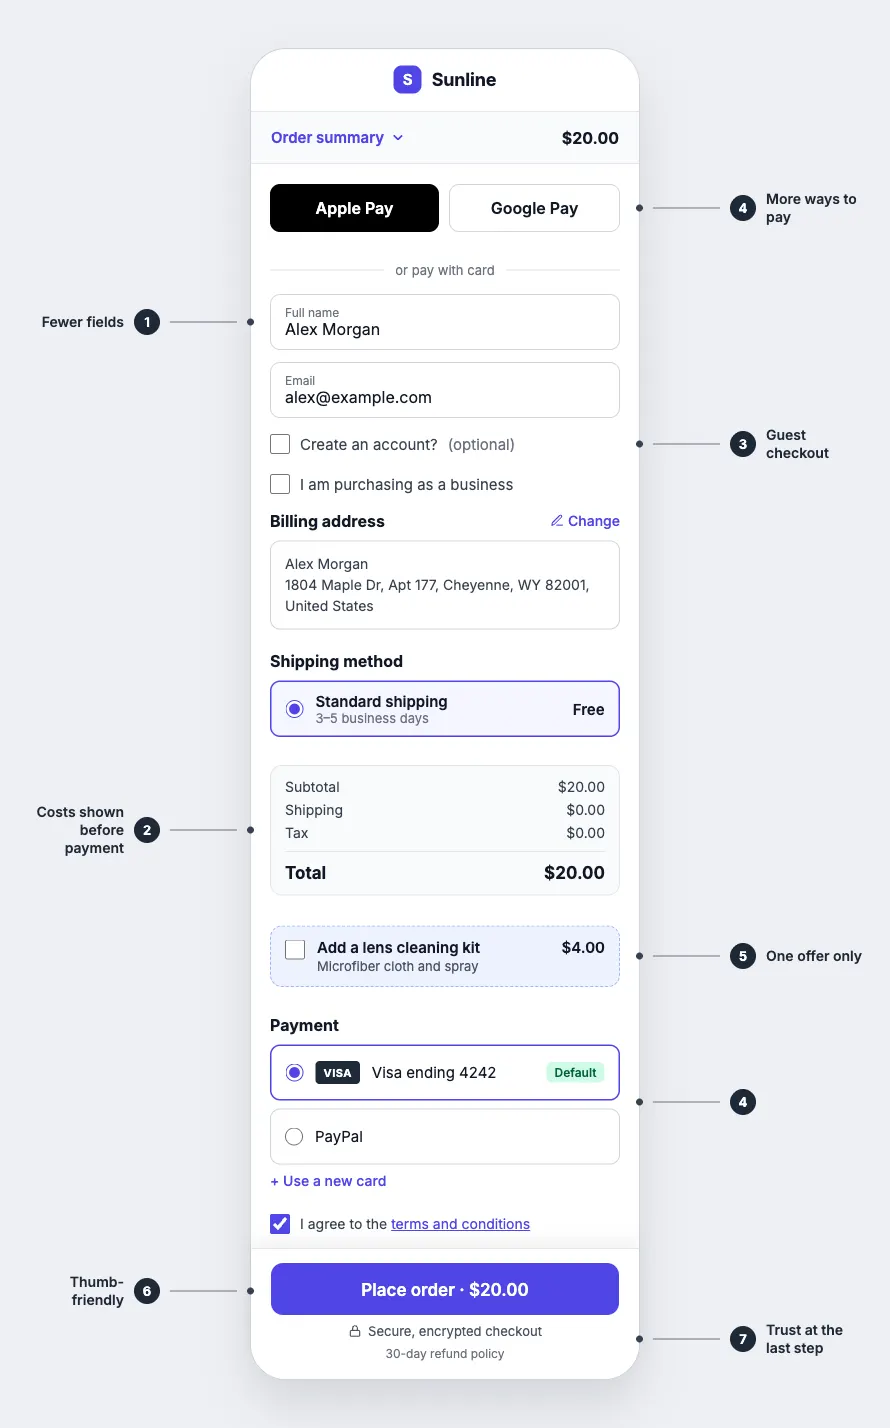
The best custom checkout page asks for as little as possible, shows every cost early, accepts the payment methods your buyers expect, and works well on a phone. Then you measure it and change one thing at a time.
These habits show up in checkouts that keep converting:
Baymard also estimates that the average large ecommerce site could raise its conversion rate by 35.26% through better checkout design. That gain comes from small fixes added together.
Tools Best Suited for Checkout Customization
The best tool for checkout customization depends on how much control you need. Hosted checkout tools launch fast but limit layout and data. SaaS store builders offer settings panels with fixed limits. A self-hosted WordPress plugin gives you full control over fields, layout, and code.
Here is how the main options compare.
How Checkout Customization Compares Across Tools
Every major ecommerce platform lets you change the checkout, but they split on three things: how much you can do without code, whether the change is built in or needs an app, and what that app or plan costs. Here is how six platforms describe their own checkout customization options.
Before you pick a tool, it helps to see what each platform’s own documentation says. The table below sums up checkout customization on each one, based on its official docs and app store listings.
| Platform | Ease of customization | Native or third-party | Extra cost to go further |
|---|---|---|---|
| WooCommerce | Checkout block is editable in the WordPress editor. New fields need PHP or an extension | Layout is native. Code-free field editing needs an extension | Official field editor extensions list at $49 per year each, plus hosting |
| Shopify | No-code editor for logo, colors, and fonts on every plan | Branding is native. Custom blocks inside checkout steps need Shopify Plus | Shopify Plus starts at $2,300 per month on a three-year term |
| BigCommerce | Checkout settings cover guest checkout, coupon field, order comments, and branding | Settings are native. Larger changes need the Checkout SDK and a developer | Developer time. Custom checkouts stop getting automatic updates |
| Shopware | Template (Twig) and plugin work for most changes | One-page checkout and extra fields mostly come from Store extensions | Extensions rent monthly, for example one-page checkout from €15 per month |
| PrestaShop | Multi-step by default. Native one-page checkout arrived in version 9.2 | Field managers and custom fields come from paid modules | One popular one-page checkout module lists at $79.99 (on sale at $63.99), with paid support extensions |
| Lightspeed eCom | Pick multi-step, one-page, or one-step from the admin | Layout and branding are native. Field options depend on which Lightspeed eCom you run | Extra checkout fields app is $10.95 per month (old checkout only) |
*Table Powered by NinjaTables
FluentCart
FluentCart builds checkout control into the core. The free plugin covers one-page and modal checkout, configurable fields, block-based layout, payment links, guest checkout, EU VAT, and Turnstile. Pro adds order bumps, inline checkout, saved payment methods, and conditional pricing. There’s no transaction fee on either plan.
No tool fixes a checkout on its own. The tool decides how much you can change. You decide what to change.
WooCommerce
WooCommerce ships a block-based checkout you can rearrange in the WordPress editor. Adding a new field, like a delivery note, goes through the Additional Checkout Fields API, which needs WooCommerce 8.9 or later and PHP code. It supports text, select, and checkbox fields in three places: contact, address, and order.
For code-free field editing, you need an extension. The official Checkout Field Editor costs $49 per year, and its listing says it works with the legacy checkout only. A conditional fields extension at the same price works with checkout blocks.
Shopify
Shopify gives every plan a no-code checkout editor for your logo, colors, and fonts, plus express payments. The catch sits inside the checkout steps. Shopify’s developer docs say checkout UI extensions for the information, shipping, and payment steps are “available only to stores on a Shopify Plus plan.”
That means a gift message field or an in-checkout upsell needs Plus. Shopify Plus starts at $2,500 per month on a one-year term, or $2,300 per month on a three-year term, before any variable platform fee.
BigCommerce
BigCommerce’s Optimized One-Page Checkout has a long settings list: guest checkout rules, a coupon field toggle, order comments, a terms checkbox, reCAPTCHA, and a checkout logo, fonts, and colors through Page Builder.
Past that, you build a custom checkout with the Checkout SDK and a hosted script. BigCommerce notes that custom checkouts “no longer receive automatic updates” and may affect PCI compliance. Its developer docs also say the SDK changes the interface but “does not let you introduce new behavior,” such as a new payment method.
Shopware
Shopware’s Community Edition is free, while paid editions start at €600 per month (Rise) and €2,400 per month (Evolve), priced partly on sales volume. Checkout changes usually mean editing Twig templates or installing Store extensions.
Those extensions rent by the month. One-page checkout listings start at €15 per month, a custom checkout checkbox costs €8.99 per month, and delivery instructions start at €1.58 per month. Three small checkout tweaks can cost around €300 a year on their own.
PrestaShop
PrestaShop uses a multi-step checkout by default. Version 9.2 added a native one-page checkout module, but it stays off until a merchant turns it on, according to the PrestaShop developer docs.
Custom fields, field ordering, and column layouts mostly come from third-party modules. One popular one-page checkout module lists at $79.99, with updates for one year and longer support sold separately.
Lightspeed eCom
Lightspeed eCom lets you choose a multi-step, one-page, or one-step checkout from the admin, and the new checkout adds color, font, and logo controls. Multi-step checkout and A/B testing are only available on the old checkout, according to Lightspeed’s help center.
Fields depend on which Lightspeed eCom you run. The version managed through Lightspeed Retail POS has native custom checkout fields with optional surcharges. On the standalone eCom, the Extra Registration Fields app adds checkout fields for $10.95 per month, but only on the old checkout.
Easier vs Cheaper vs More Control: How They Stack Up on Paper
Going only by what each platform publishes, the trade-offs look like this:
The pattern is hard to miss. The platforms that are easiest to start with charge the most for deep changes. The cheapest ones ask you to add code or plugins.
FluentCart tries to close that gap. Field settings, a block-based layout, one-page and modal checkout, payment links, and guest checkout all ship in the free plugin, with no transaction fee on any plan. Here is how to set it up.
Frequently asked questions
Can I customize a checkout page without code?
Yes. In FluentCart, you can turn fields on or off, rearrange the checkout block, change label styles, reorder payment methods, and add business fields from the dashboard and editor. Code is only needed for brand-new inputs or custom business logic.
Is a one-page checkout better than a multi-step checkout?
For most stores, yes. One page shows the whole task, which feels shorter, especially on mobile. Multi-step checkouts can work when you collect a lot of information, such as B2B or custom orders. Test both if you are unsure.
Can I add ACF fields to a FluentCart checkout?
Not automatically. FluentCart has no native ACF checkout integration. You can still use ACF data in a custom extension, but you need to render, validate, and save the field yourself through checkout hooks mentioned above.
Conclusion
Remember the shopper from the start, the one who left at the payment step? Odds are they didn’t leave because of your product. They left because of a field, a hidden fee, or a forced account.
You now know what to look for. Pick the checkout type that fits how you sell. Cut fields first, show costs early, and let people pay the way they want. Then measure every change.
Want to see what’s included before you start? Compare FluentCart Free and Pro and pick the plan that covers your checkout.

Rasel leads the marketing function at FluentCart, driving both high-level strategy and ground-level execution across the product’s growth engine. He plays a central role in defining how FluentCart is positioned, how it enters the market, and how it evolves based on user behavior and feedback. His responsibilities span go-to-market planning, funnel architecture, conversion strategy, and narrative development. He works across teams to ensure that product decisions, marketing efforts, and customer experience stay tightly aligned.

Subscribe now
Related Articles and Topics
-

What Is a Digital Download? (Plus How to Sell Your Own)
A digital download is a file you buy online and keep on your device, like an ebook or…
-

FluentCart Shipping Integration: Live Rates and Labels, Coming Soon
FluentCart Shippo integration: live carrier rates and labels, coming soon.
-

Tools to Make Your Black Friday Sale a Success: The Complete 2026 Guide for FluentCart Stores
The best Black Friday tools for FluentCart stores cover offers, checkout, cart recovery, and reporting. Get the setup…




A great addition for this would be the ability to create different specific pages for products or categories of products. For example, I currently use a sales funnel plugin to create a custom checkout page for raffle ticket items where I only need email and phone from the customer and brand the background and colors to the raffle branding. I have certain checkouts for subscriptions & memberships, where we need other information from the customer or need to upsell/order bump other certain items if we can. If you had this functionality in Fluent Cart that would be two plugins I could get rid of. The free and paid versions of the other plugin and have the simplicity of central management under Fluent Cart and know that they would work as developed, rather than dealing with third part support. If you let me build these using templates for checkout, upsell, thank you, order bump, etc. based on Divi and other builders in a graphical environment similar to Fluent CRM automations, that would be the ultimate. Sorry, wishful thinking… Thank you for listening and keep up the great work!