WordPress Cache: Why Your Site Hides Updates and How to Clear It for Good
Everyone knows WordPress caching makes your site faster. True. What nobody warns you about is what happens when you update something and the cache does not.
A store owner bumps a product price from $8.99 to $9.99. Supplier raised costs, margin was not there anymore. They update the backend, save, refresh the product page. It shows $9.99. Done. They close the tab and move on.
What they do not know is that their visitors are still seeing $8.99.
The cache had already saved a copy of the old price. The server updated, but the version being served to the public did not. Every customer landing on that page sees $8.99, clicks add to cart, and then hits $9.99 at checkout. They do not think “the product page was cached.” They think the store lured them in with one price and switched it at the last second. Most of them leave. Some leave a review. The store owner sees checkout conversions dropping and has no idea why.
That is a WordPress cache problem. And it is the kind that costs real money before anyone realises it is happening.
Clearing the WordPress cache is a thirty second job once you know where to look. Here is exactly how.
TL;DR
What a WordPress cache actually is
A WordPress cache is a saved copy of your finished page, stored so the server can hand it over instantly instead of rebuilding it from scratch on every visit.
Without caching, every page request triggers the same sequence: PHP runs, the database gets queried, HTML gets assembled, then shipped. Do that work once, save the result, and every subsequent visitor gets the pre-built version. That is the whole mechanism.
One thing most guides skip: out of the box, WordPress does not run full-page caching. It has some lightweight object caching for database queries, and that is about it. The real performance layer comes from a plugin or from caching built into your hosting. One commenter on Reddit put it plainly when someone suggested installing a plugin just to flush a cache that was never there: “adding one just to clear caching that doesn’t exist is ridiculous.”
So before hunting for a clear button, ask: what is actually doing the caching on your site?
How to clear your WordPress cache
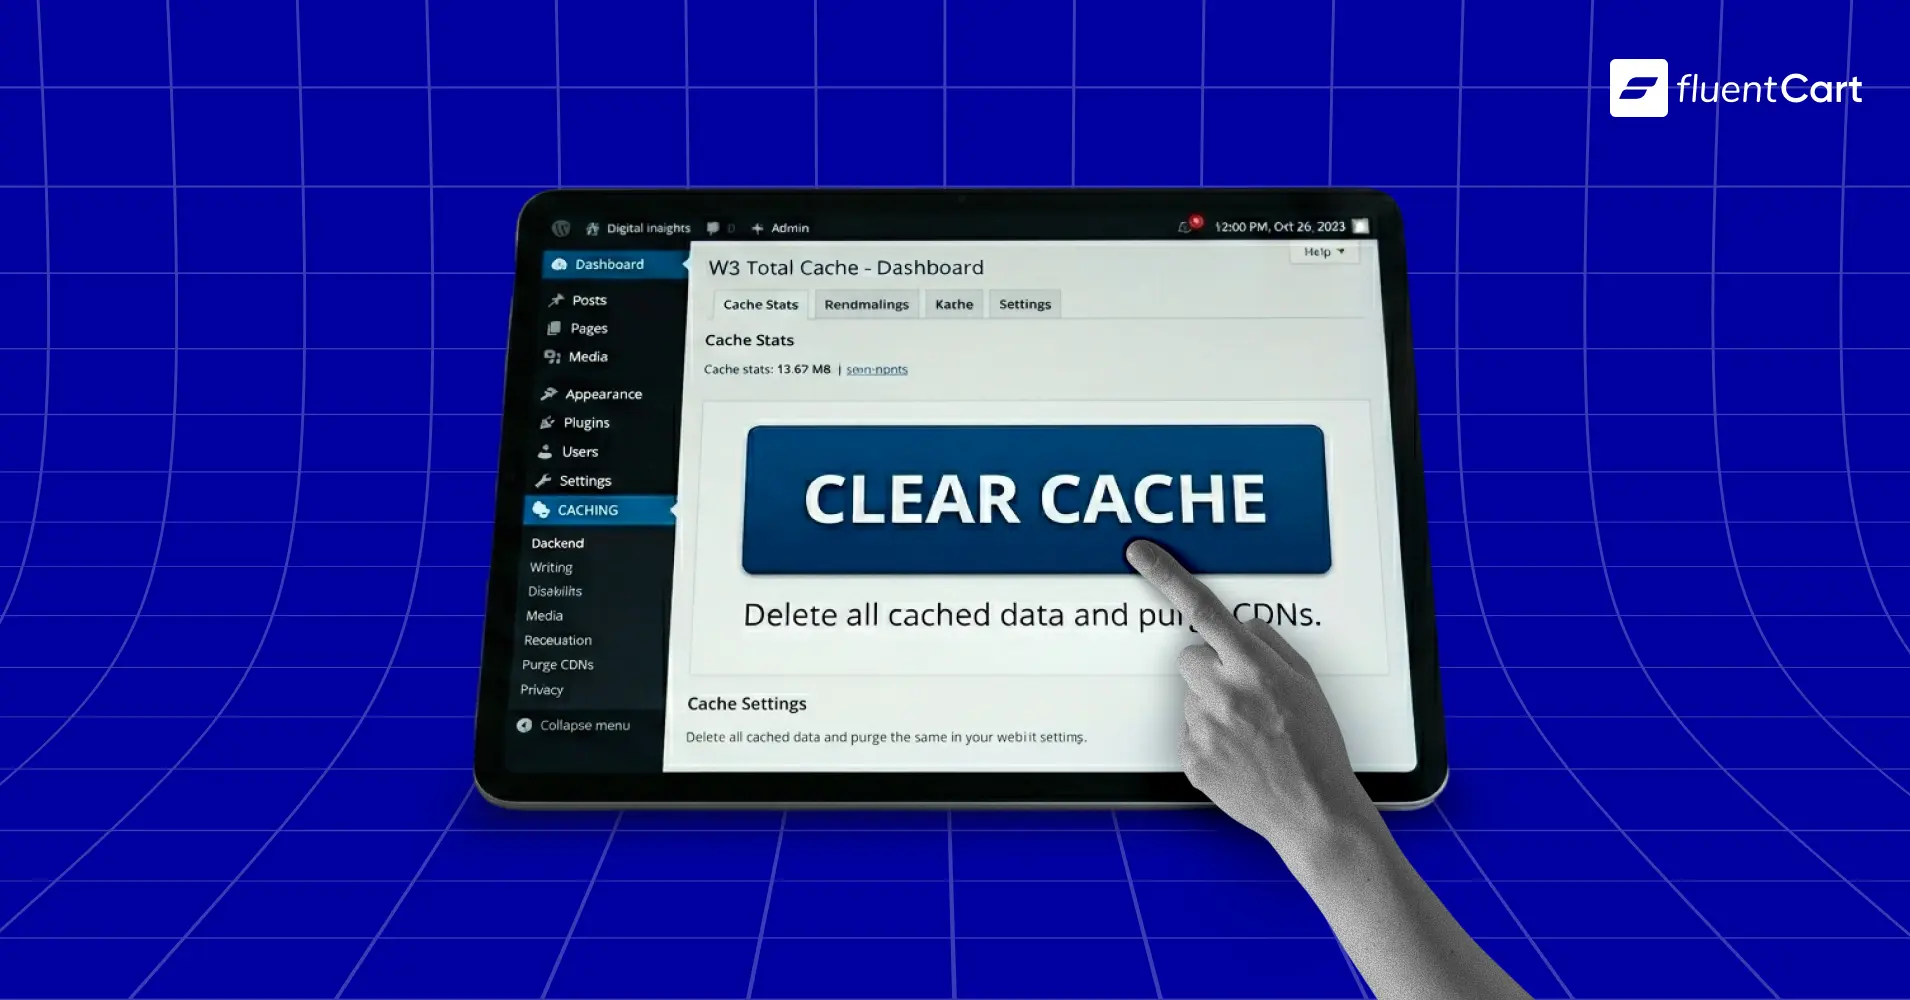
Most of the time this is a one-click job. Here is how to clear WordPress cache across each layer, starting with the fastest method.
Through your caching plugin
Almost every plugin drops a shortcut into the admin bar at the top of your WordPress screen. Look for “Clear Cache” or “Purge All” and it is almost always sitting right there.
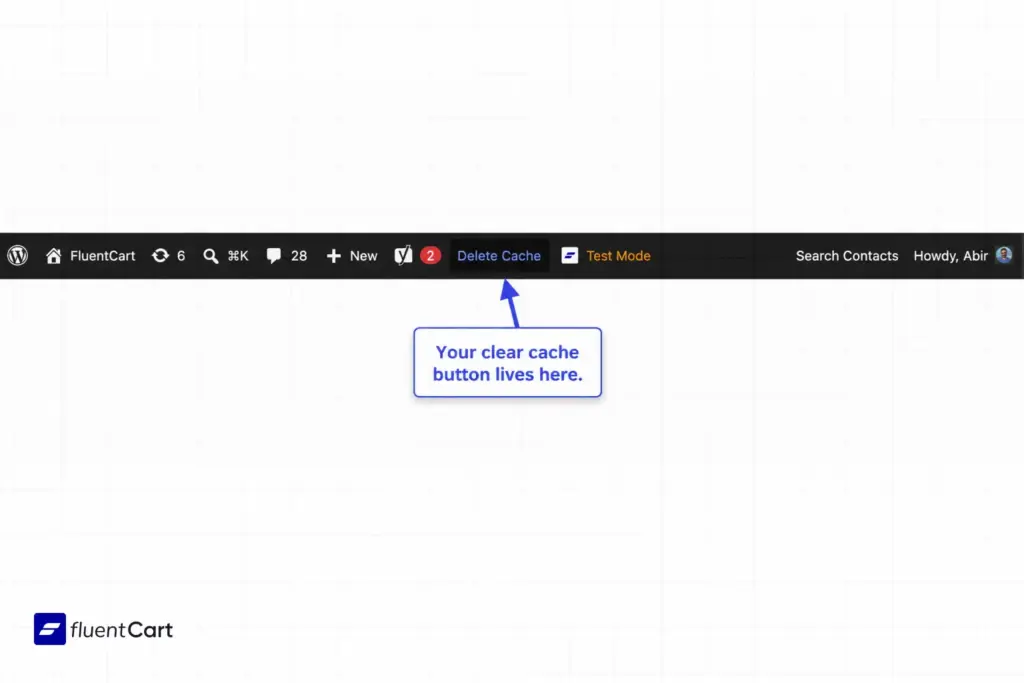
- WP Rocket: Settings, then click Clear Cache.
- WP Super Cache: Settings, then Delete Cache.
- WP Fastest Cache: Delete Cache in the admin toolbar, then Clear All Cache.
- LiteSpeed Cache: Purge All in the toolbar, or through the LiteSpeed menu.
Through your hosting dashboard
Managed hosts handle caching at the server level and give you their own button for it.
- WP Engine: WP Engine tab in the sidebar, Caching, then Clear All Caches.
- WordPress.com: Settings, Server, Caching, then Clear all.
- cPanel or LiteSpeed hosts: LiteSpeed Web Cache Manager, then Flush All.
WordPress clear cache without plugin
If there is no caching plugin on the site, the cache probably lives at the host level. The clear button will be in your hosting control panel, not inside WordPress.
For a last resort situation where a caching bug has locked you out of the dashboard entirely: connect via FTP using a client like FileZilla, navigate to /wp-content/, open the cache folder, and delete the files inside it. Leave the folder itself intact. Only empty the contents.
Do not forget the browser
After clearing any server-side cache, do a hard refresh on your own browser. Ctrl plus F5 on Windows, Cmd plus Shift plus R on Mac. Otherwise your own device keeps serving the past version and the fix appears to have done nothing.
Where the WordPress cache actually lives
This is where things break for most people. They clear one layer, see no change, and assume the fix failed. It did not. They cleared the wrong layer.
Your content can sit in four places at once.
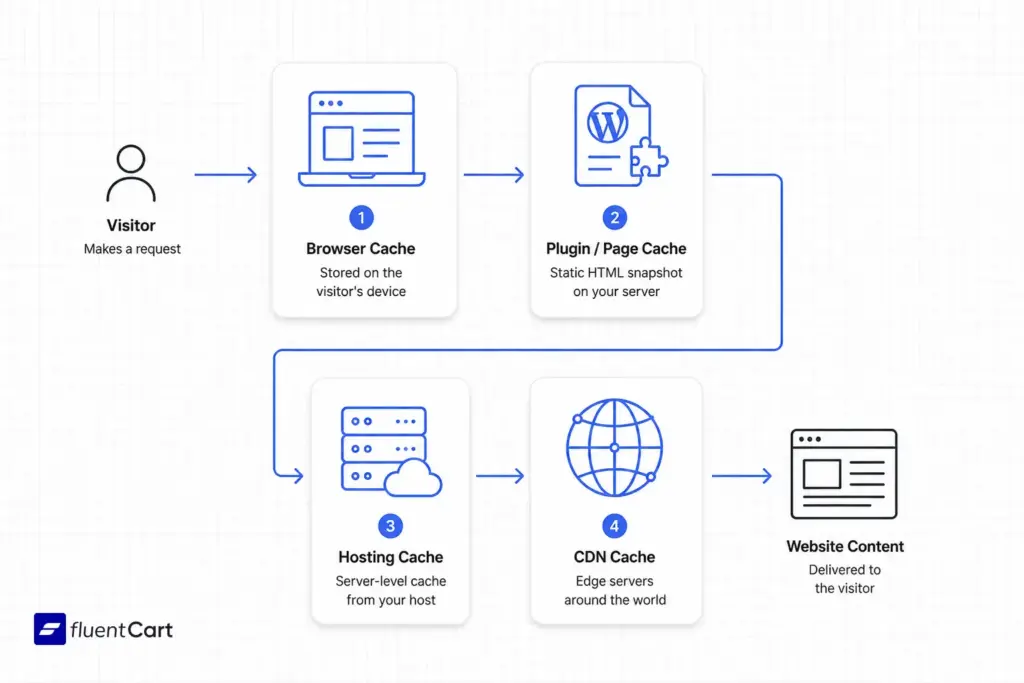
Browser cache. On the visitor’s own device. Their browser saves a local copy to speed up return visits, which is why you can sometimes see the old version on your phone even after the server cache is cleared.
Plugin or page cache. On your server, created by your caching plugin. This is the main one. It serves a static HTML snapshot to logged-out visitors.
Hosting cache. Many managed WordPress hosts add server-level caching on top of or instead of a plugin. This sits between the plugin cache and the visitor.
CDN cache. If you use Cloudflare or a similar network, copies of your site live on edge servers around the world. This is usually the last layer a request passes through before it reaches the visitor’s screen.
Clear them out of order and stale content keeps leaking through. The CDN happily serves an old page even after your plugin and hosting caches are completely fresh.
One thing worth knowing about CDN caches specifically: most let you set an automatic expiry interval, called a TTL or Time to Live. Rather than clearing manually every time, you tell the CDN “expire cached copies every 12 hours” or every 24, and it handles the purge on a schedule without you touching it. A 24-hour TTL is a reasonable default for most content-driven sites. Tighten it on pages that change frequently. Loosen it on assets like product images that rarely change.
The mystery of “it shows for me but not for them”
When you are signed into wp-admin, your caching plugin typically skips the cache entirely and serves you the live, freshly built page. Your visitors, who are not logged in, get the saved copy from before your last edit. You are both seeing real versions of the site. You are just seeing different ones.

Device mismatches work the same way. Your phone holds its own browser cache, independent of the server. Clearing the server cache does not touch it. A hard refresh on the device does, as covered in the clearing steps above.
Picking the best WordPress cache plugin
If you already have a plugin installed, the clearing steps above have you covered. If you are still deciding which one to use, here is how the main options compare. No single plugin wins for every setup.
| Plugin | Cost | Best for |
|---|---|---|
| LiteSpeed Cache | Free | Sites on LiteSpeed hosting. Talks directly to the server. |
| WP Rocket | Premium | Beginners who want it working on activation. Sensible defaults out of the box. |
| WP Super Cache | Free | Simple, reliable setups. Backed by Automattic. |
| WP Fastest Cache | Free | Lightweight needs. Clean interface, Gzip and minification included. |
| W3 Total Cache | Free | Power users who want granular control over every layer. |
If your host runs on LiteSpeed, that is your answer before you even open the others. If you want zero configuration and are happy to pay for it, WP Rocket activates with sensible defaults and covers most sites immediately.
Never run two caching plugins at the same time
This deserves its own warning because it trips people up regularly. Two caching plugins do not stack their benefits. They interfere with each other, produce unpredictable output, and can slow the site down or break it outright. Pick one and uninstall the rest.
Caching and your WordPress store
If you are building a store on WordPress, the golden rule splits cleanly: cache your catalog aggressively, and never cache the pages that render customer-specific data. That means keeping cart, checkout, receipt, and account pages completely out of the page cache.
Here is what’s actually happening when this goes wrong. Most eCommerce plugins track each shopper’s cart via a browser cookie. If a caching layer does not recognise that cookie, it intercepts the request and hands back a cached page before the store can check who the visitor is. The customer sees a stale cart, an empty basket they know they filled, or checkout fields from a previous session. That scenario is one of the quietest reasons shoppers abandon their carts and it almost never gets traced back to caching.
The fix is deliberate exclusions. Any WordPress store should tell its caching plugin to skip /cart, /checkout, /receipt, and /account. It should also bypass caching entirely whenever a cart-identity cookie is present, since that cookie flags a live session that needs fresh, personalised data.
Well-built eCommerce tooling handles this rather than leaving it as a configuration task. FluentCart, for instance, automatically sends no-cache headers on its checkout and cart AJAX endpoints covering cart updates, coupon handling, order placement, and checkout summary. Cart identity runs through a browser cookie, so any CDN or caching layer that respects standard cookie-bypass rules stays out of the way without extra setup. Product listings and marketing pages are still fair game for aggressive caching. The customer session is not.
When to clear your WordPress cache
A short list, because the rest is noise.
- After updating a theme, template, or CSS.
- After installing, updating, or removing a plugin.
- After editing content that is not appearing correctly on the live site.
- After a site migration or a URL change.
- When troubleshooting a display or functionality issue.
Outside of those moments, leave it alone. The whole point of a cache is that you forget it exists.
The takeaway
Caching is the cheapest speed upgrade your WordPress site will ever get. The 32% jump in bounce probability Google recorded when load time slips from one second to three is the reason it is worth getting right. But a WordPress cache that is misunderstood costs you too, whether that is a silent margin leak on a mispriced product or a customer who walked away at checkout because the session data was stale. Set it up properly, know where each layer lives, and clear it with intent when your changes need to show. That is the whole job.

Hi, this is Abir, a Deputy Marketing Lead, passionate product designer, and WordPress core contributor. Creating interesting content and products that ensure a 360-degree customer experience is my daily job.

Subscribe now
Related Articles and Topics
-
What Are Webhooks? Everything You Need to Know
What webhooks are, how they work, and why they enable real-time data sharing between apps. Explore examples and…
-

How to Sell Online Courses With WordPress: The 2026 Setup
The LMS plugin you have leaned on for years just changed hands again, the cart you bolted on…
-
FluentPlayer: HQ Video Player Comes To WordPress
If you are already building with the Fluent ecosystem, you’re already reaping the benefits of an integrated system.…


Leave a Reply